How to Bulk Import Projects to Xero from CSV (OAuth Integration Guide)
Complete guide to importing project data into Xero Projects using CSV files. OAuth authentication walkthrough, field mapping tips, and real-world example with screenshots.
Managing projects in Xero can become time-consuming when you need to migrate data from another system or set up dozens of new projects. Manually entering each project through the Xero web interface? That’s hours of repetitive clicking. Writing a custom integration script? That requires OAuth knowledge, API documentation deep-dives, and extensive testing.
There’s a better way: bulk import your projects from a CSV file using an OAuth-integrated tool that connects directly to Xero’s Projects API.
In this tutorial, I’ll show you how to import project data into Xero in under 15 minutes, with secure OAuth authentication and automatic field mapping.
Table of Contents
- What You’ll Need
- Step 1: Connect to Xero with OAuth
- Step 2: Select Your Xero Organization
- Step 3: Choose the Projects Endpoint
- Step 4: Prepare Your CSV File
- Step 5: Upload Your CSV
- Step 6: Map CSV Columns to Xero Fields
- Step 7: Submit and Track Progress
- Verify Projects in Xero
- Common Issues and Solutions
What You’ll Need
Before we start, make sure you have:
- A Xero account with Projects access (available in Premium, Ultimate, and Partner Edition)
- Organization administrator access to authorize the OAuth connection
- A CSV file with your project data - we’ll cover the format below
Unlike many API integrations, you don’t need API keys or developer credentials. The OAuth flow handles authentication securely through Xero’s official login.
Step 1: Connect to Xero with OAuth
CSVImport provides native OAuth integration for Xero, which means secure authentication without manually handling API keys.
- Go to CSVImport
- In Step 1 (Choose API), click the Xero card
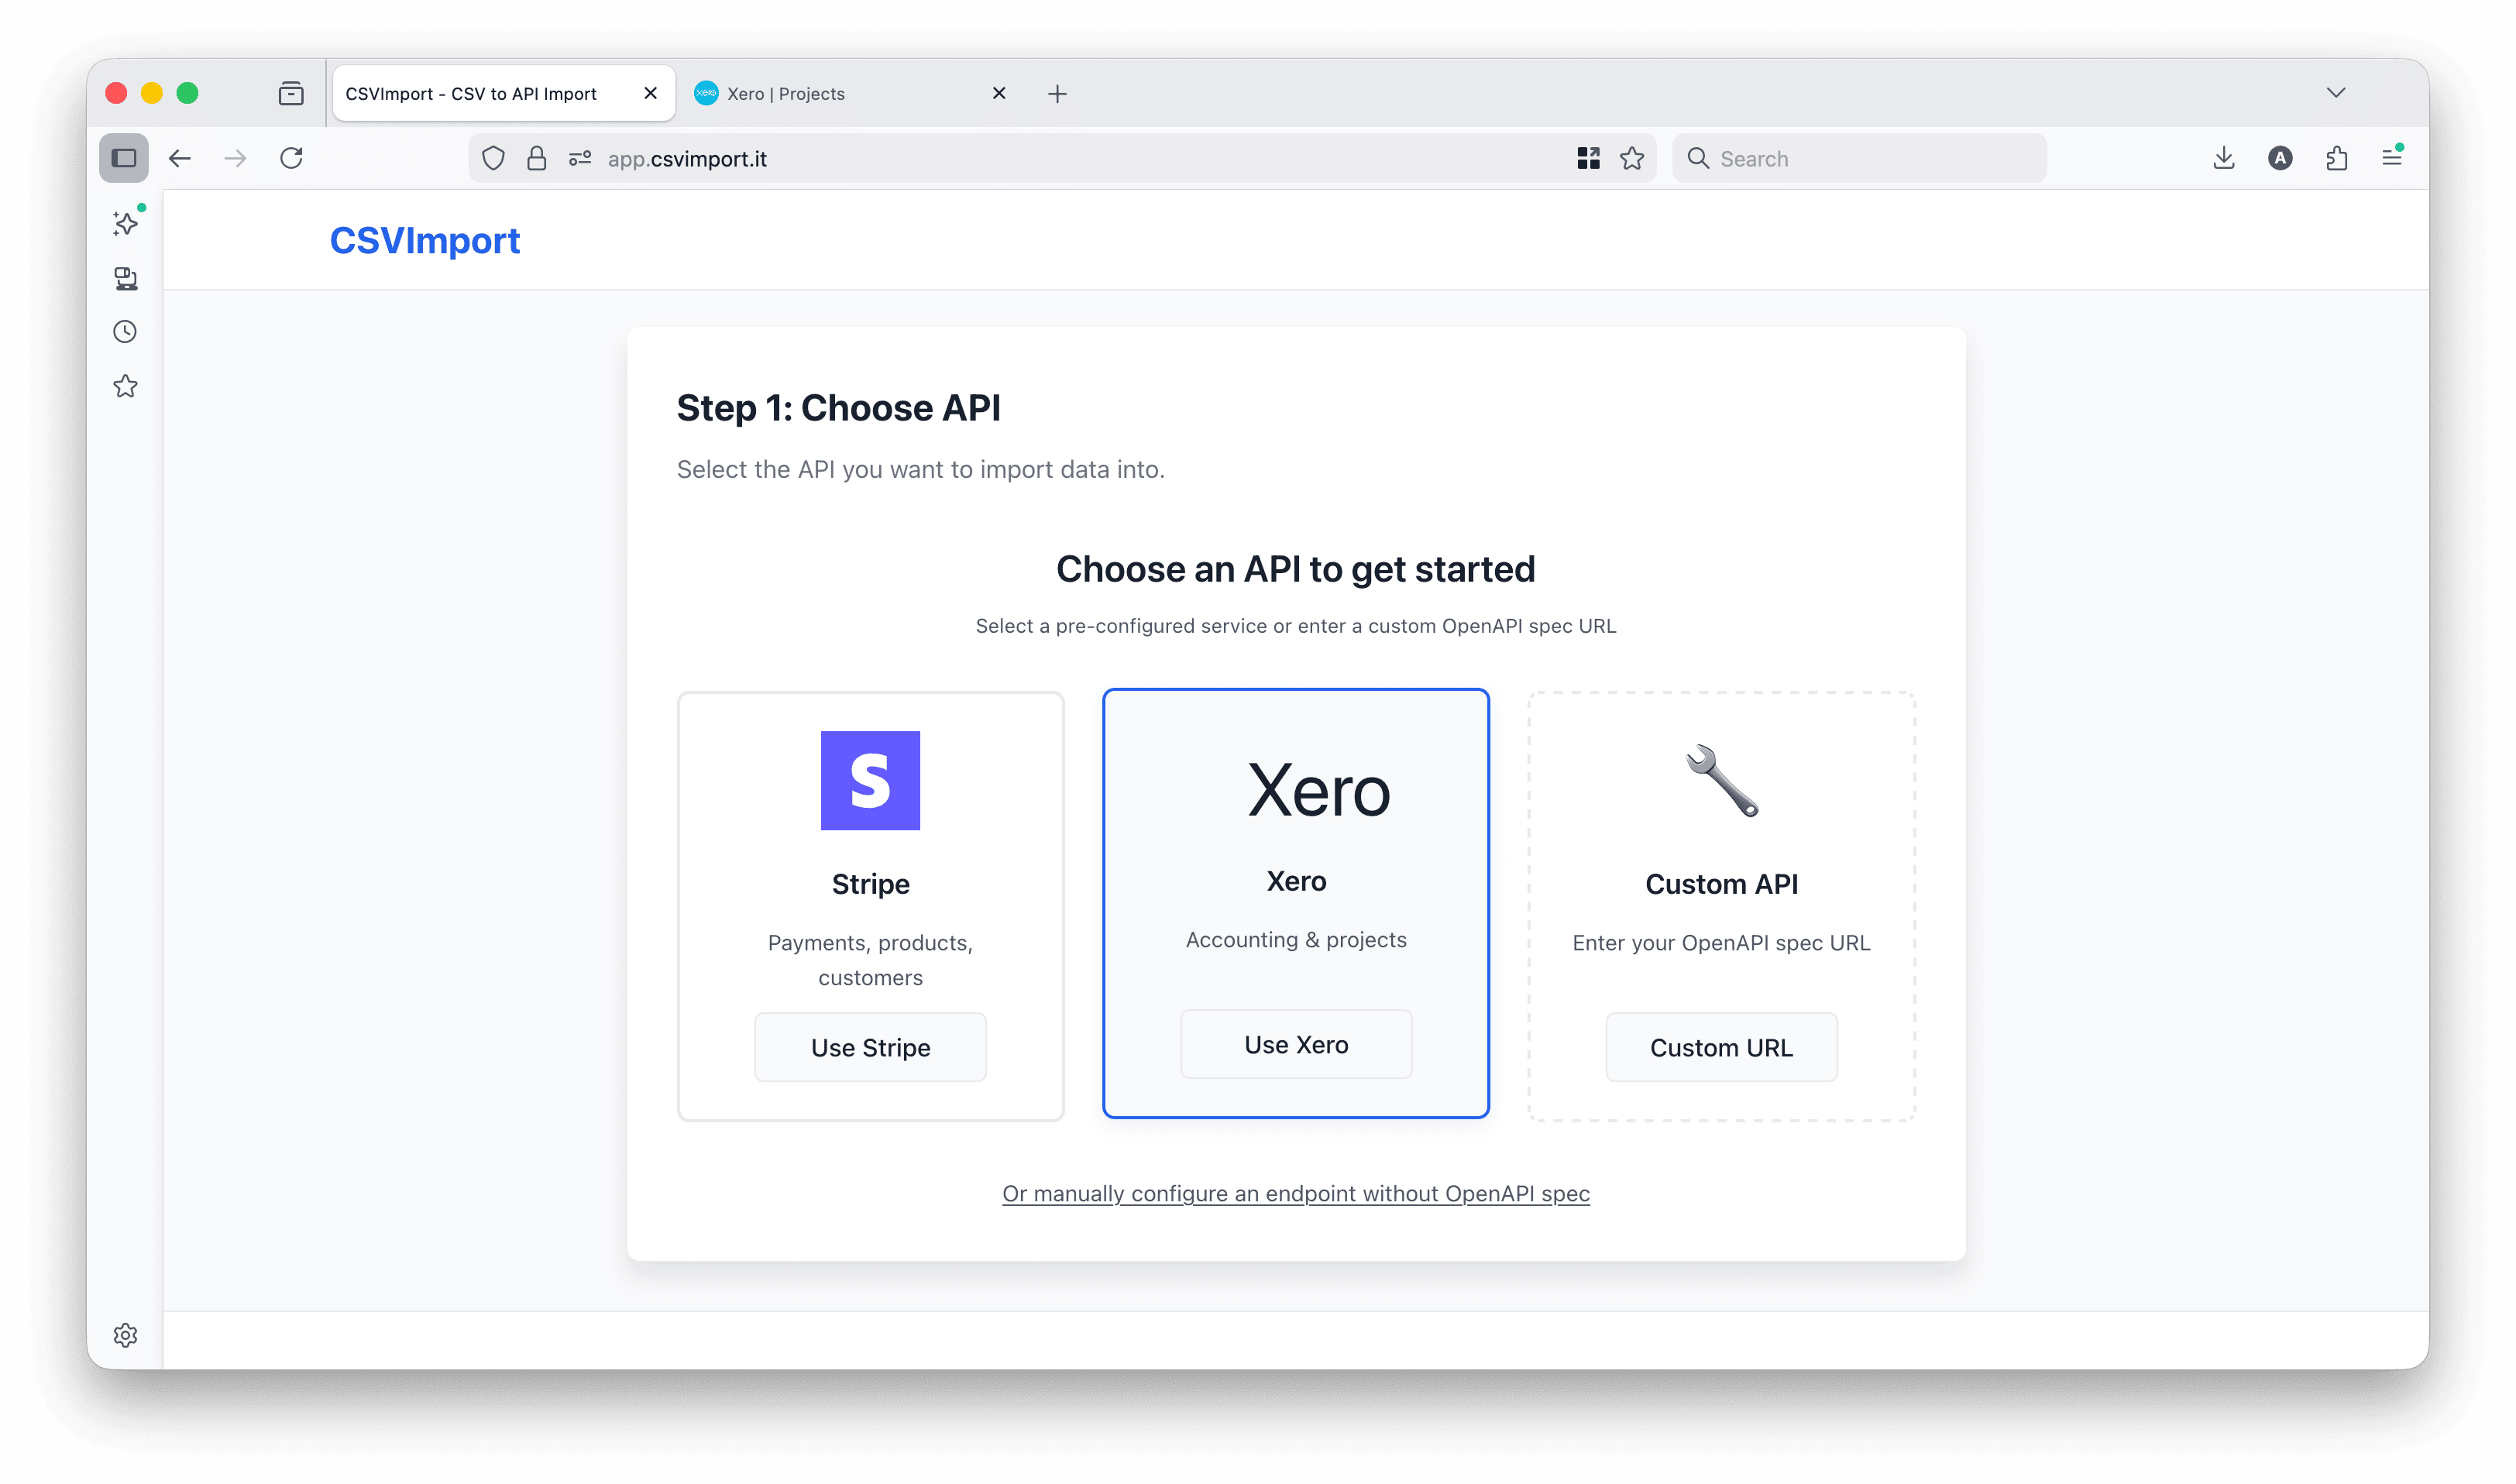
- Click Connect with Xero to start the OAuth flow
You’ll be redirected to Xero’s official login page. This is Xero’s own authentication system - CSVImport never sees your Xero password.
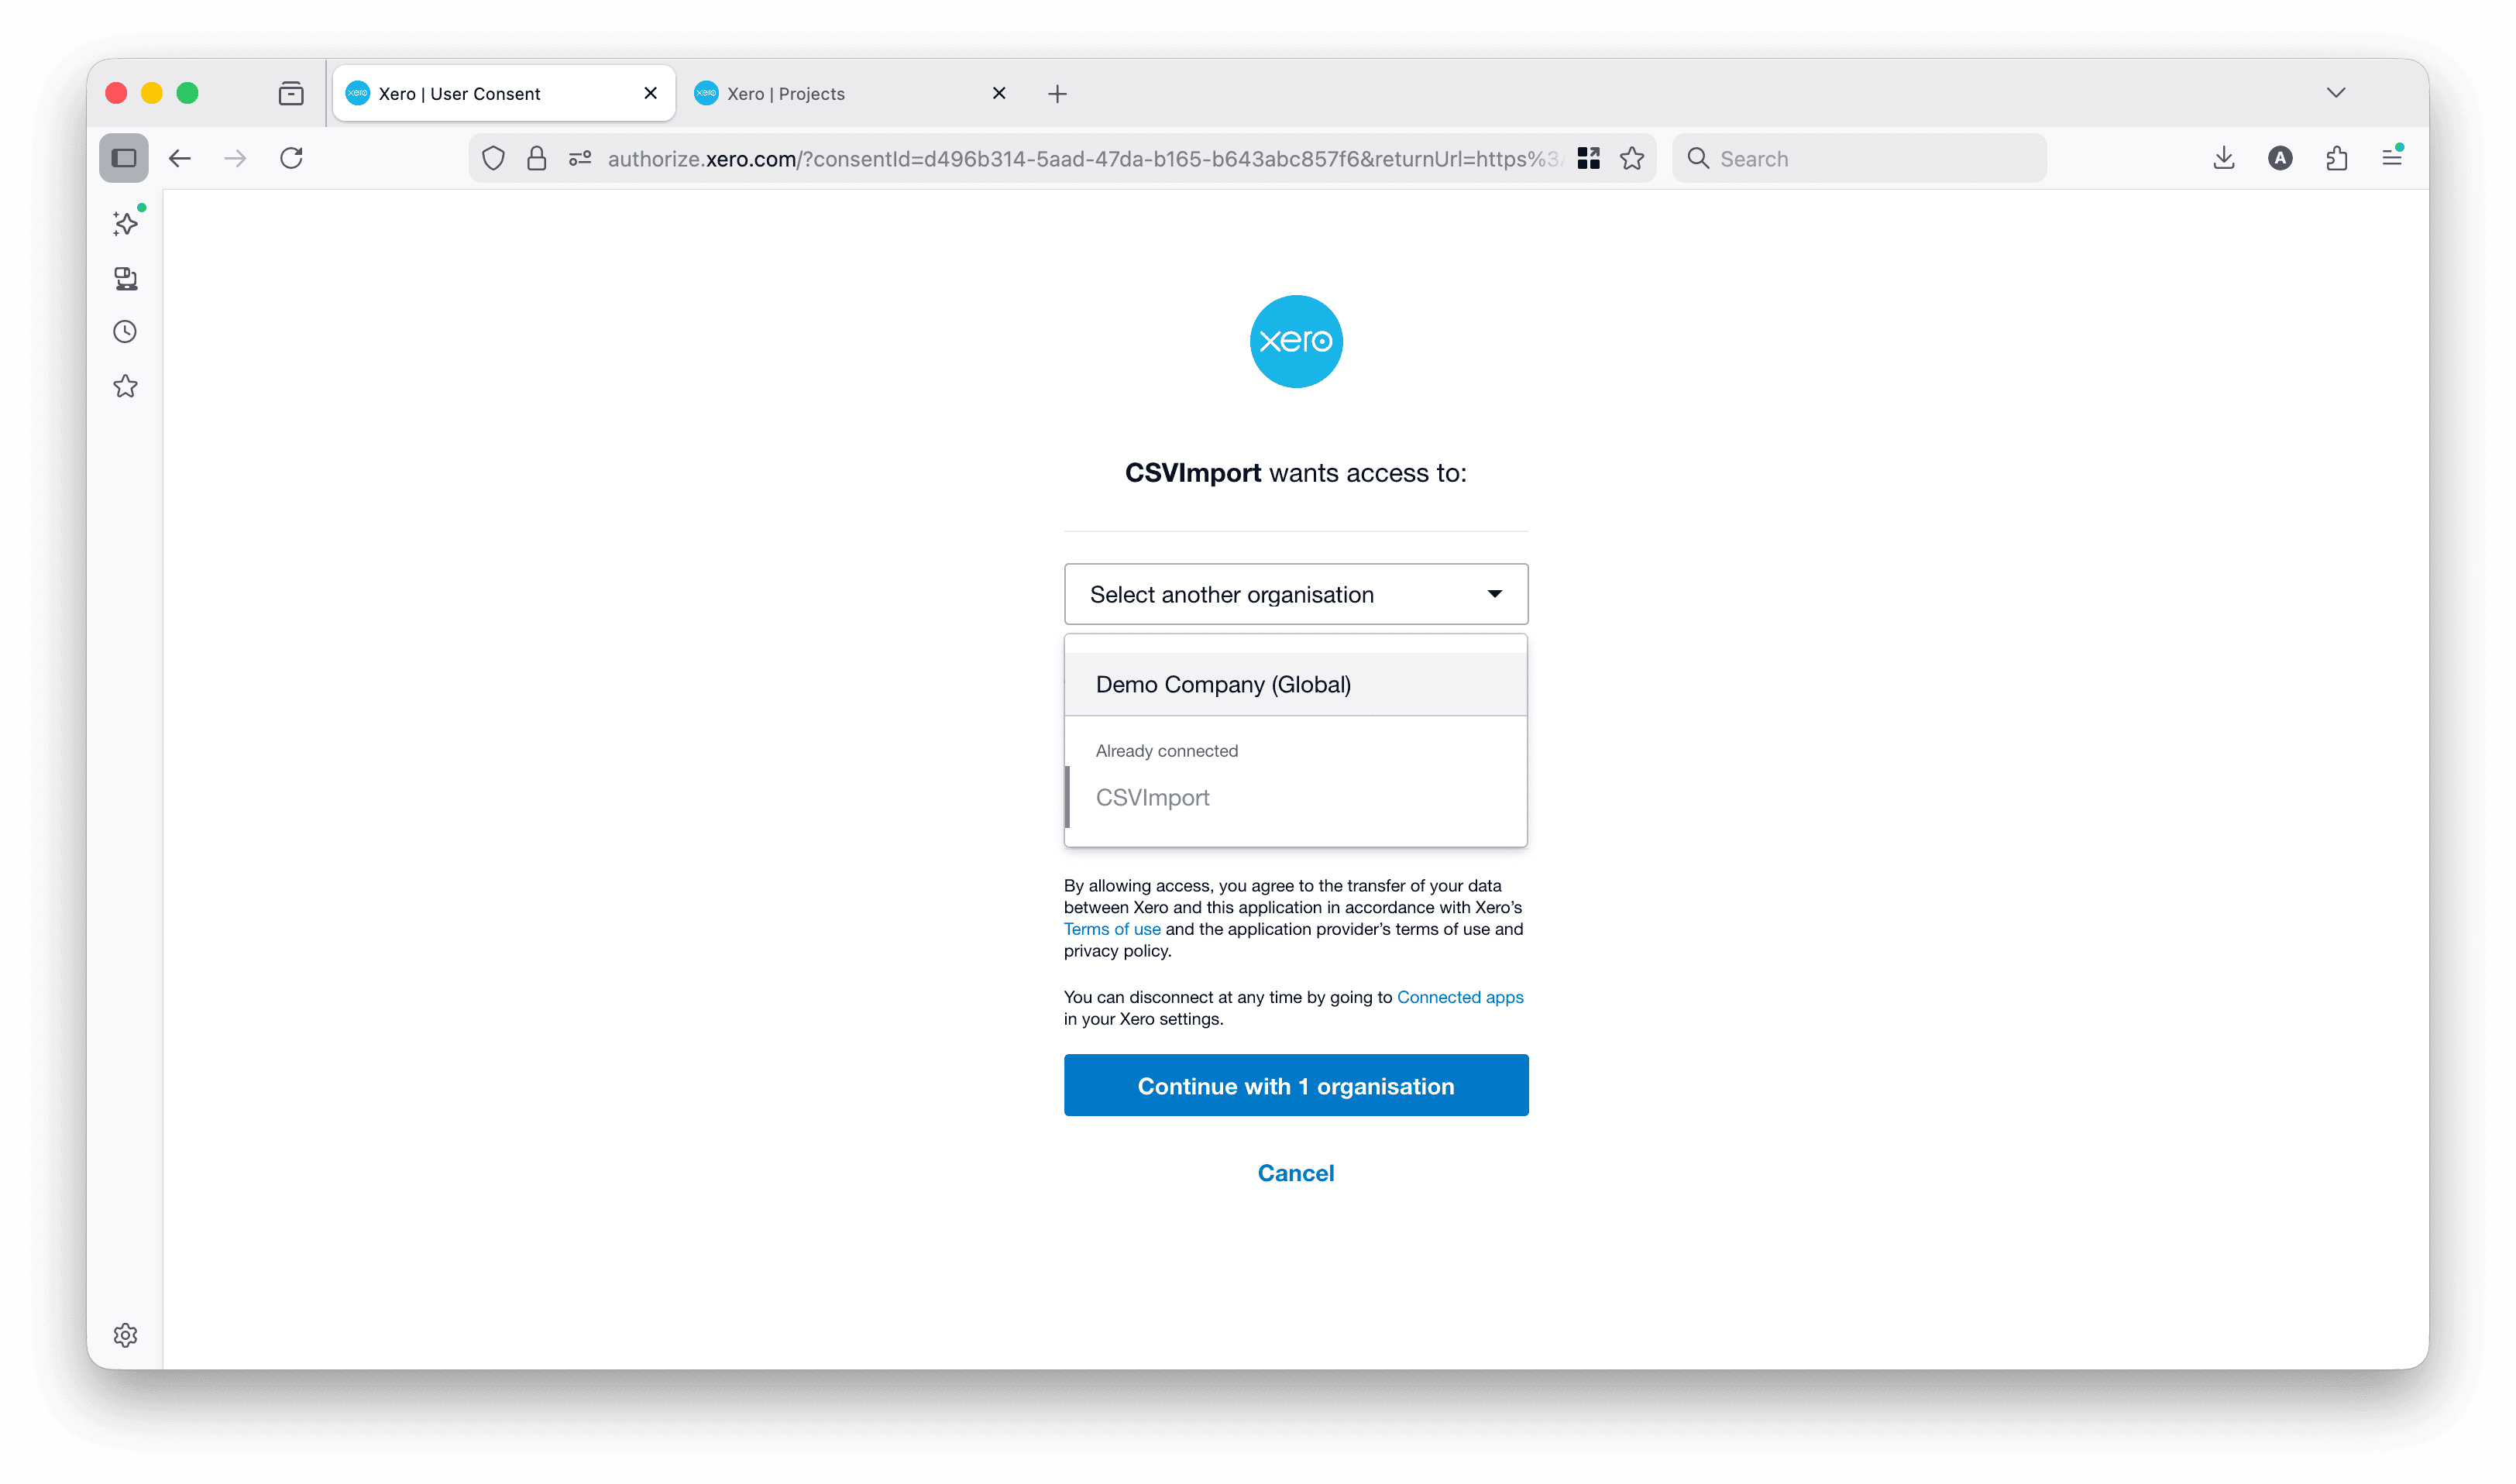
- Log in to your Xero account
- Select the organization you want to import projects to
- Click Allow access
After authorization, you’ll be redirected back to CSVImport with a secure access token. This token allows CSVImport to make API calls on your behalf.
Security Note: The OAuth token is stored securely in your session and is only used for the duration of your import. You can revoke access anytime through your Xero account settings under Connected Apps.
Step 2: Select Your Xero Organization
If you have access to multiple Xero organizations, you’ll need to select which one to import projects into.
The tool automatically loads all available Xero API endpoints after OAuth connection:
- Projects API - Create and manage projects
- Accounting API - Invoices, contacts, accounts
- Finance API - Financial reports and statements
- Assets API - Fixed assets management
All four Xero API specifications are merged automatically, giving you access to 161+ endpoints from one OAuth connection.
Step 3: Choose the Projects Endpoint
Now we need to select the specific API endpoint that creates projects.
- In the endpoint list, search for “projects”
- Select POST /projects/{projectId}
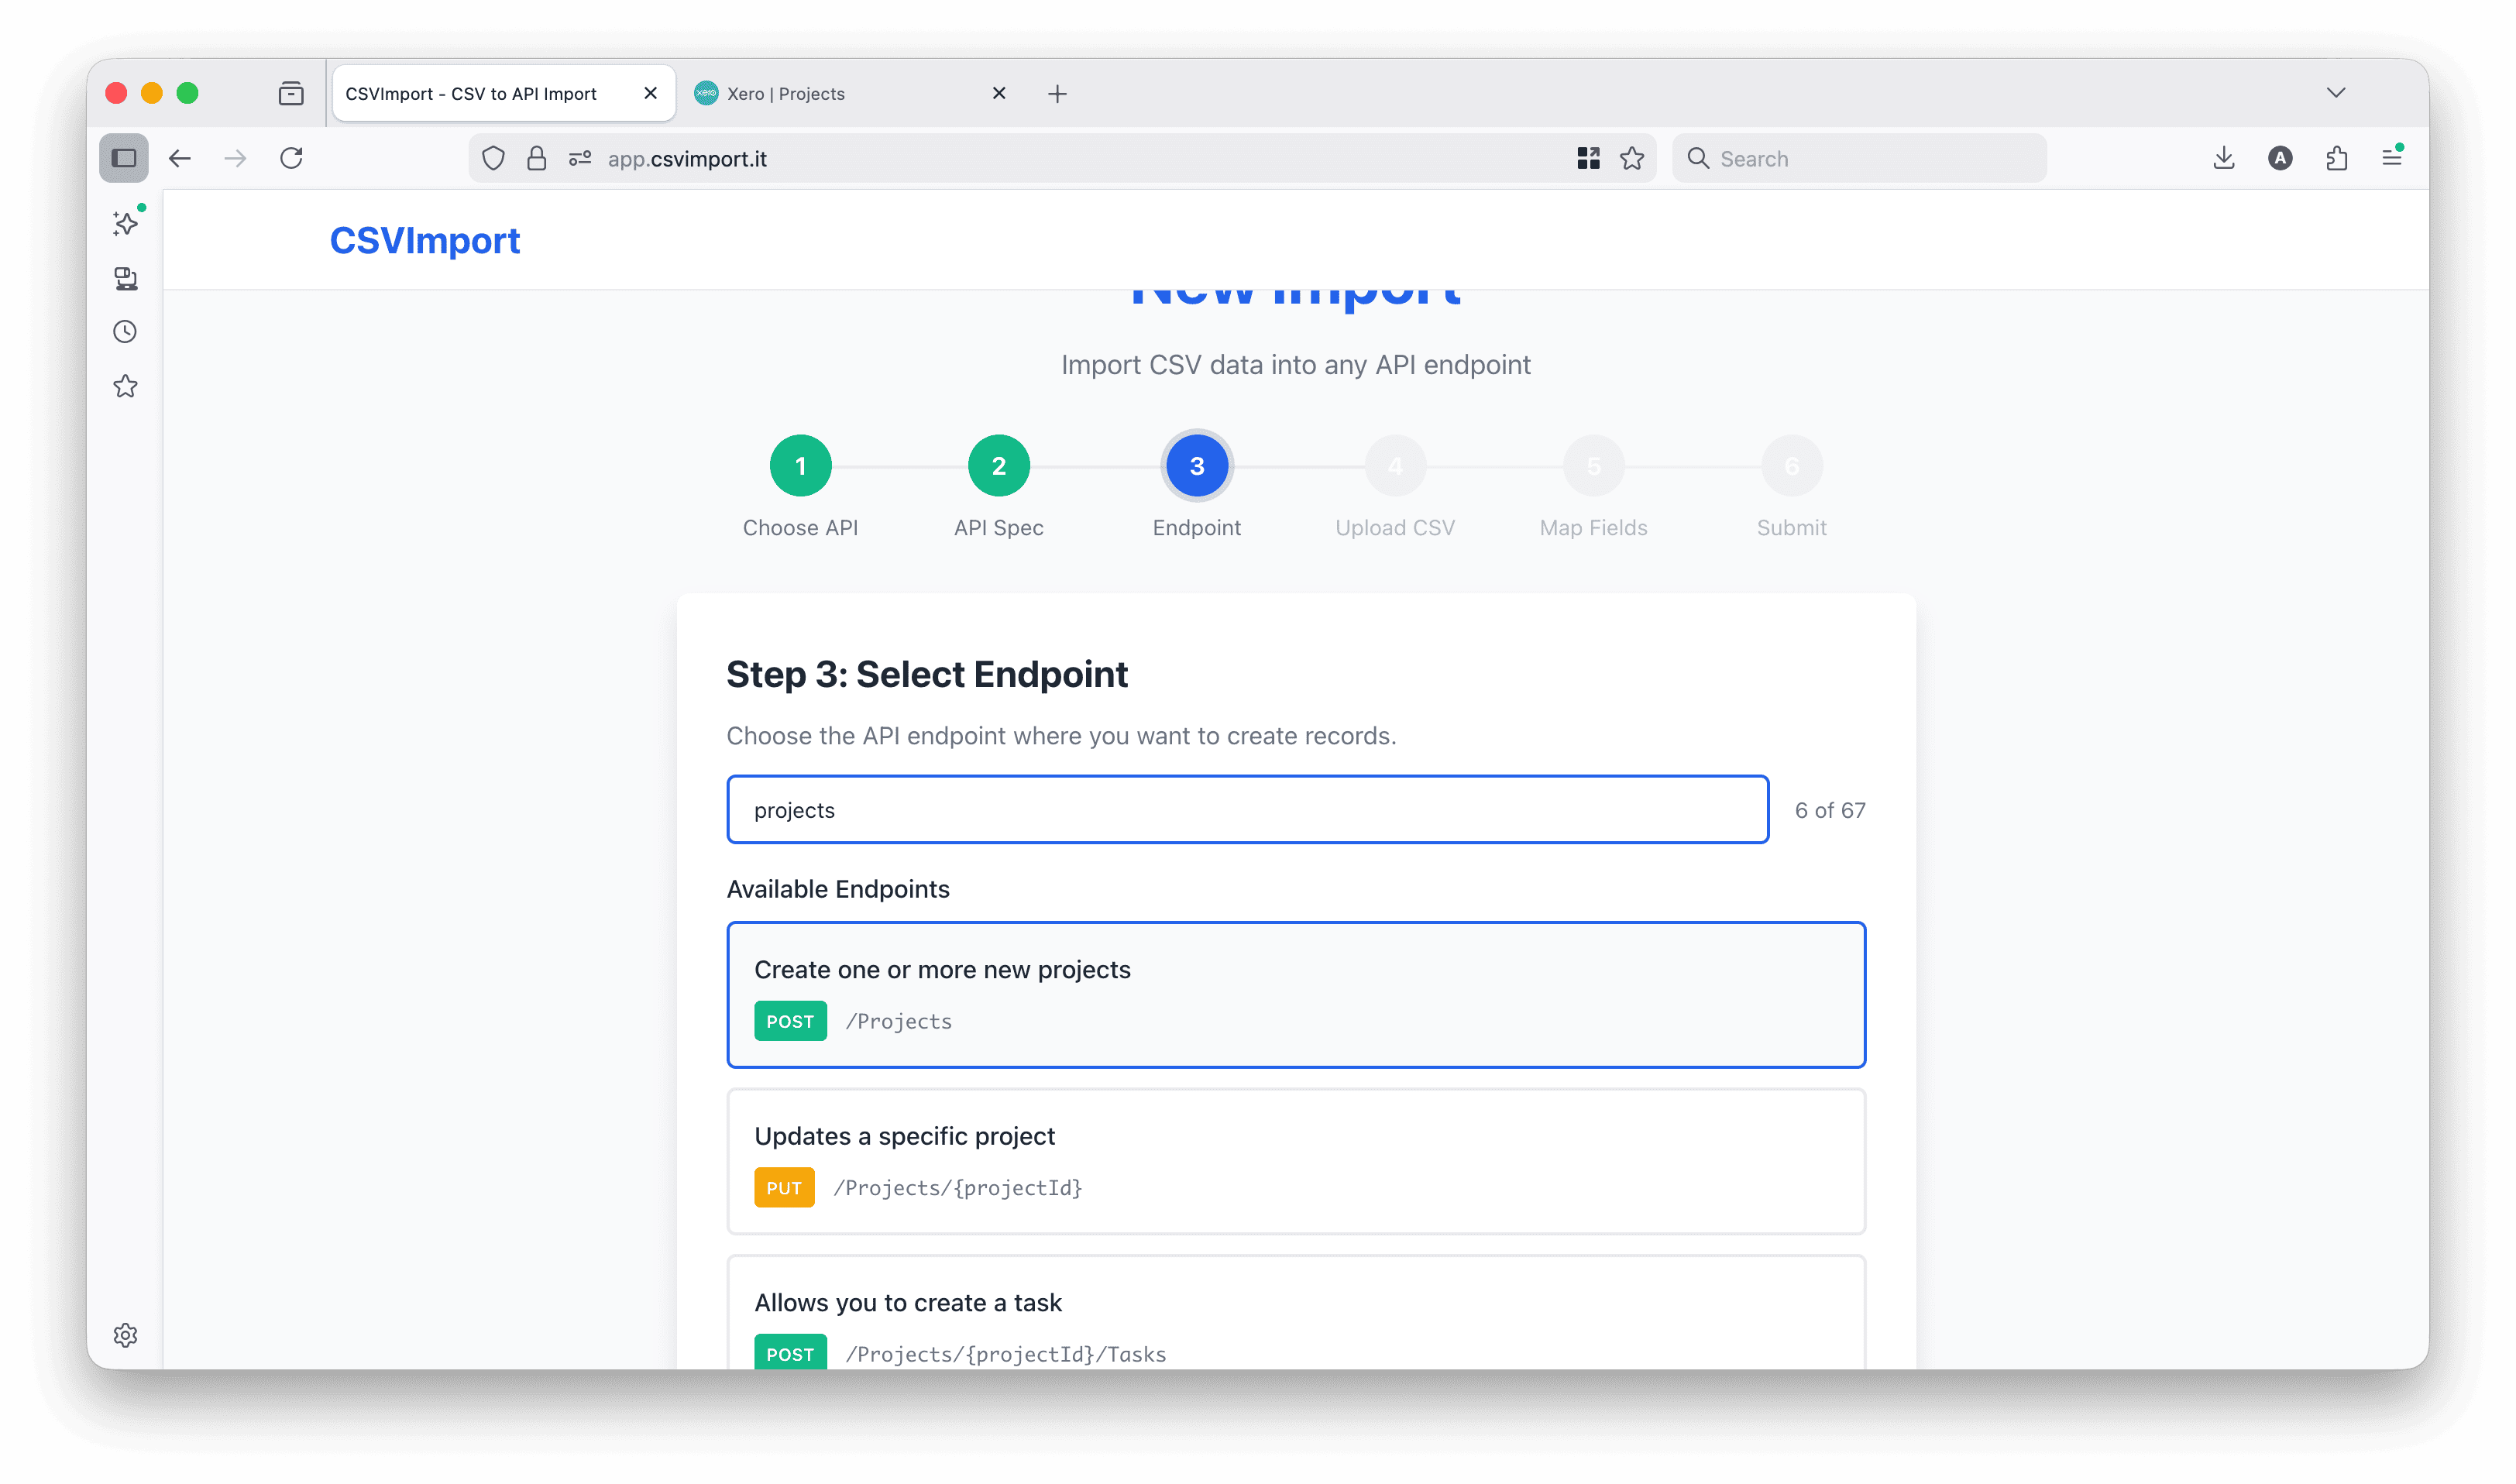
You’ll notice the endpoint includes \{projectId\} in the path. Don’t worry - you can provide this as a CSV column, and CSVImport will substitute it for each row.
The endpoint filter shows:
- Method (POST, GET, PUT, DELETE)
- Path (the API endpoint URL)
- Description (what the endpoint does)
With 161 endpoints available across Xero’s APIs, the search filter helps you find the right one quickly.
Step 4: Prepare Your CSV File
Your CSV file should contain one row per project. Xero Projects accepts several fields, but let’s focus on the essential ones.
Here’s a simple example:
projectId,name,contactId,estimateAmount,deadlineUtc,status
10001,Website Redesign,a3b5c7d9-1234-5678-9abc-def012345678,15000.00,2026-03-31T00:00:00Z,INPROGRESS
10002,Mobile App Development,b4c6d8e0-2345-6789-0bcd-ef1234567890,45000.00,2026-06-30T00:00:00Z,INPROGRESS
10003,Brand Refresh,c5d7e9f1-3456-7890-1cde-f23456789012,8500.00,2026-02-28T00:00:00Z,INPROGRESS
Key Fields Explained
| CSV Column | Description | Required |
|---|---|---|
projectId | Your unique project identifier | Yes |
name | Project name | Yes |
contactId | Xero contact ID (client) | Yes |
estimateAmount | Project budget estimate | No |
deadlineUtc | Project deadline (ISO 8601 format) | No |
status | INPROGRESS or CLOSED | No |
Important Field Details:
- projectId: This is your internal project ID, not generated by Xero. Use your existing project numbers or create unique identifiers.
- contactId: Must be a valid Xero Contact ID (UUID format). You can find these in Xero under Contacts → [Contact Name] → URL contains the ID.
- deadlineUtc: Must be in ISO 8601 format:
YYYY-MM-DDTHH:MM:SSZ - estimateAmount: Decimal number, no currency symbol
Finding Contact IDs
To get Xero Contact IDs:
- Go to your Xero Dashboard → Contacts
- Click on a contact
- Look at the URL:
https://go.xero.com/Contacts/View/XXXXX-XXXXX-XXXXX - The contact ID is the UUID in the URL
Alternatively, you can export your contacts from Xero and include the Contact ID column.
Step 5: Upload Your CSV
Now upload your prepared CSV file.
- Drag and drop your CSV, or click Browse to select it
- CSVImport auto-detects the separator (comma, semicolon, tab, pipe)
- Review the preview to verify your data
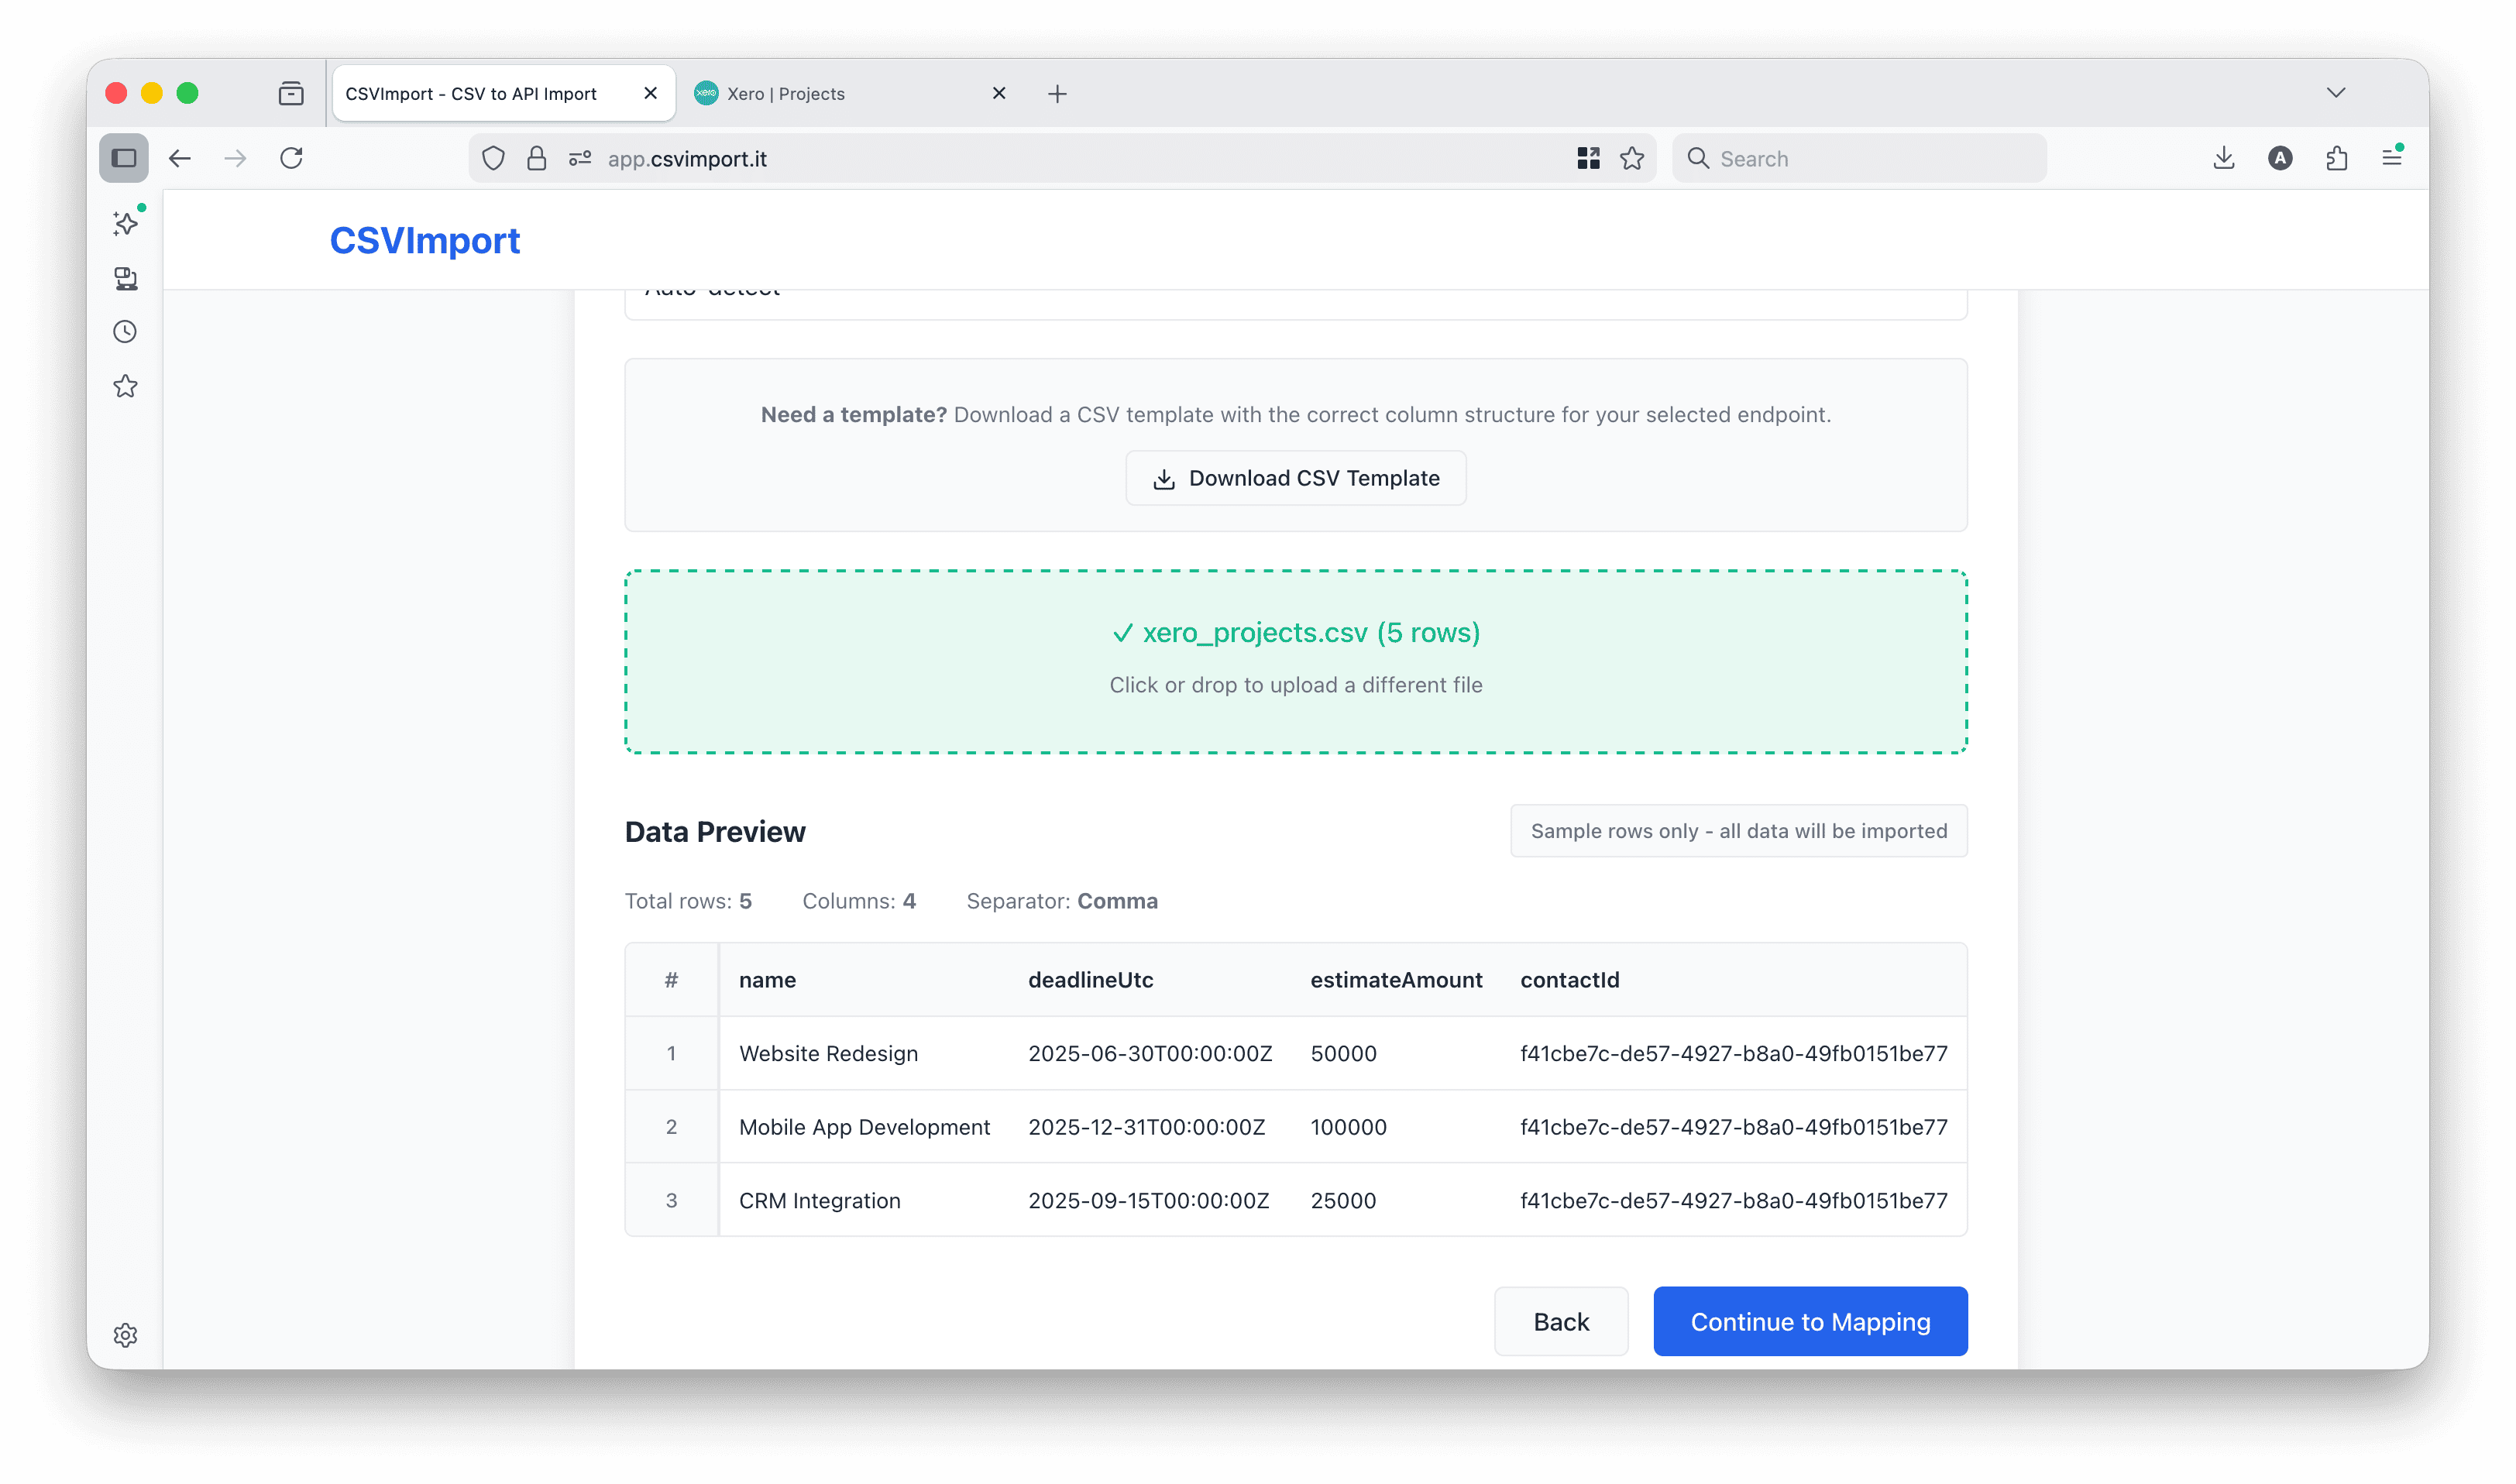
The smart preview shows:
- First 3 rows - Verify headers and initial data
- Last 3 rows - Catch any formatting issues at the end
- Row numbers - Help identify problematic rows later
- Visual separator - For files with 7+ rows, clearly shows the gap
Click Next when the preview looks correct.
Step 6: Map CSV Columns to Xero Fields
This is where CSVImport’s smart field mapping saves you time. The tool automatically analyzes your CSV columns and matches them to Xero’s Projects API fields.
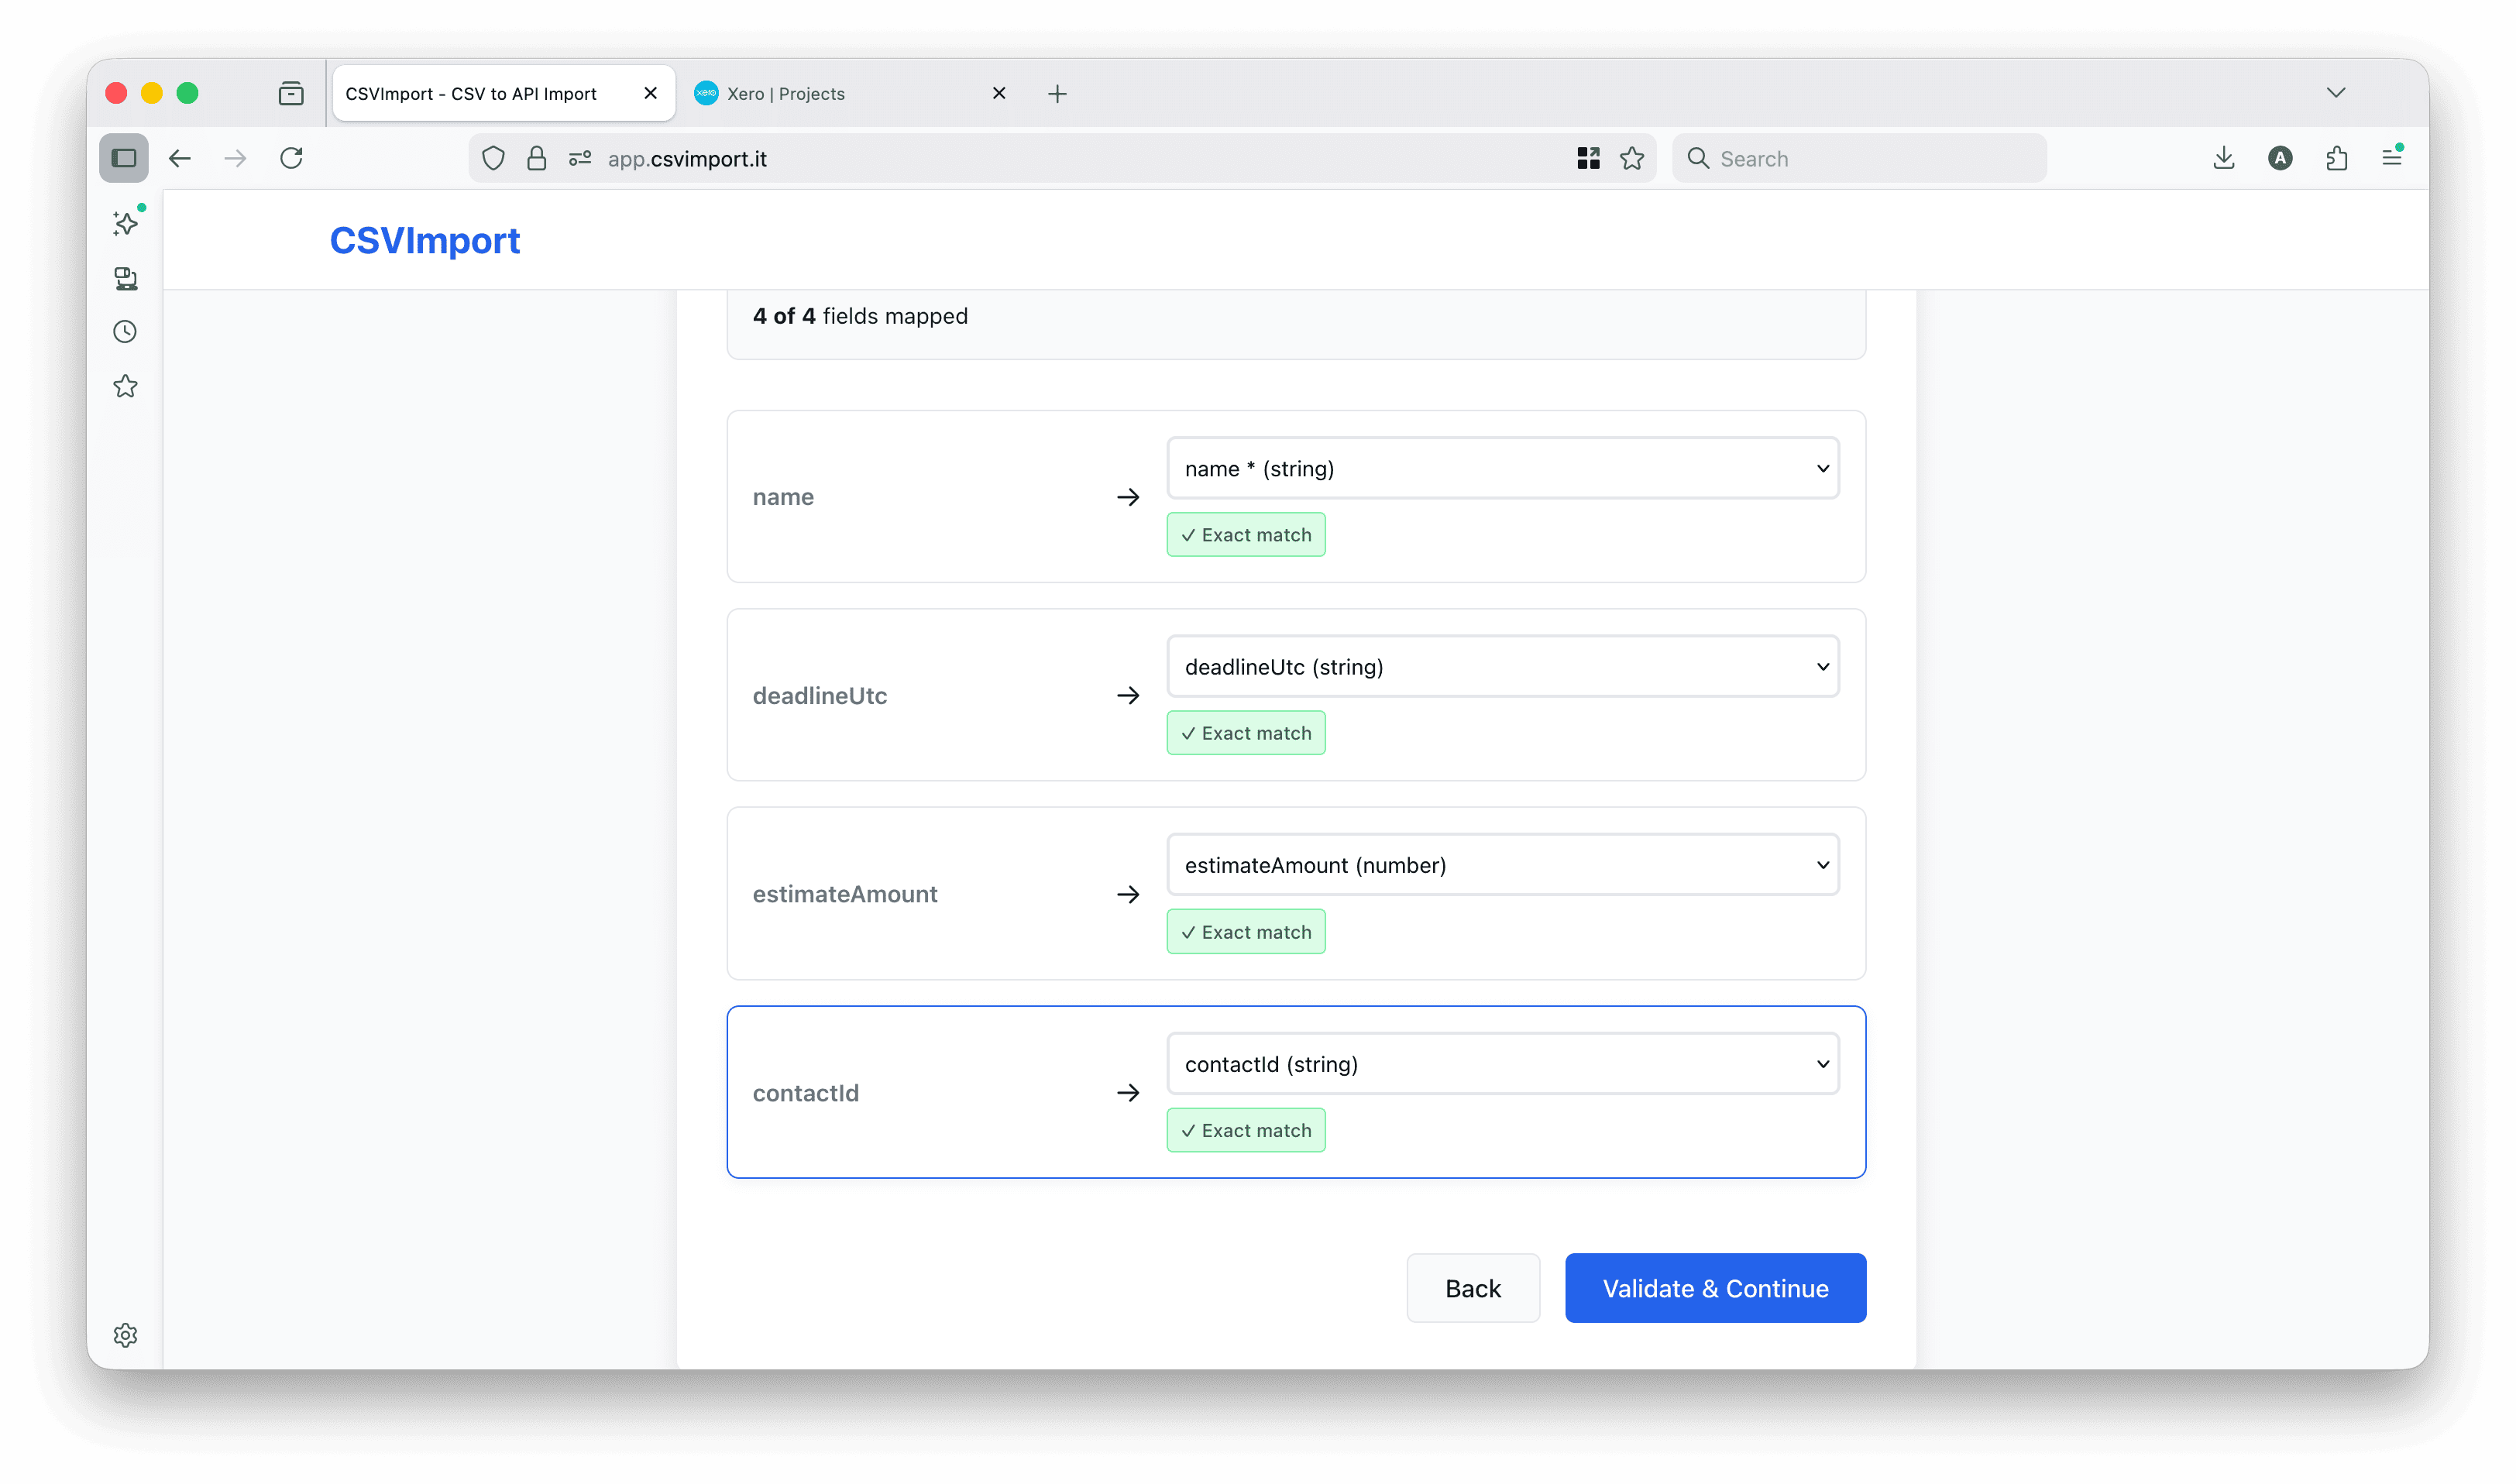
The mapping interface shows:
Left side - Your CSV columns:
- Column names from your file
- Preview of sample data
Right side - Xero API fields:
- All available fields from the Projects API schema
- Field types (string, number, date)
- Required field indicators (red asterisk)
Visual match indicators:
- 🟢 Green - Exact match (e.g.,
name→name) - 🟡 Yellow - Fuzzy match (e.g.,
estimate→estimateAmount) - ⚪ Gray - Manual mapping needed
- 🔴 Red - Required field not mapped (warning)
Understanding the Mapping
In our example, CSVImport automatically matched:
projectId→projectId(exact match)name→name(exact match)contactId→contactId(exact match)estimateAmount→estimateAmount(exact match)deadlineUtc→deadlineUtc(exact match)status→status(exact match)
The tool understands:
- Exact field name matches
- Common variations (amount vs amt, id vs identifier)
- Nested field paths (though not needed for Xero Projects)
Adjusting Mappings
If a field wasn’t mapped correctly:
- Click the dropdown on the right side
- Search for the correct Xero field
- Select it to update the mapping
The mapping summary at the bottom shows:
- ✅ Number of successfully mapped fields
- ⚠️ Number of unmapped required fields
- 📊 Total fields available in the API
Step 7: Submit and Track Progress
You’re ready to import! Review the submit screen before proceeding.
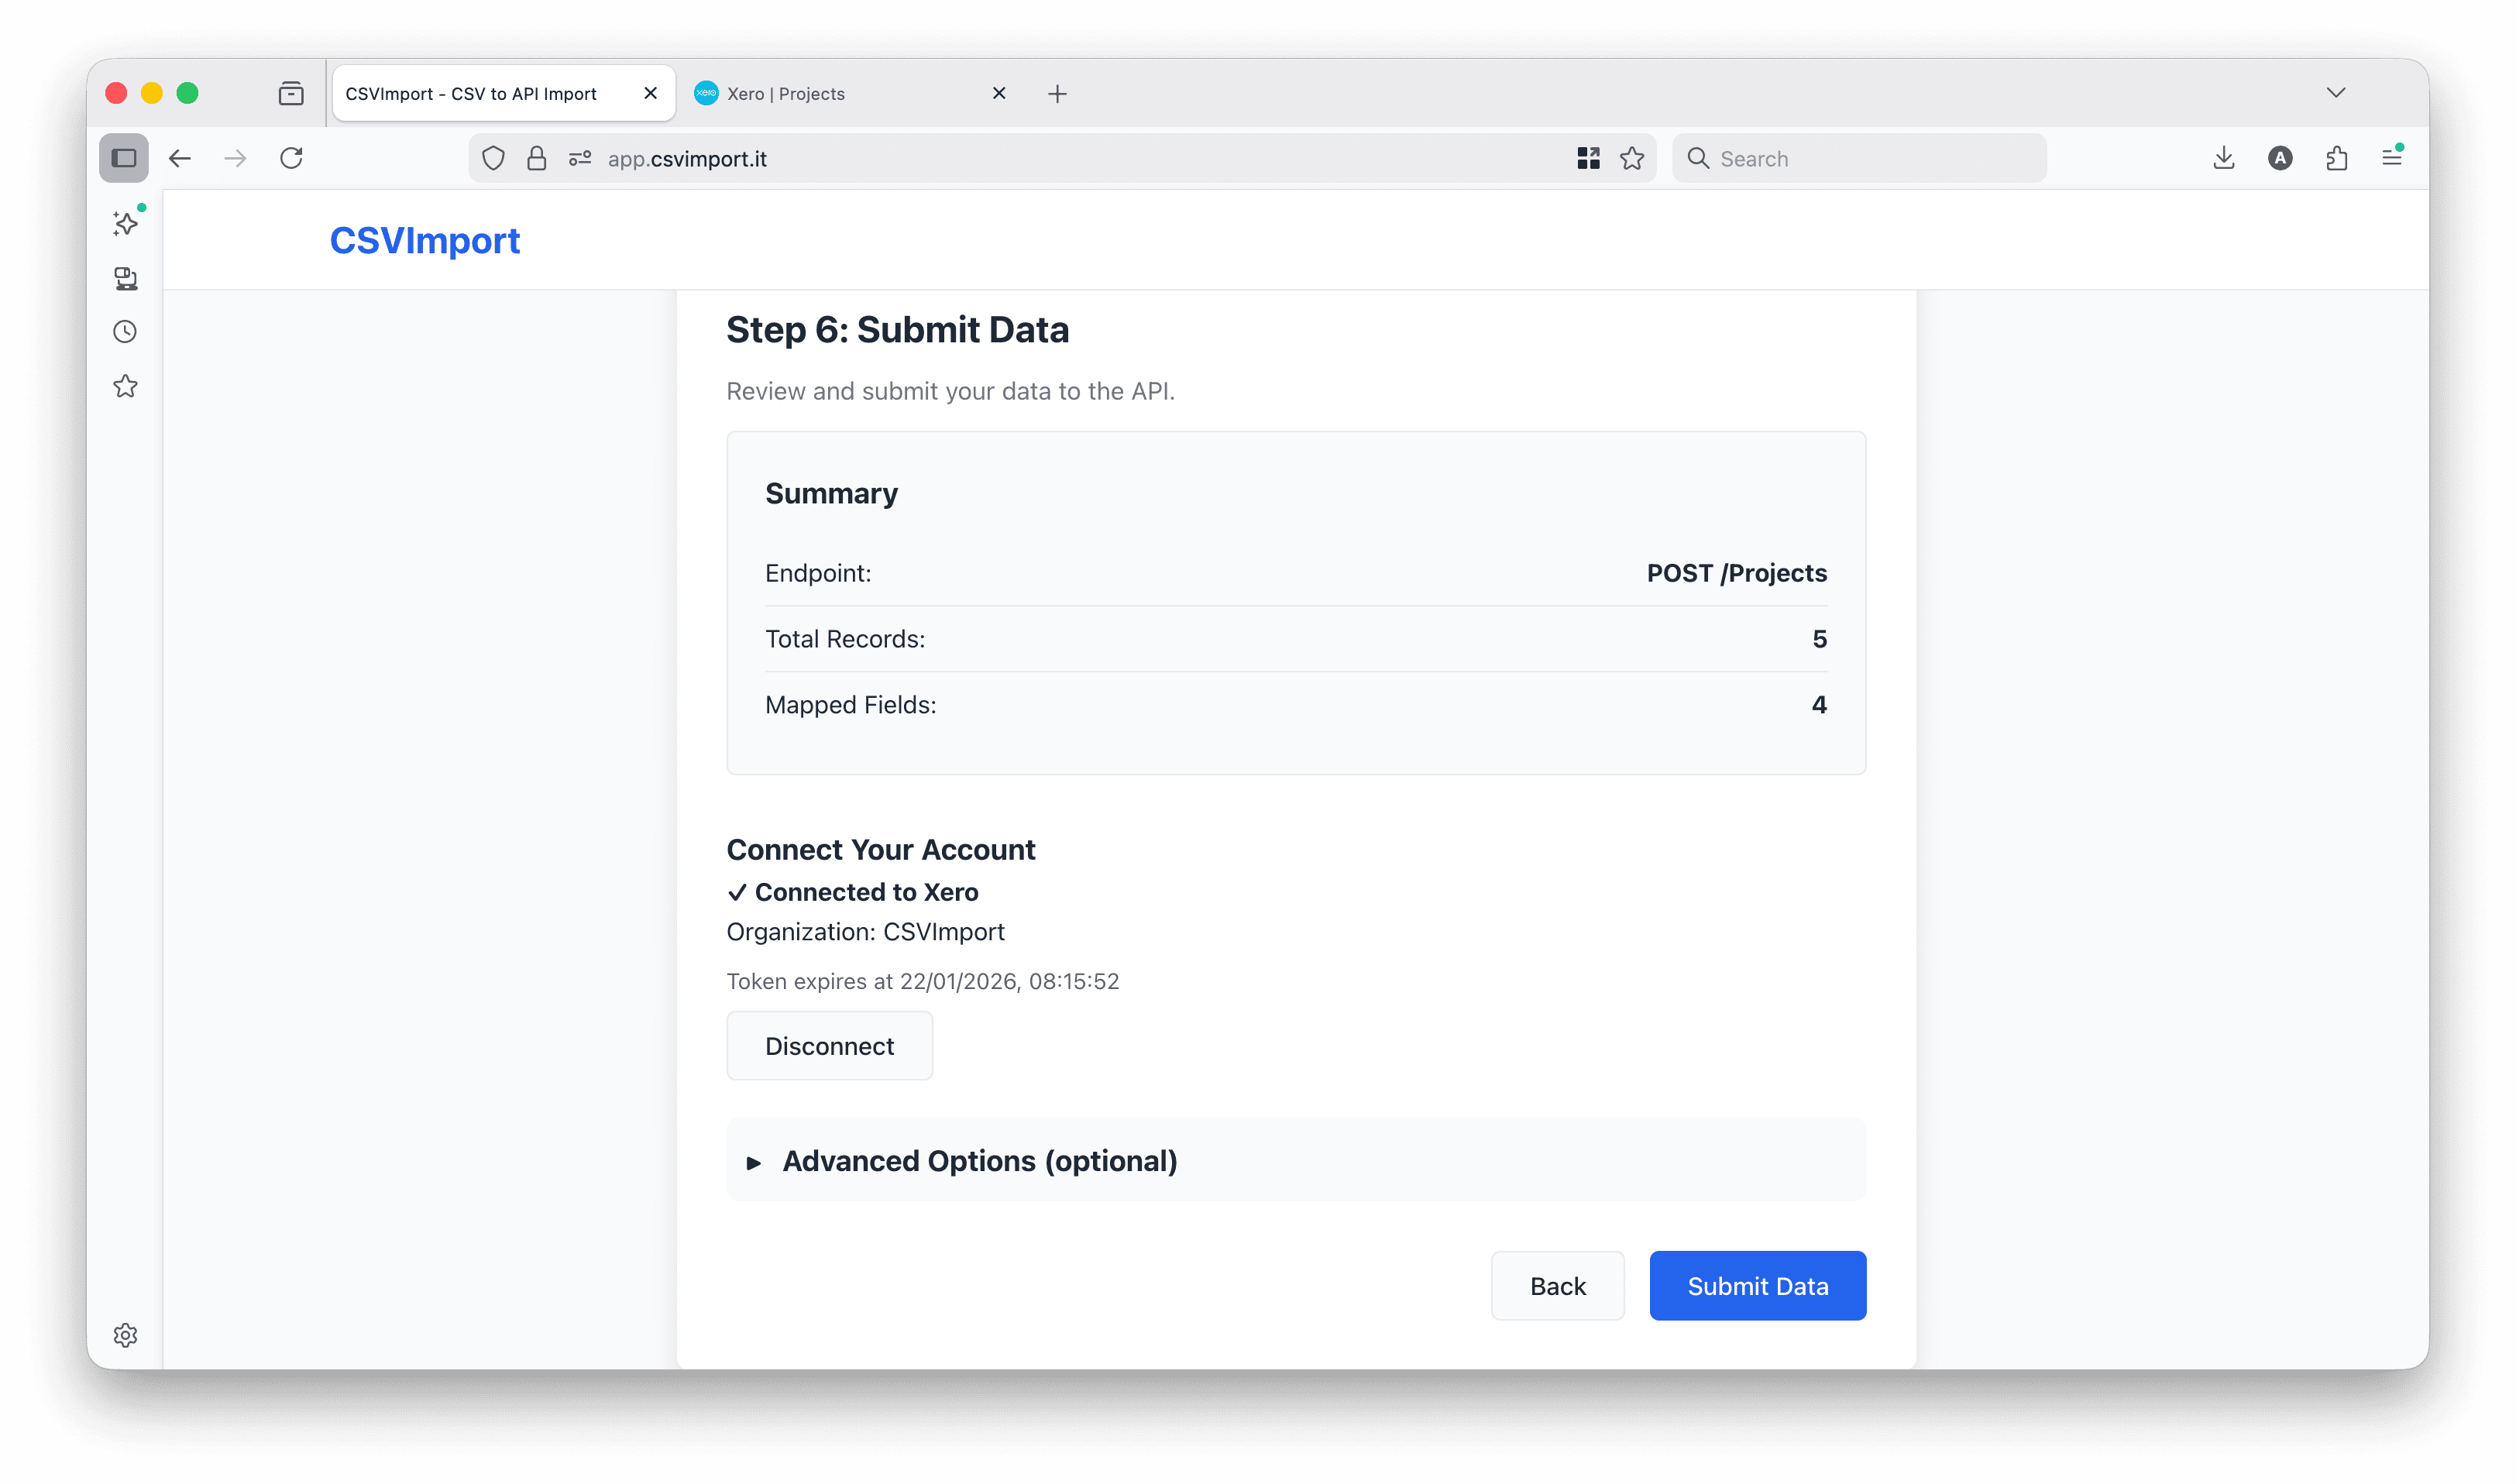
The submit screen shows:
- Endpoint: POST /projects/{projectId}
- Rows to import: Number of CSV rows
- Authentication: OAuth (connected via Xero)
- Field mappings: Summary of mapped columns
Click Submit to start the bulk import.
The import process:
- Reads each CSV row sequentially
- Transforms data to match Xero’s expected format
- Substitutes path parameters (projectId in the URL)
- Sends authenticated POST request with your OAuth token
- Records the result (success with HTTP 200/201 or error)
- Displays real-time progress with live updates
For large imports, CSVImport automatically handles:
- Rate limiting - Respects Xero’s API limits (60 requests per minute)
- Retry logic - Retries failed requests with exponential backoff
- Progress tracking - Shows current row and percentage complete
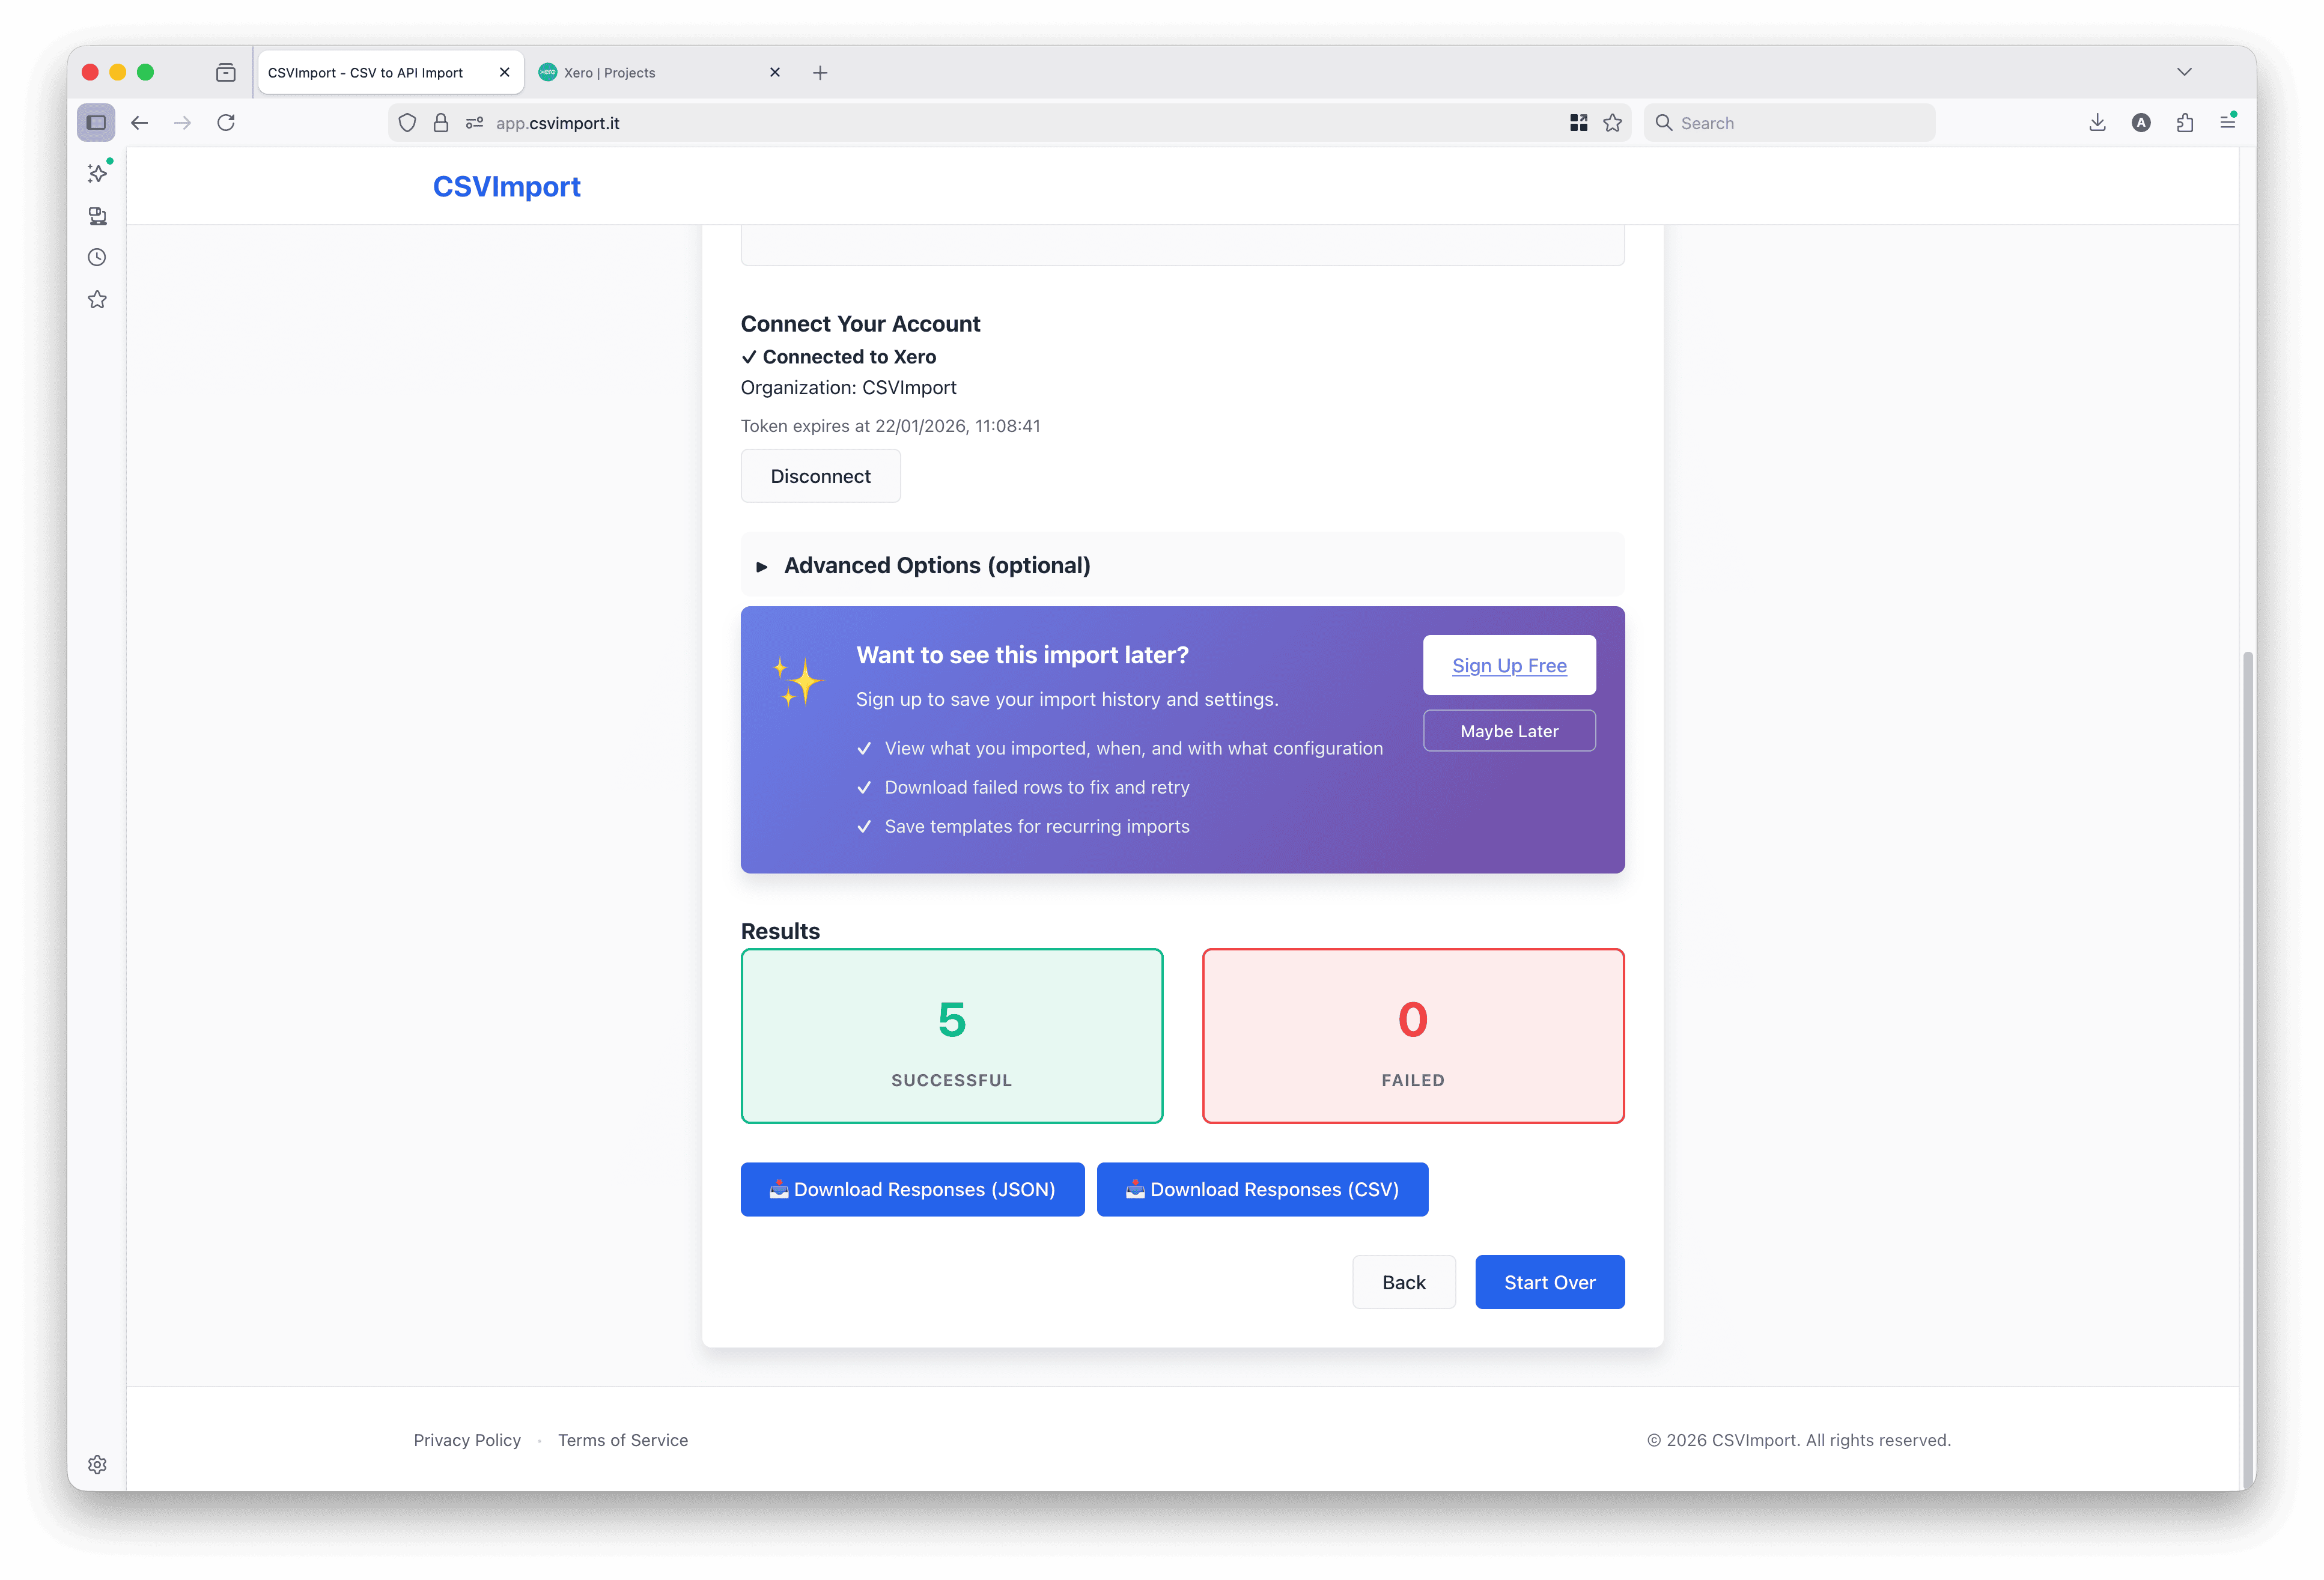
Reading the Results
The results panel shows:
- Row number - Matches your CSV row numbers
- Status icon - ✅ Success or ❌ Error
- Response - Xero’s API response or error message
- HTTP status - 200/201 for success, 400/500 for errors
If any rows failed, you’ll see detailed error messages explaining why:
- Invalid contactId (contact doesn’t exist)
- Duplicate projectId (already exists)
- Missing required fields
- Invalid date format
Verify Projects in Xero
Let’s confirm the projects were created correctly in Xero.
- Log into your Xero account
- Navigate to Projects (in the main menu or under Business → Projects)
- You should see your newly imported projects
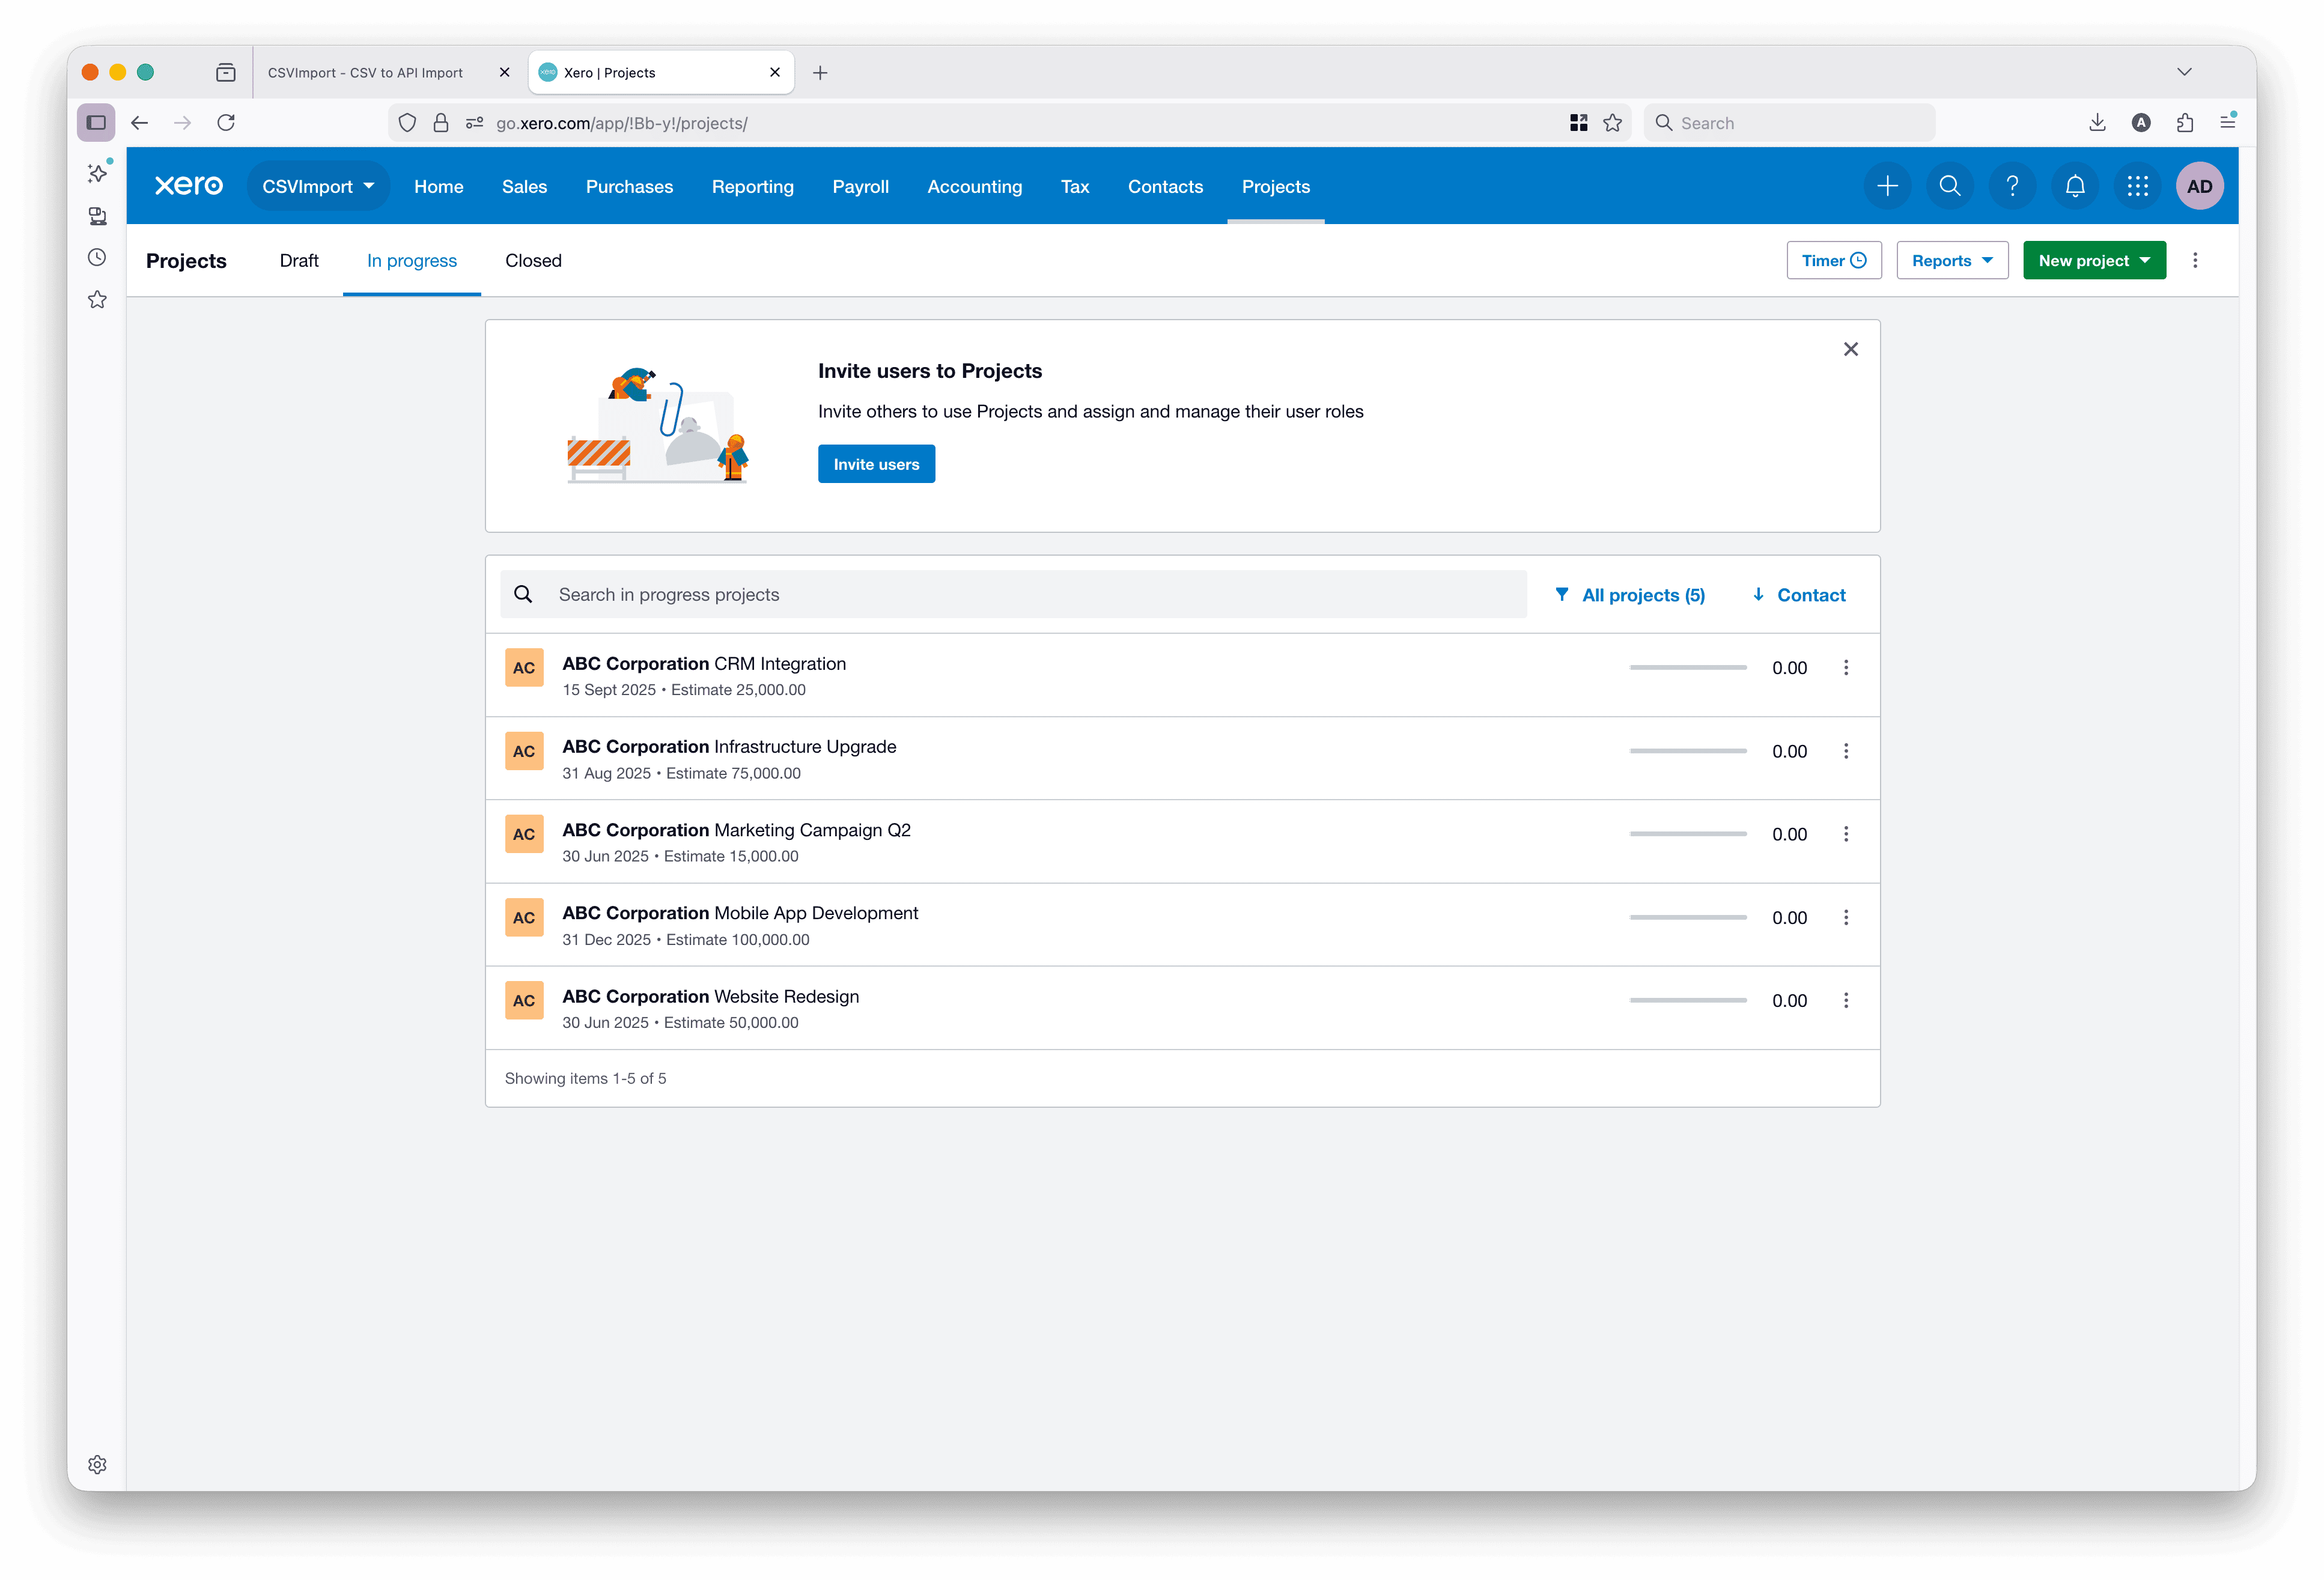
Each project shows:
- Project name from your CSV
- Contact (client) name
- Estimated amount
- Deadline date
- Current status (In Progress)
Click on a project to view full details and verify all fields were imported correctly.
Common Issues and Solutions
Issue: “Invalid contactId” Error
Cause: The contactId in your CSV doesn’t exist in Xero.
Solution:
- Verify the contact exists in Xero (Contacts menu)
- Get the correct Contact ID from the Xero contact URL
- Contact IDs are UUIDs (format:
xxxxxxxx-xxxx-xxxx-xxxx-xxxxxxxxxxxx)
Issue: “Duplicate projectId” Error
Cause: A project with that projectId already exists in Xero.
Solution:
- Use unique project IDs not already in Xero
- Or update the existing project instead of creating a new one (use PUT method)
- Or delete the existing project in Xero first
Issue: “Date format invalid” Error
Cause: Deadline dates aren’t in the correct ISO 8601 format.
Solution: Format dates as YYYY-MM-DDTHH:MM:SSZ, for example:
- Correct:
2026-03-31T00:00:00Z - Incorrect:
31/03/2026,03-31-2026,March 31, 2026
Issue: OAuth Token Expired
Cause: OAuth tokens expire after 30 minutes of inactivity.
Solution:
- Click Reconnect to Xero to get a new token
- Complete your import within 30 minutes of authentication
- For large imports, consider breaking into smaller batches
Issue: Rate Limit Exceeded
Cause: You exceeded Xero’s API rate limit (60 requests per minute).
Solution:
- CSVImport automatically throttles requests, but you can add a custom delay
- In the submit settings, set “Request Delay” to 1000ms (1 second between requests)
- This ensures you stay well under Xero’s limits
What’s Next?
Now that your projects are in Xero, you can:
- Add time entries - Import time tracking data using the same process
- Create project tasks - Use POST /projects/{projectId}/tasks to import task breakdowns
- Import project quotes - Add quotes and invoices linked to projects
- Set up project templates - Save your mapping configuration for repeated imports
Importing Other Xero Data
The same OAuth-connected workflow works for:
- Contacts - Import customers and suppliers
- Invoices - Bulk create sales invoices
- Purchase Orders - Import POs from your ERP
- Bank Transactions - Import bank statement data
- Fixed Assets - Bulk create asset records
CSVImport automatically merges all four Xero API specifications (Projects, Accounting, Finance, Assets), giving you access to 161 endpoints from a single OAuth connection.
Understanding Xero’s Multi-Spec Architecture
Xero’s API is split into multiple OpenAPI specifications:
- Projects API - Projects, time, expenses
- Accounting API - Invoices, contacts, accounts, journals
- Finance API - Financial statements, cash flow, profit & loss
- Assets API - Fixed asset management
CSVImport automatically discovers and merges all four specs when you connect via OAuth, so you can access any Xero endpoint without reconfiguring authentication. Each endpoint routes to the correct Xero API base URL automatically.
Conclusion
Bulk importing projects to Xero with OAuth authentication is straightforward when you have the right tools:
- Secure OAuth login - No API keys to manage
- Automatic spec merging - Access all Xero APIs from one connection
- Smart field mapping - Auto-detects column matches
- Real-time progress - Track imports as they happen
- Error handling - Clear messages for failed rows
The same approach works for any Xero resource and any API with OAuth support.
Ready to import your own project data? Try CSVImport with your Xero account - it’s free for up to 25 rows.
Ready to try CSVImport?
Import your CSV data into any API in minutes. No coding required.
More from the blog
Bulk Import Products to Stripe from CSV
Step-by-step tutorial showing how to import your product catalog into Stripe. No programming required.
Complete CSV to API Import Guide
Learn how to bulk import CSV data without writing scripts or code. Complete guide for non-developers.
Smart Field Mapping with Visual Validation
Prevent data import disasters with visual warnings for unmapped fields and semantic mismatches.
Why Data Migration Scripts Fail
Understanding the common pitfalls in data migration and how to avoid them with proper tooling.