How to Bulk Import Products to Stripe from CSV (No Code Required)
Step-by-step tutorial showing how to import your product catalog into Stripe using a CSV file. No programming required - just upload, map fields, and submit.
Setting up a product catalog in Stripe can be tedious when you have dozens or hundreds of products. Manually entering each product through the Stripe Dashboard? That’s hours of repetitive work. Writing a custom script? That requires programming skills and debugging time.
There’s a faster way: bulk import your products from a CSV file using a no-code tool that connects directly to Stripe’s API.
In this tutorial, I’ll show you exactly how to import a product catalog into Stripe in under 10 minutes, with no coding required.
Table of Contents
- What You’ll Need
- Step 1: Get Your Stripe API Key
- Step 2: Prepare Your CSV File
- Step 3: Load the Stripe OpenAPI Spec
- Step 4: Select the Products Endpoint
- Step 5: Upload Your CSV
- Step 6: Map CSV Columns to Stripe Fields
- Step 7: Configure Authentication
- Step 8: Submit and Track Progress
- Verify Your Products in Stripe
- Handling Errors
What You’ll Need
Before we start, make sure you have:
- A Stripe account - You can use test mode to try this without affecting real data
- Your Stripe API key - We’ll show you where to find this
- A CSV file with your product data - We’ll cover the format below
Step 1: Get Your Stripe API Key
First, you need your Stripe API key. This allows the import tool to create products in your Stripe account.
- Log into your Stripe Dashboard
- Click Developers in the top navigation
- Select API Keys
- Copy your Secret key (starts with
sk_test_for test mode orsk_live_for production)
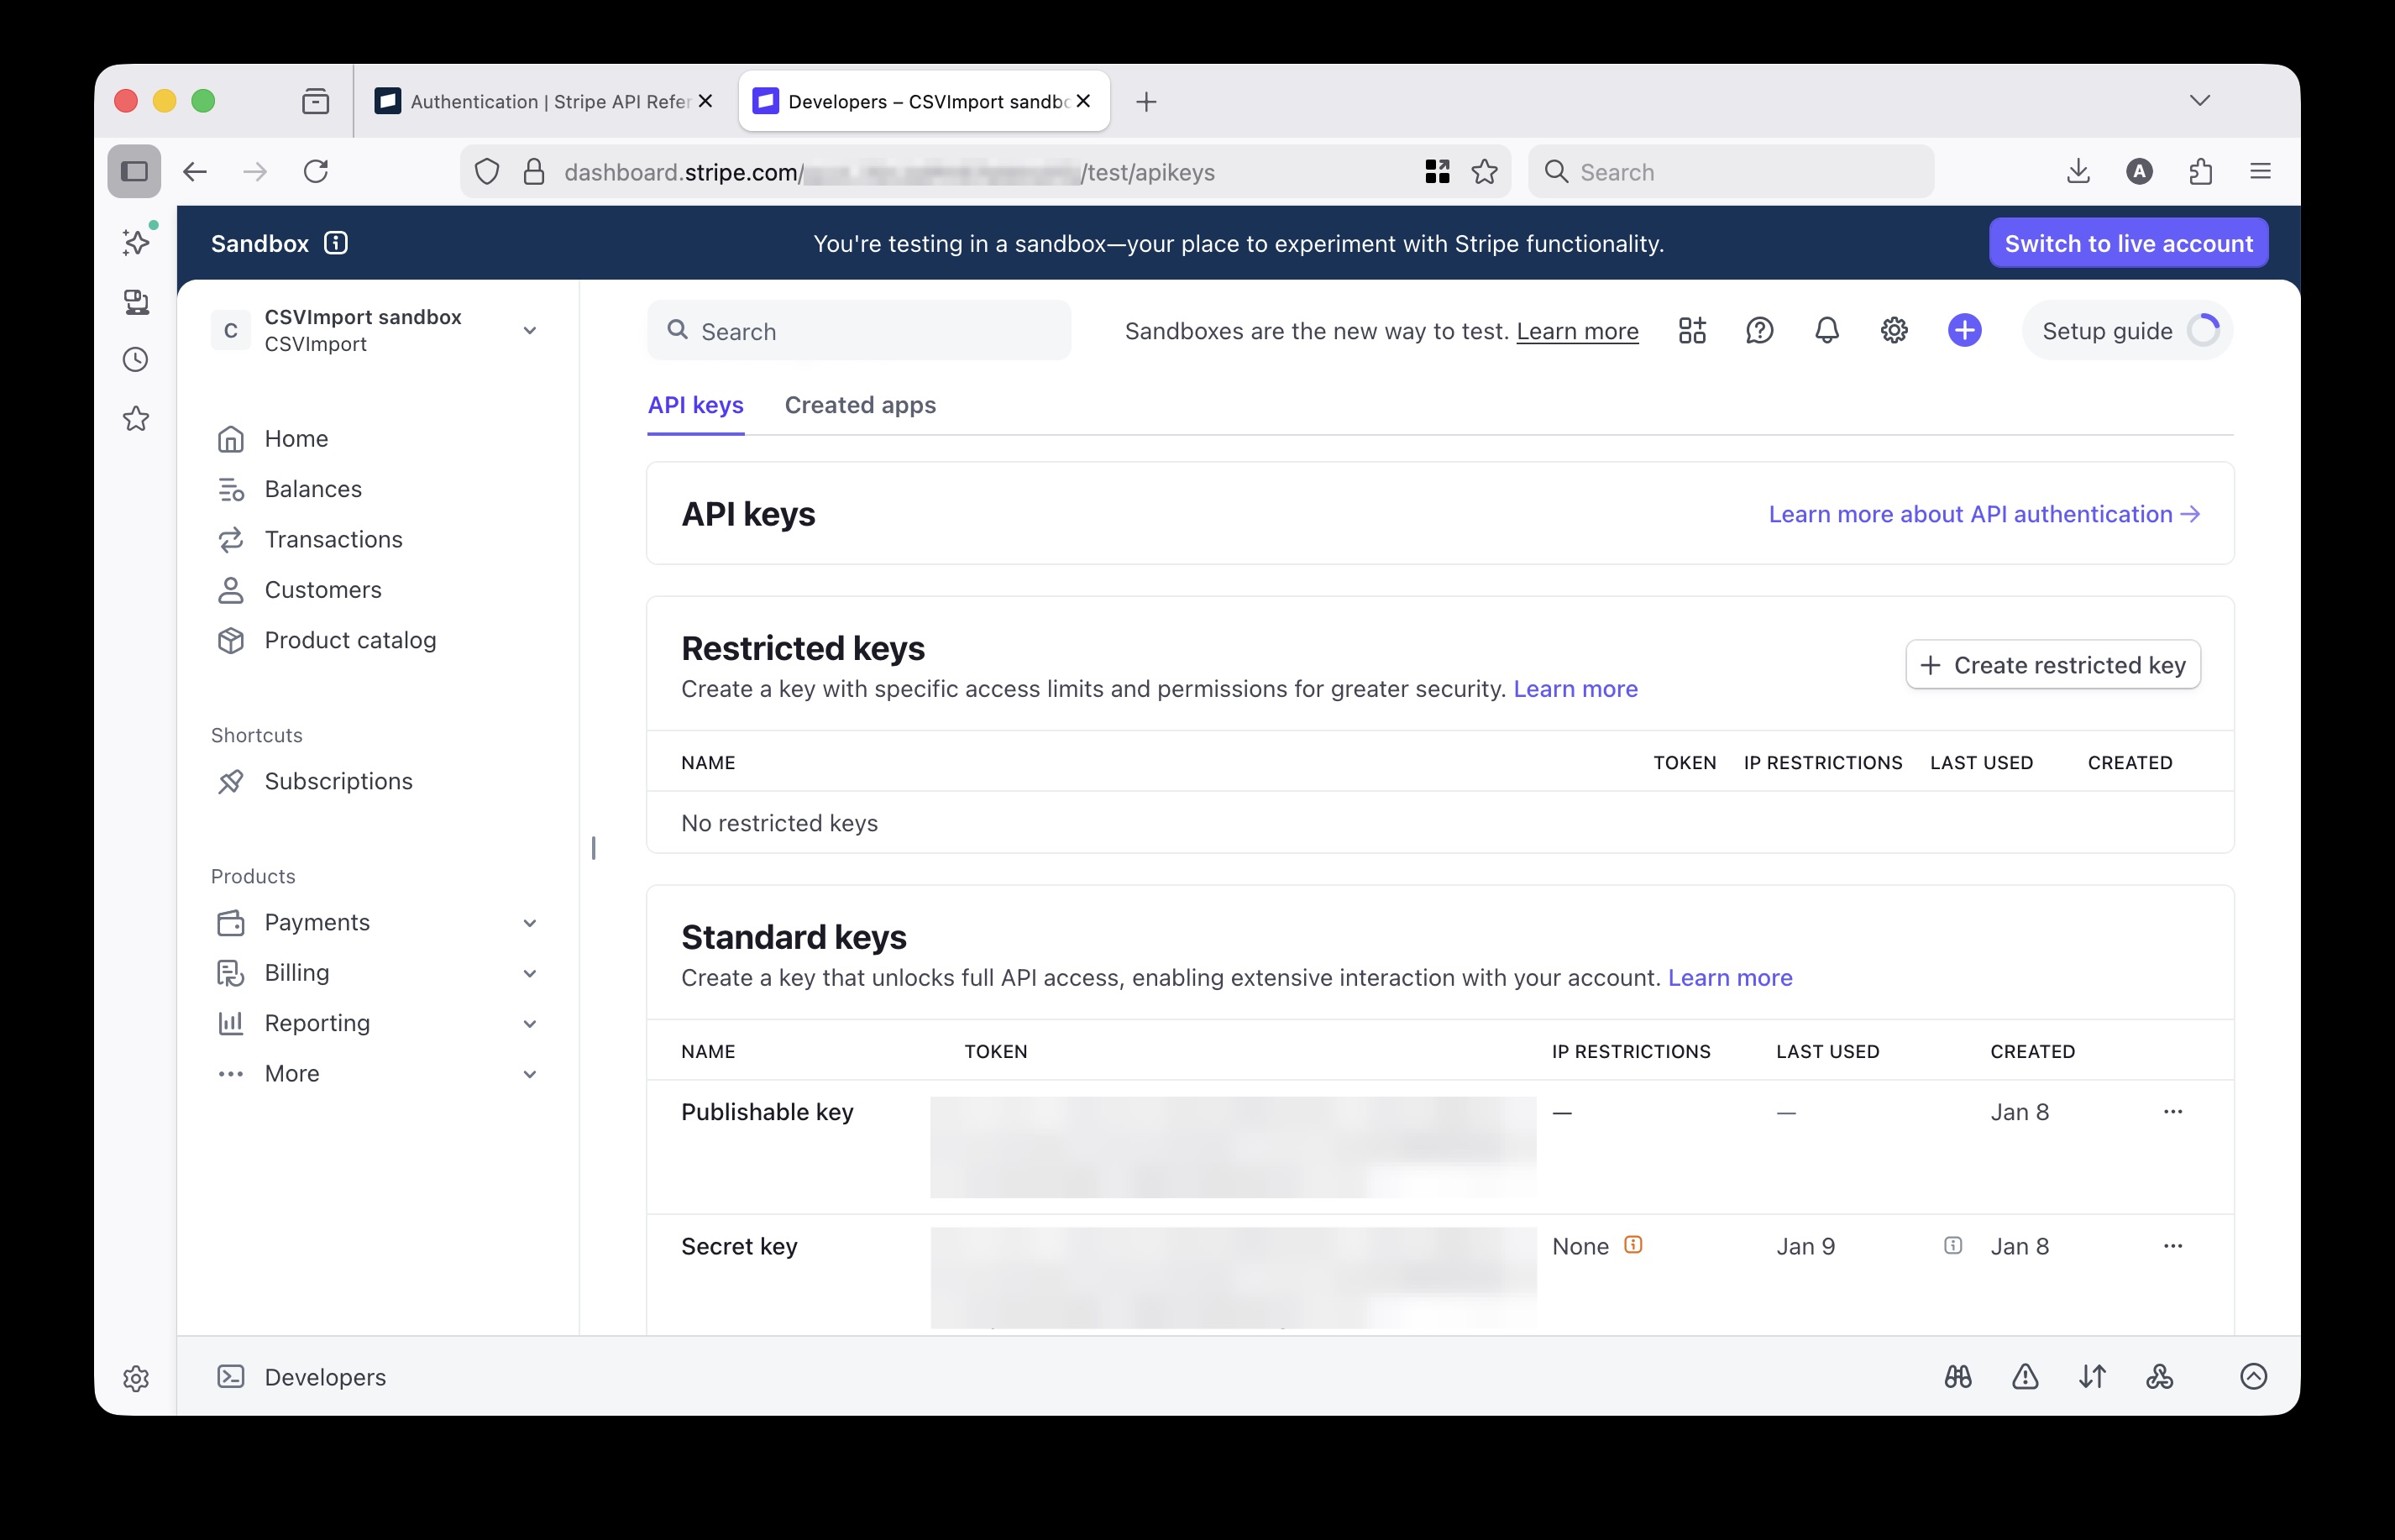
Important: Use your test mode key (sk_test_...) while following this tutorial. You can switch to live mode once you’ve verified everything works correctly.
Step 2: Prepare Your CSV File
Your CSV file needs columns for your product data. The good news: you don’t need to know Stripe’s exact API field names. Use simple, intuitive column names and let the import tool figure out the mapping.
Here’s a simple example:
name,description,unit_amount,currency
Basic Plan,Essential features for small teams,2900,usd
Pro Plan,Advanced features with priority support,7900,usd
Enterprise Plan,Full platform access with dedicated support,19900,usd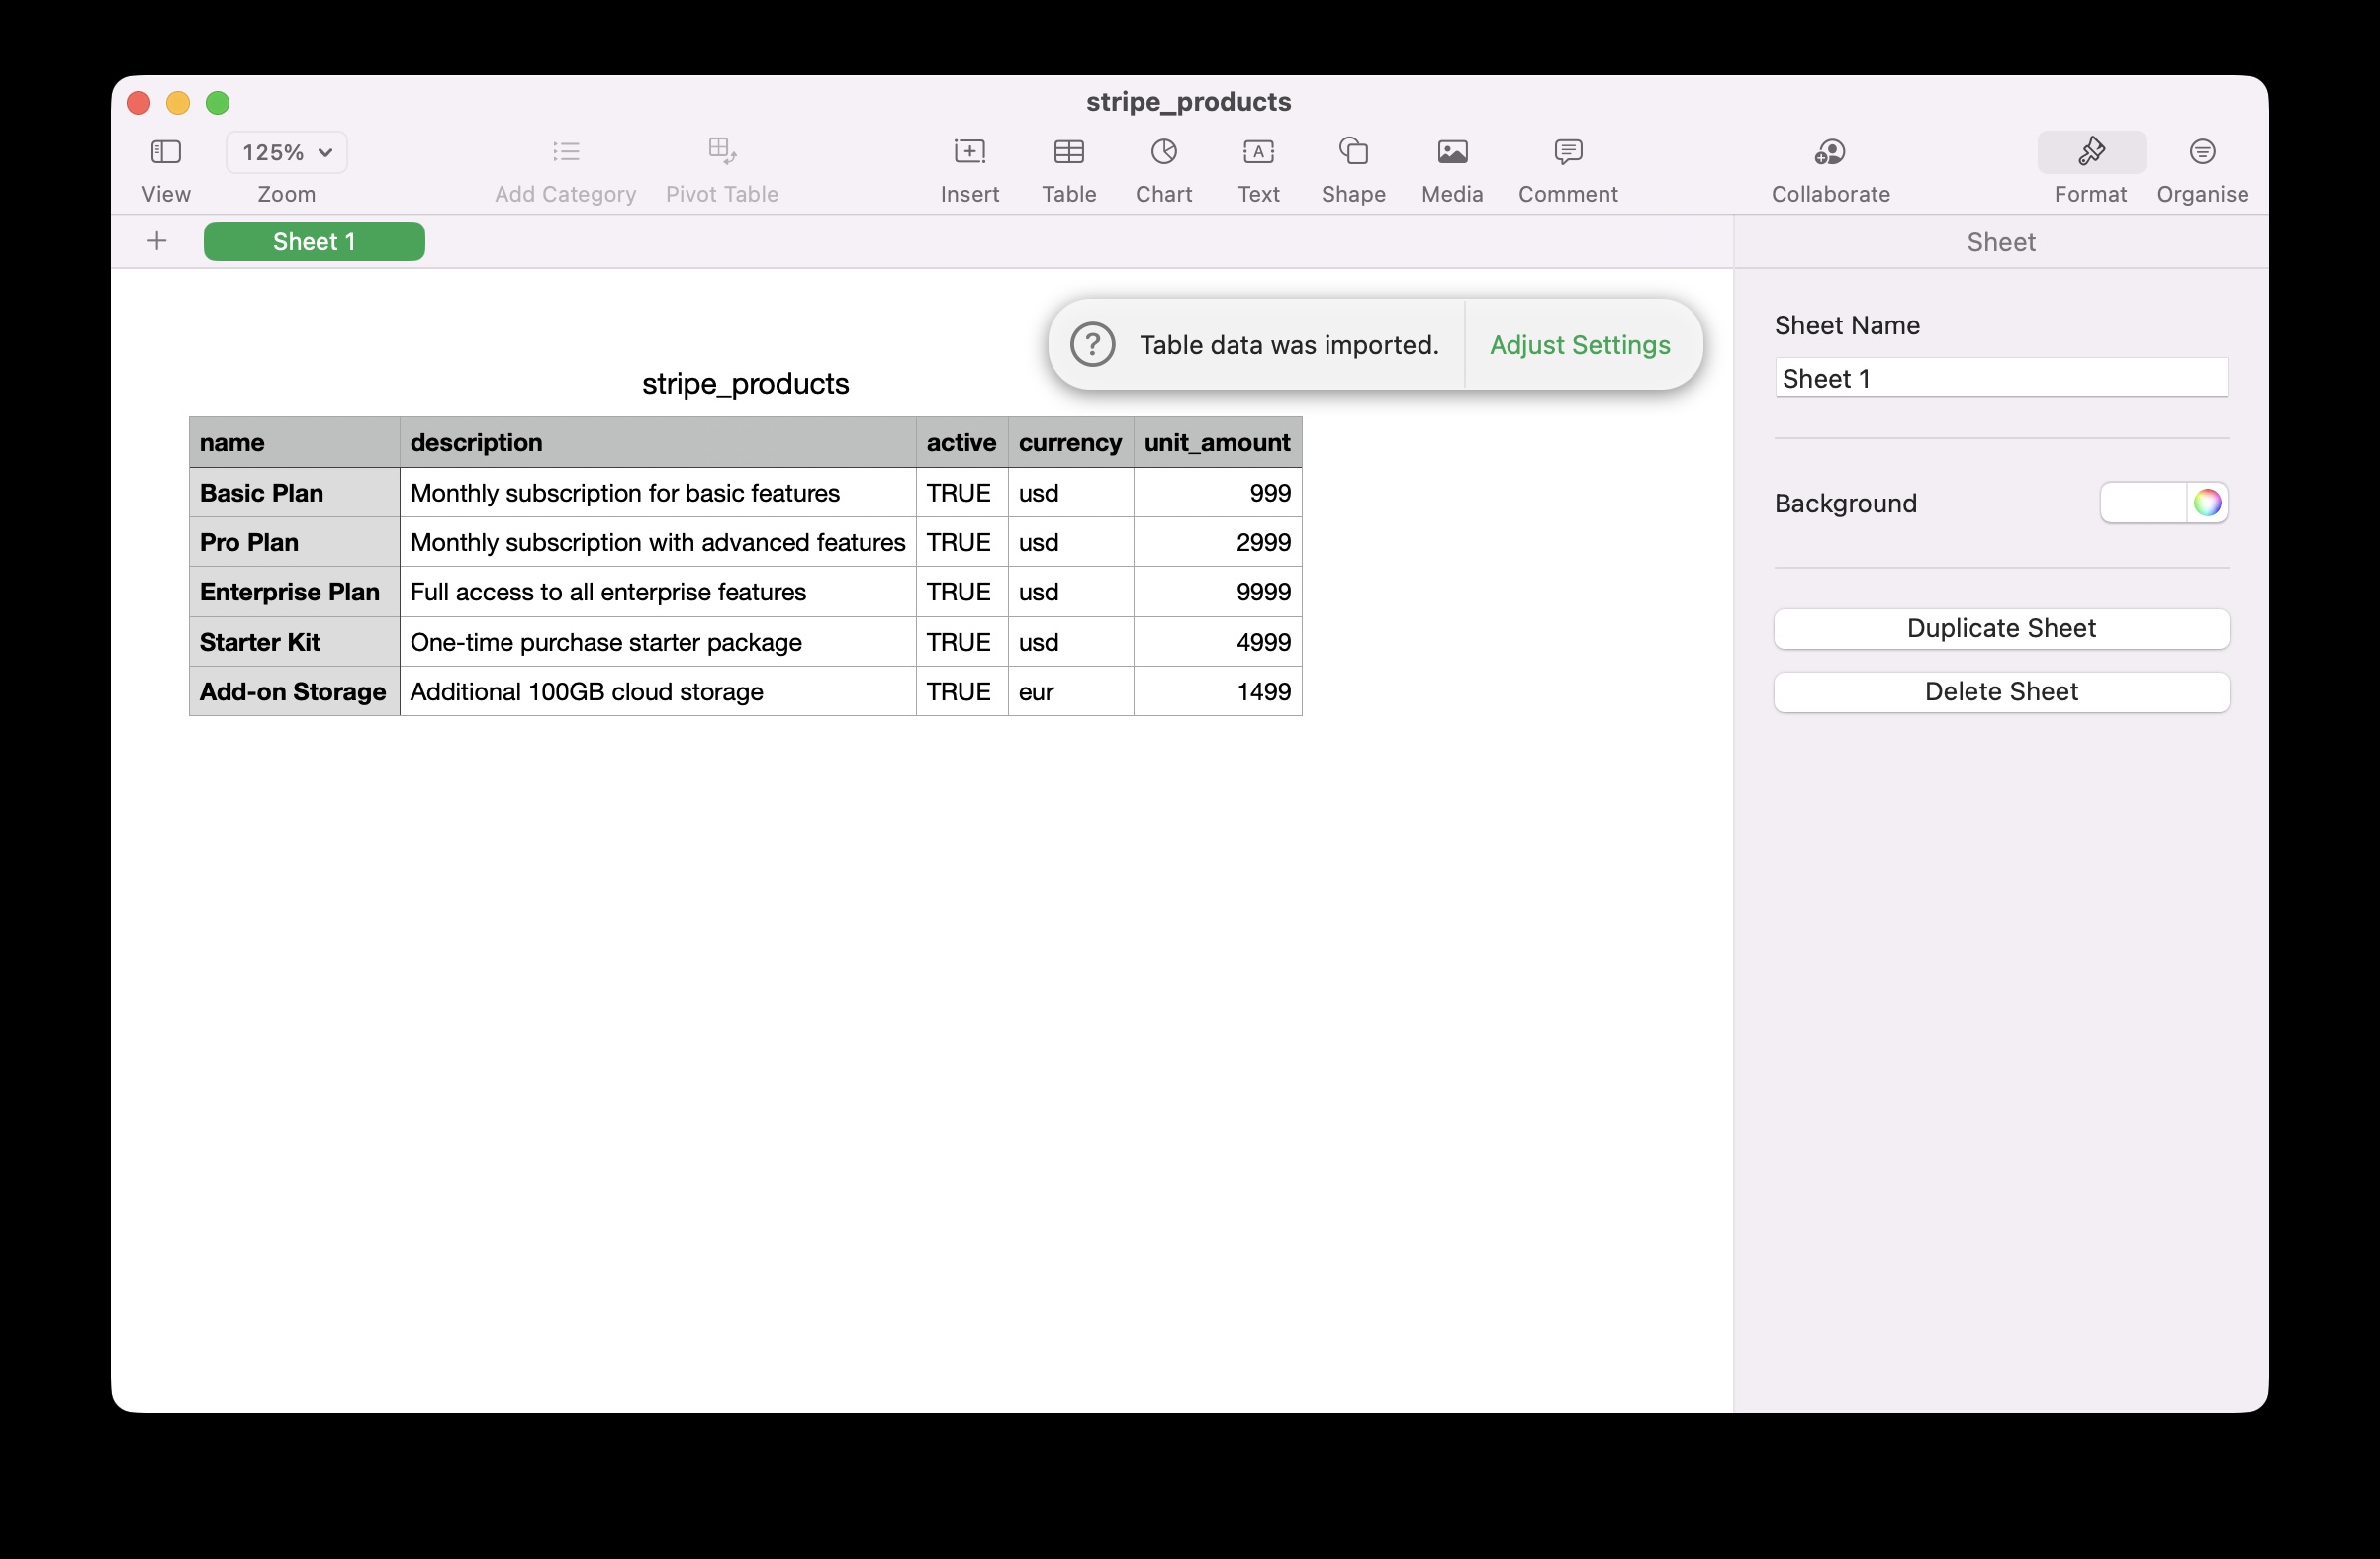
Key Fields Explained
| CSV Column | Description |
|---|---|
name | Product name (required) |
description | Product description |
unit_amount | Price in cents (e.g., 2900 = $29.00) |
currency | Currency code (usd, eur, gbp, etc.) |
Note on pricing: Stripe expects prices in the smallest currency unit. For USD, that’s cents:
- $29.00 →
2900 - $79.00 →
7900 - $199.00 →
19900
Step 3: Load the Stripe OpenAPI Spec
Now let’s use CSVImport to connect to Stripe’s API.
- Go to CSVImport
- In Step 1, enter Stripe’s OpenAPI specification URL:
https://raw.githubusercontent.com/stripe/openapi/master/openapi/spec3.json- Click Fetch Spec
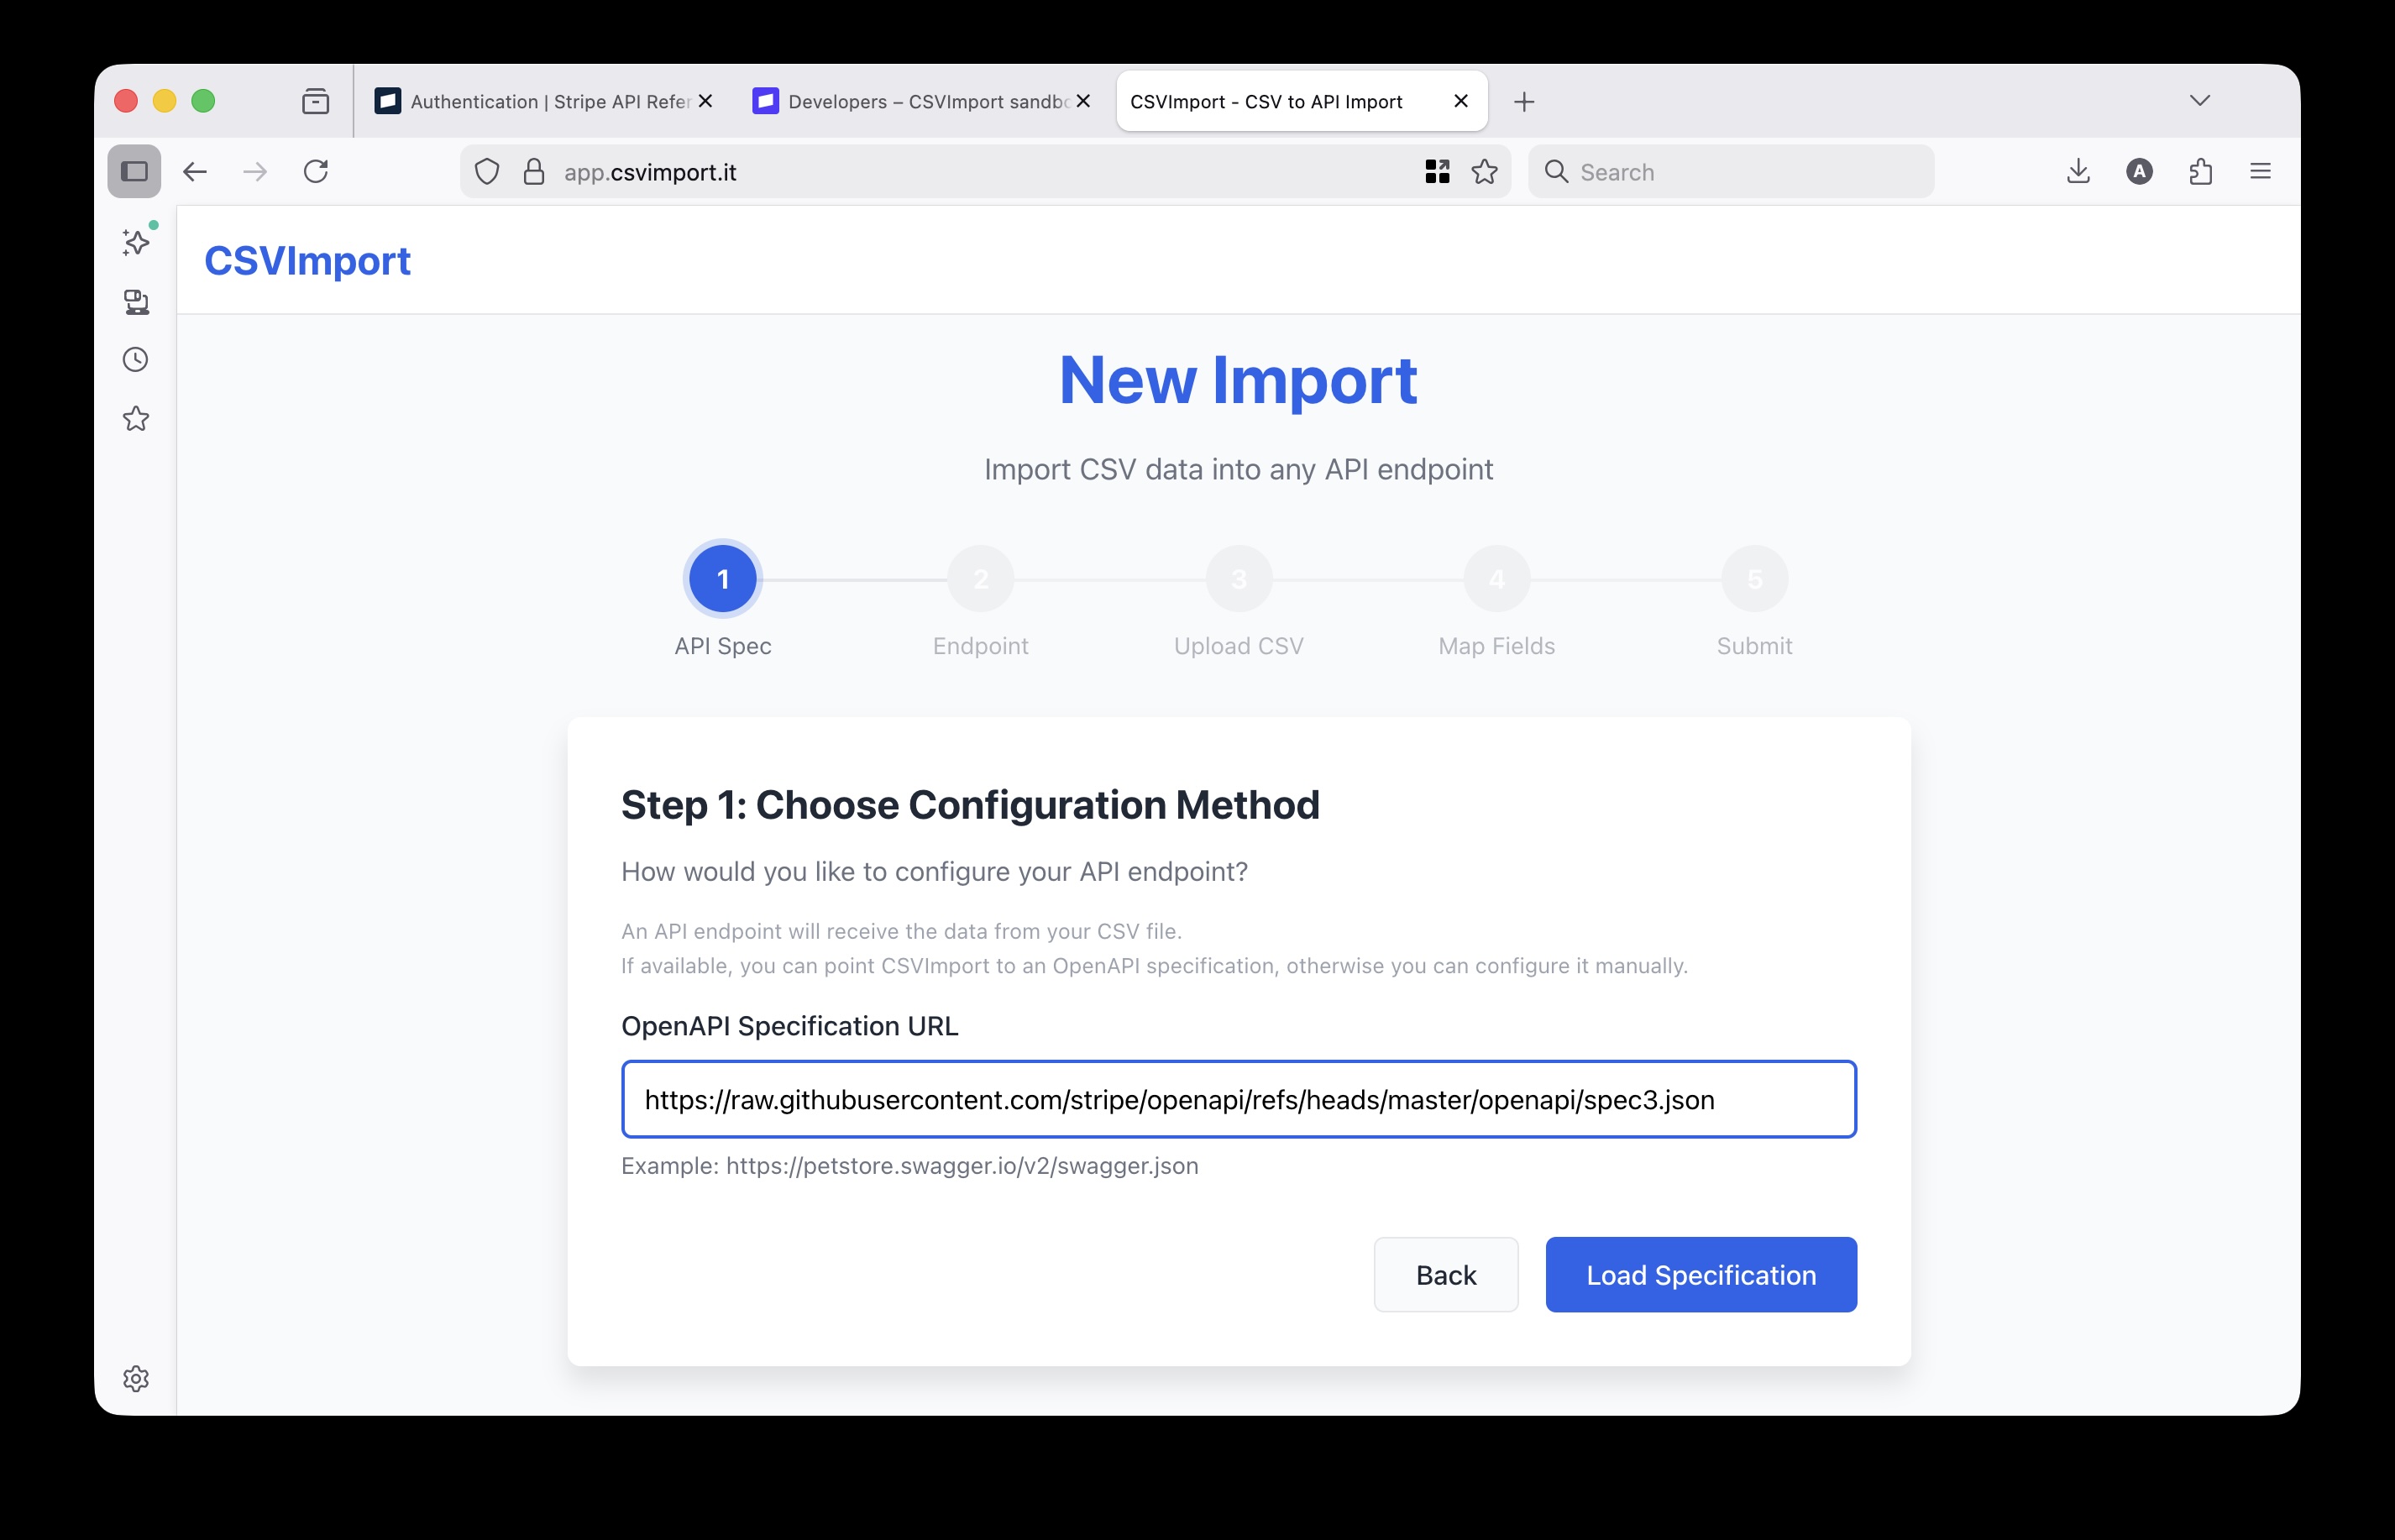
The tool will parse Stripe’s API specification and discover all available endpoints, field types, and authentication requirements automatically.
Step 4: Select the Products Endpoint
After the spec loads, you’ll see a list of available Stripe API endpoints. We need the one that creates products.
- Search or scroll to find POST /v1/products
- Click to select it
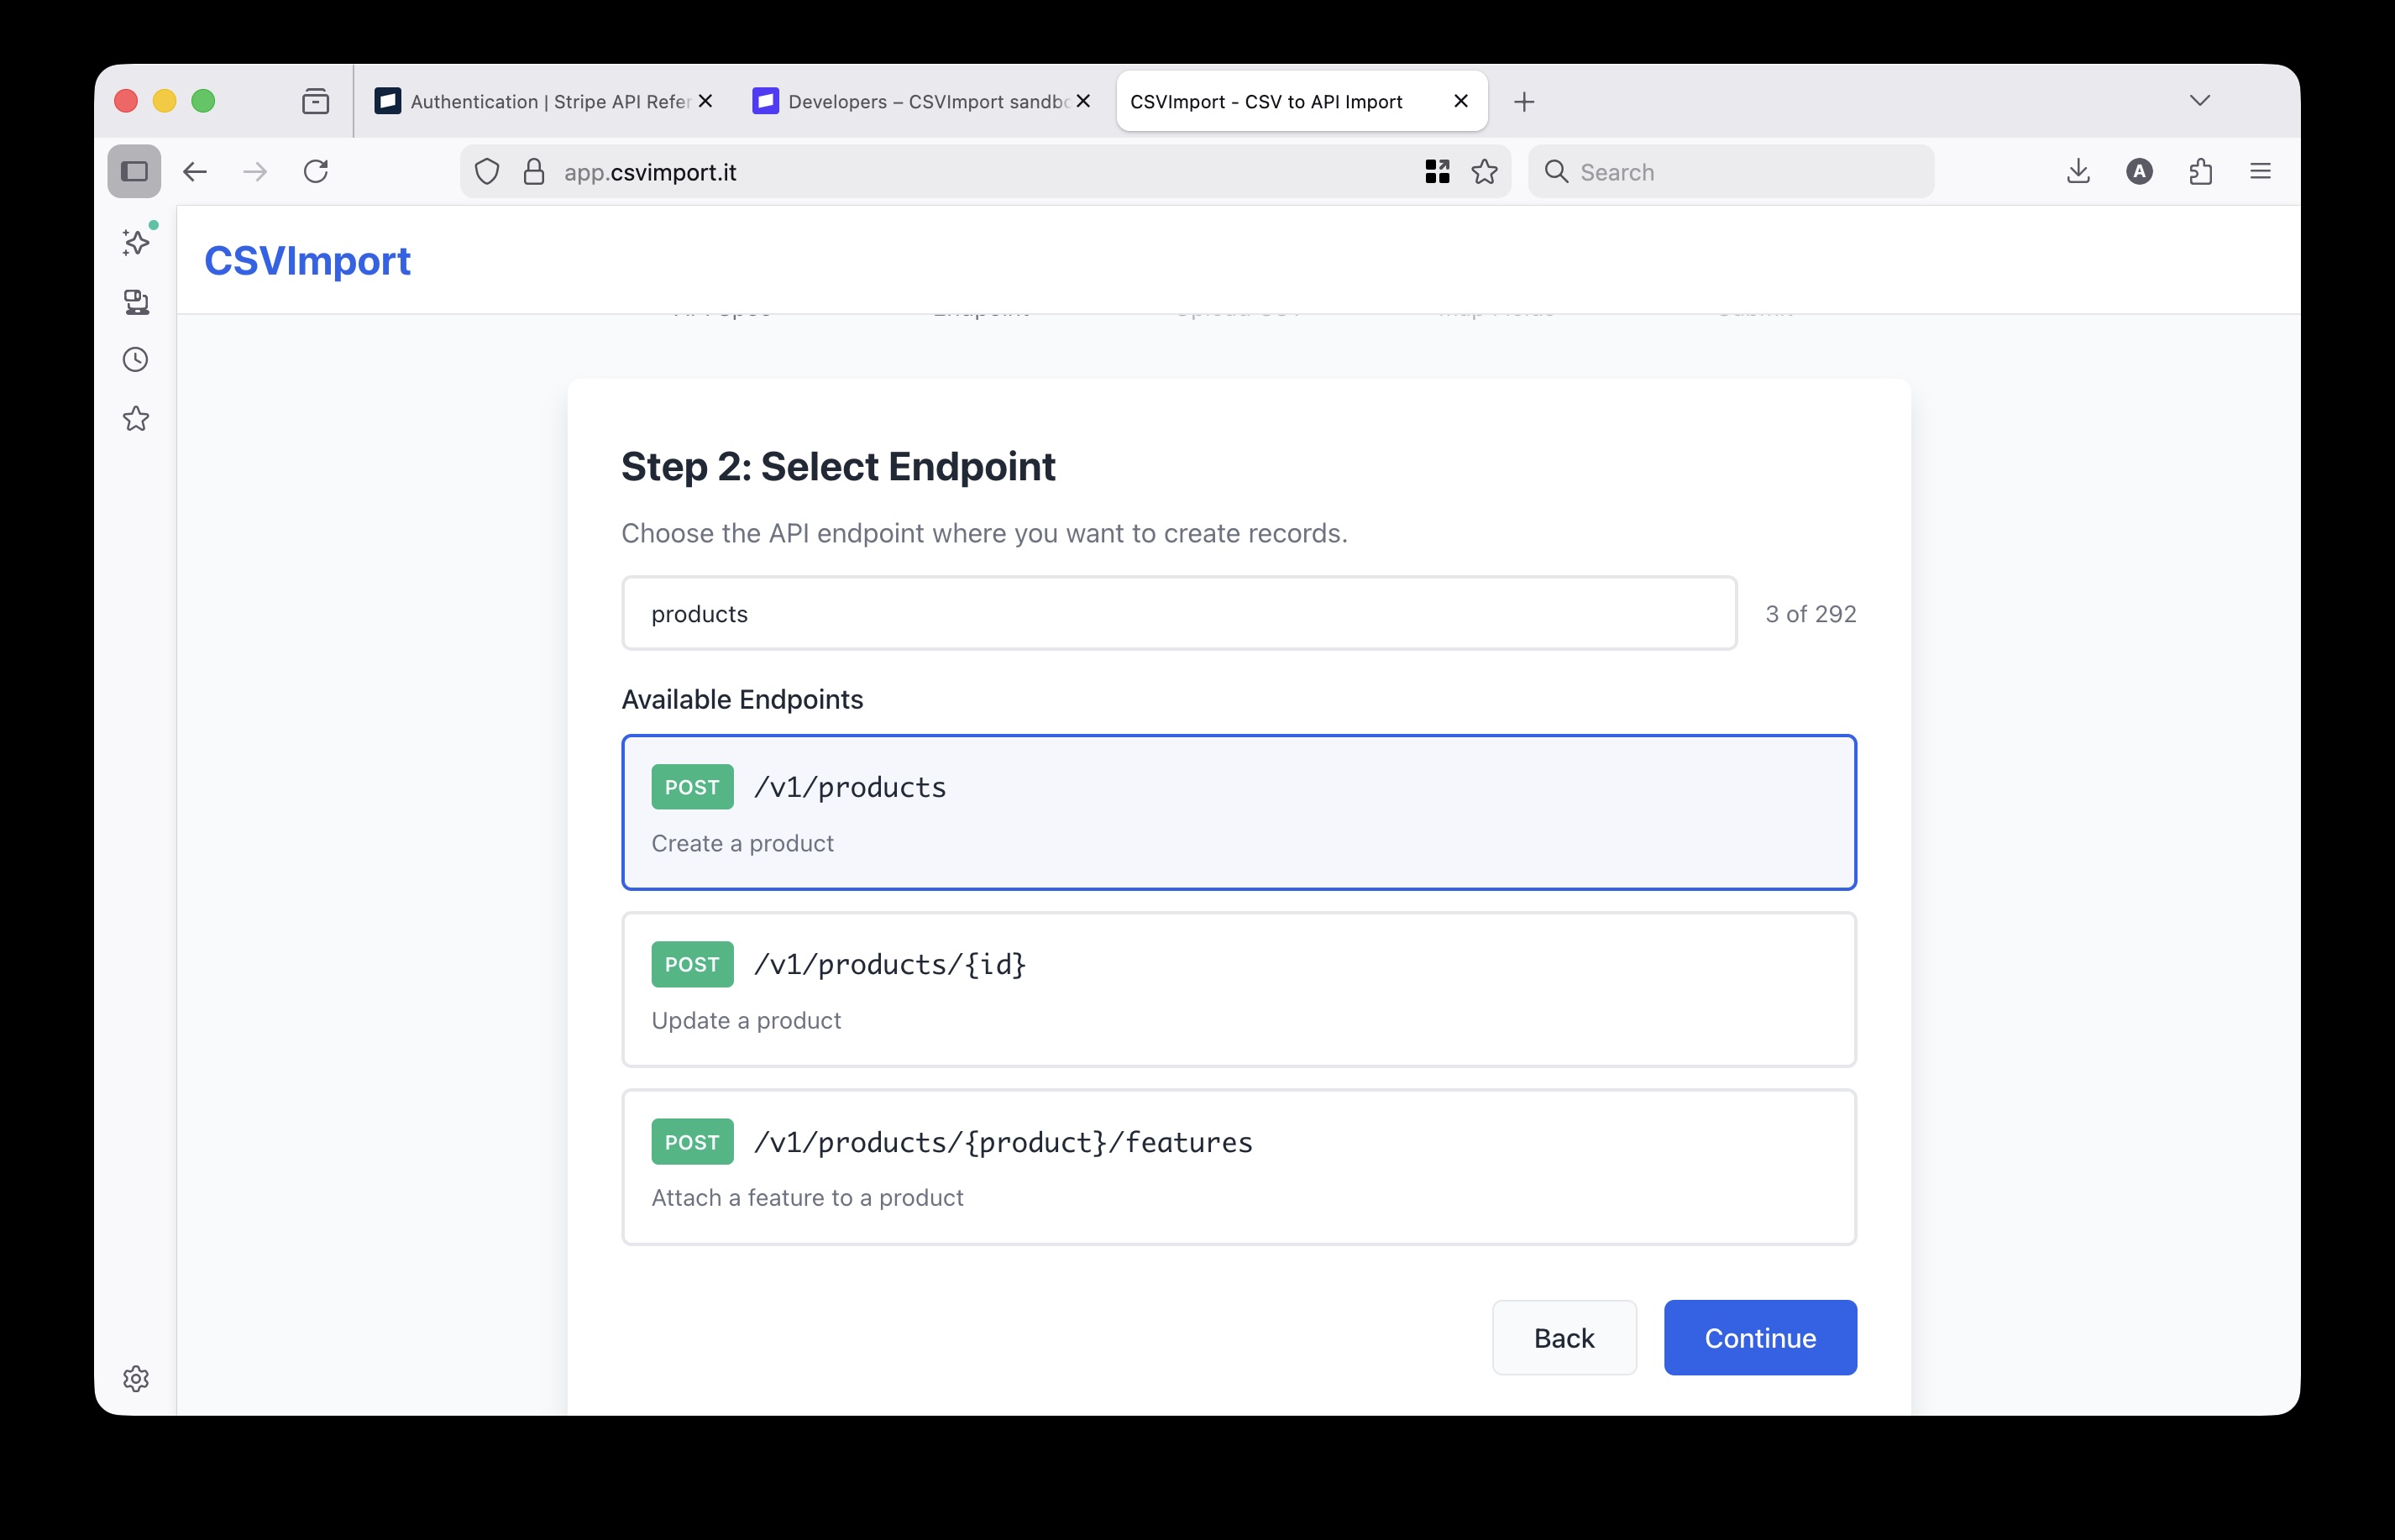
This endpoint creates a new product in your Stripe catalog each time it’s called. The import tool will call it once for each row in your CSV.
Step 5: Upload Your CSV
Now upload the CSV file you prepared earlier.
- Drag and drop your CSV file, or click to browse
- The tool will auto-detect the separator (comma, semicolon, tab)
- Preview your data to make sure it looks correct
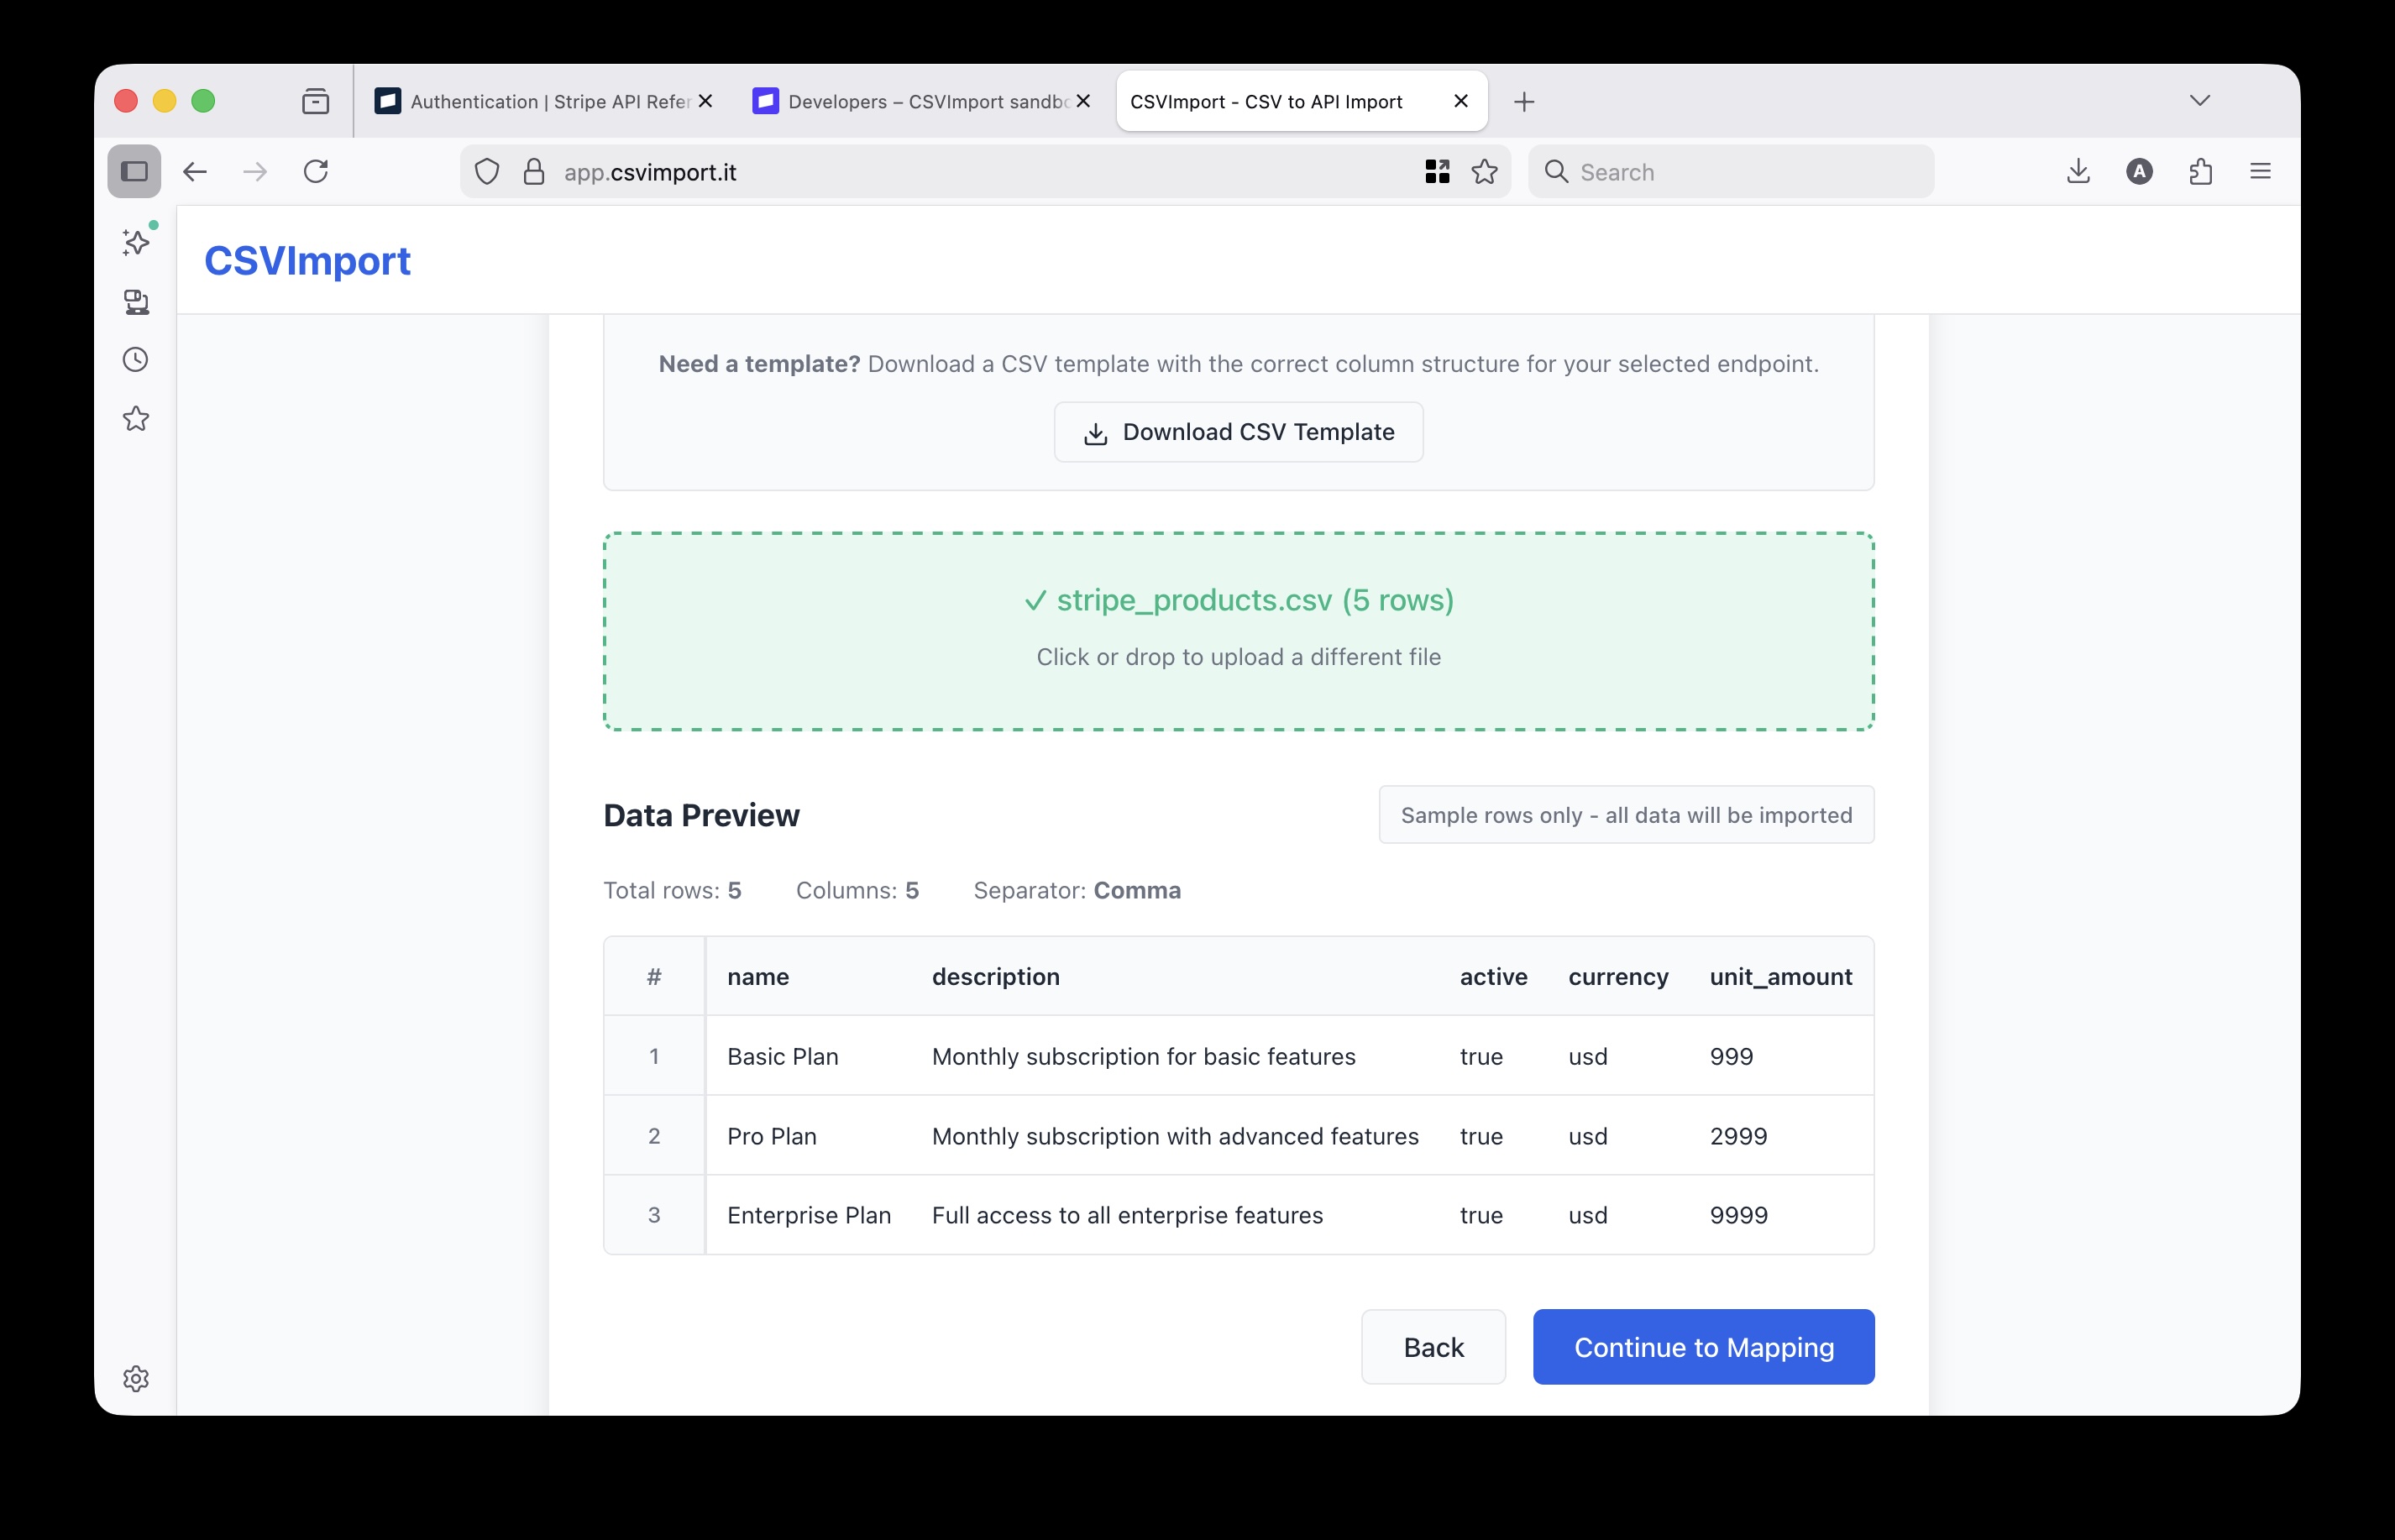
The preview shows the first few rows so you can verify:
- Column headers are detected correctly
- Data looks as expected
- No encoding issues with special characters
Step 6: Map CSV Columns to Stripe Fields
This is where CSVImport’s smart field mapping really shines. The tool automatically analyzes your CSV columns and matches them to Stripe’s API fields - even when the names don’t match exactly.
Remember how our CSV used simple column names like currency and unit_amount? Stripe’s API actually expects these nested inside a default_price_data object:
{
  "default_price_data": {
    "currency": "usd",
    "unit_amount": 2900
  }
}
CSVImport figures this out automatically. It matched:
name→name(exact match)description→description(exact match)currency→default_price_data.currency(smart match)unit_amount→default_price_data.unit_amount(smart match)
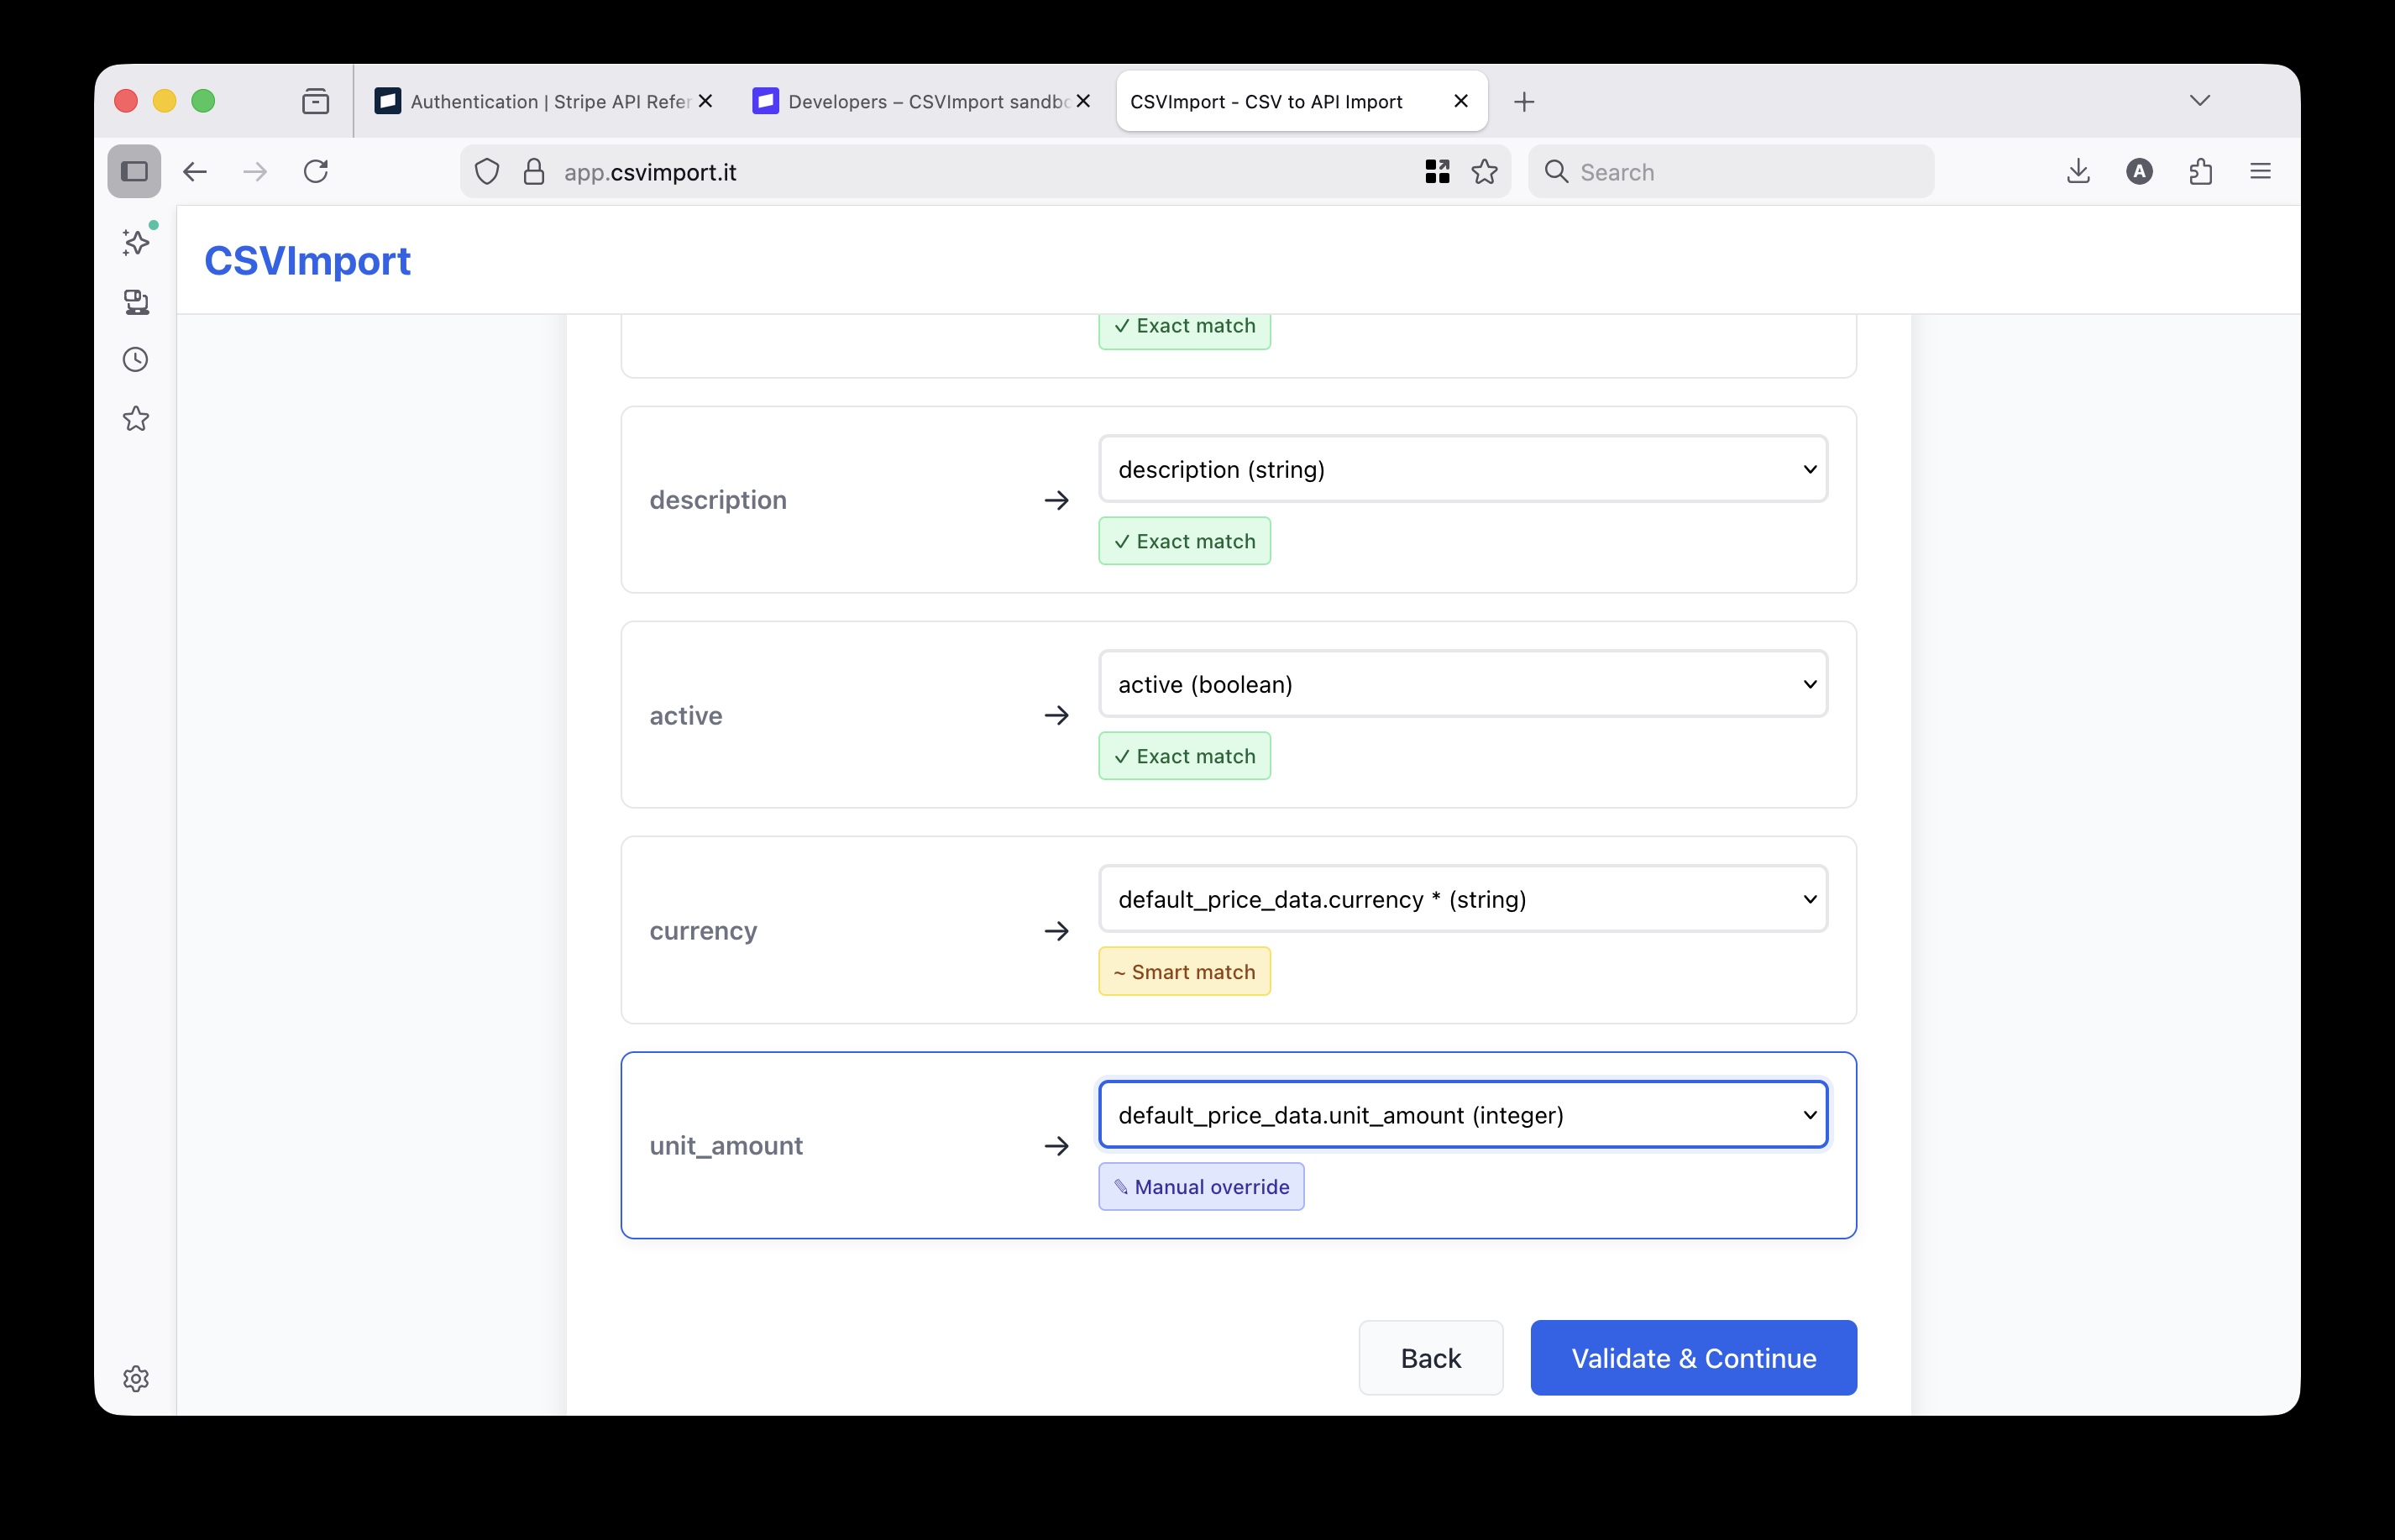
The interface shows visual indicators for each mapping:
- Green indicators for exact matches
- Yellow indicators for smart/fuzzy matches (like
currency→default_price_data.currency) - Red warnings for required fields that aren’t mapped
You can review and adjust any mappings if needed, but in most cases the auto-detection handles everything correctly. This saves you from having to learn Stripe’s nested API structure - just use intuitive column names and let the tool do the translation.
Step 7: Configure Authentication
Stripe requires authentication for all API calls. The tool detected this from the OpenAPI spec and will prompt you for credentials.
- Select Basic Auth as the authentication method
- Enter your Stripe API key as the username
- Leave the password field empty (Stripe only uses the username field)
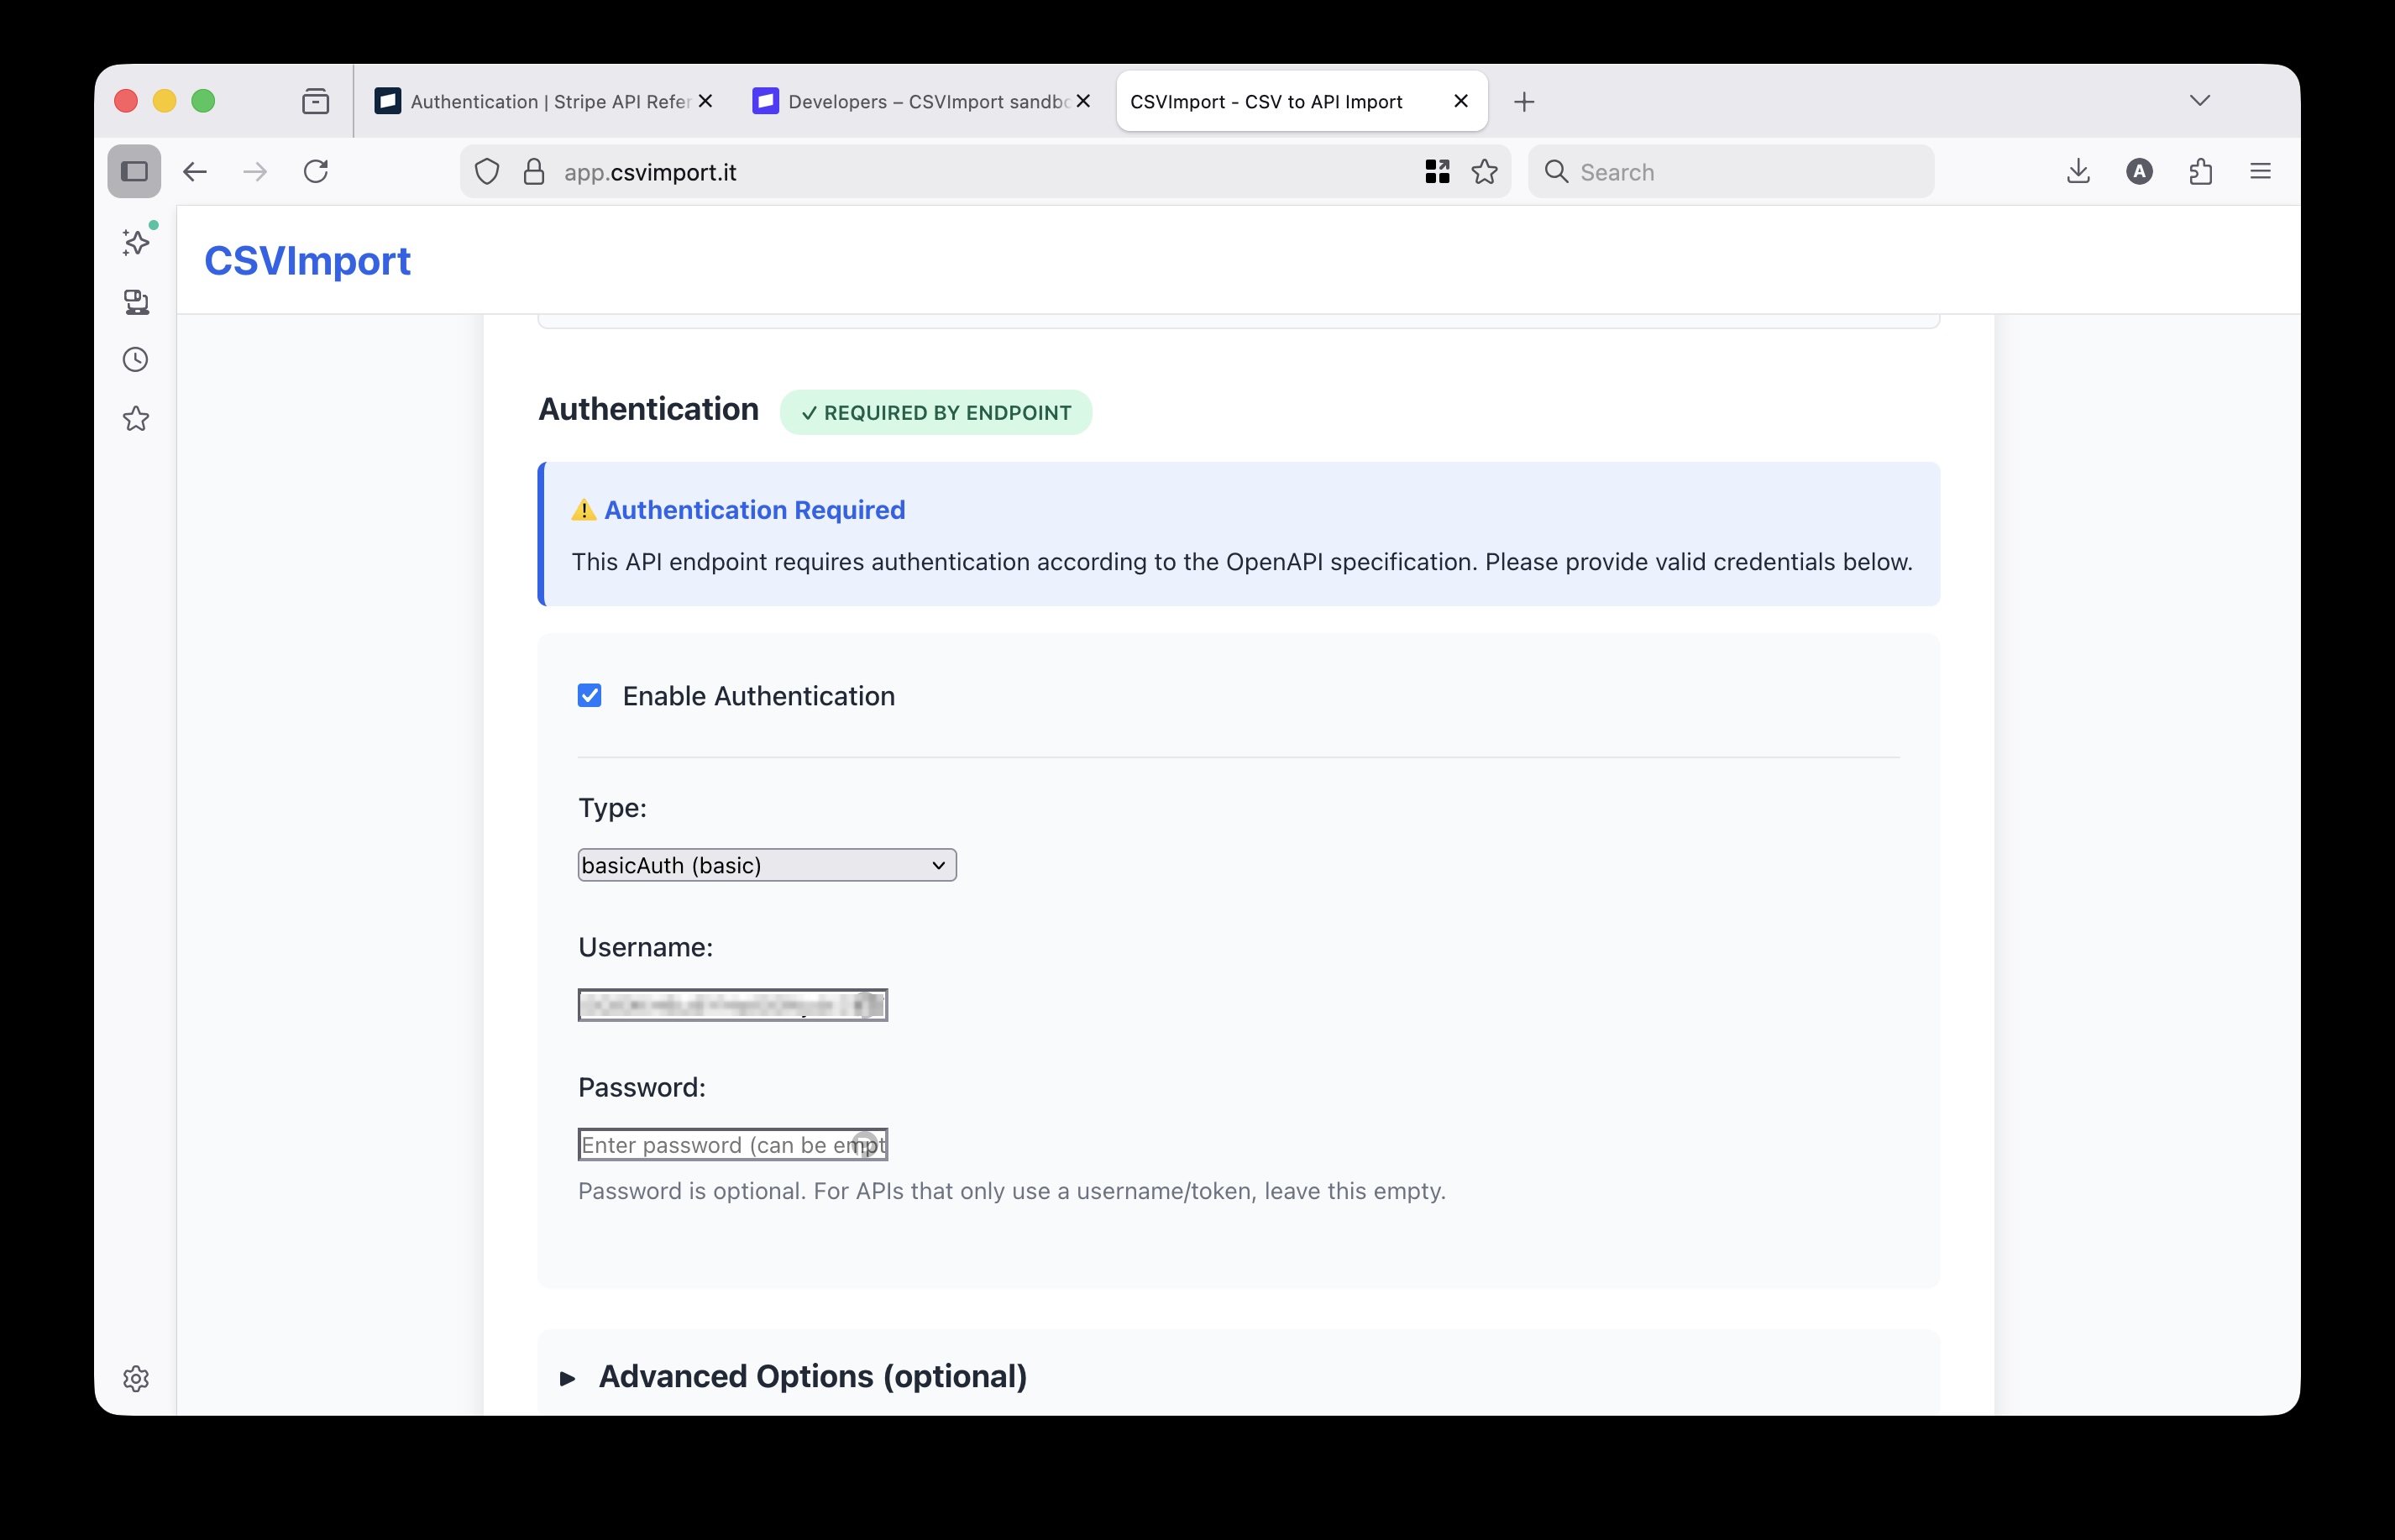
Why Basic Auth? Stripe’s API accepts your secret key as a Basic Auth username with an empty password. This is equivalent to using Bearer sk_test_... - both methods work.
Step 8: Submit and Track Progress
You’re ready to import! Click Submit to start the bulk import.
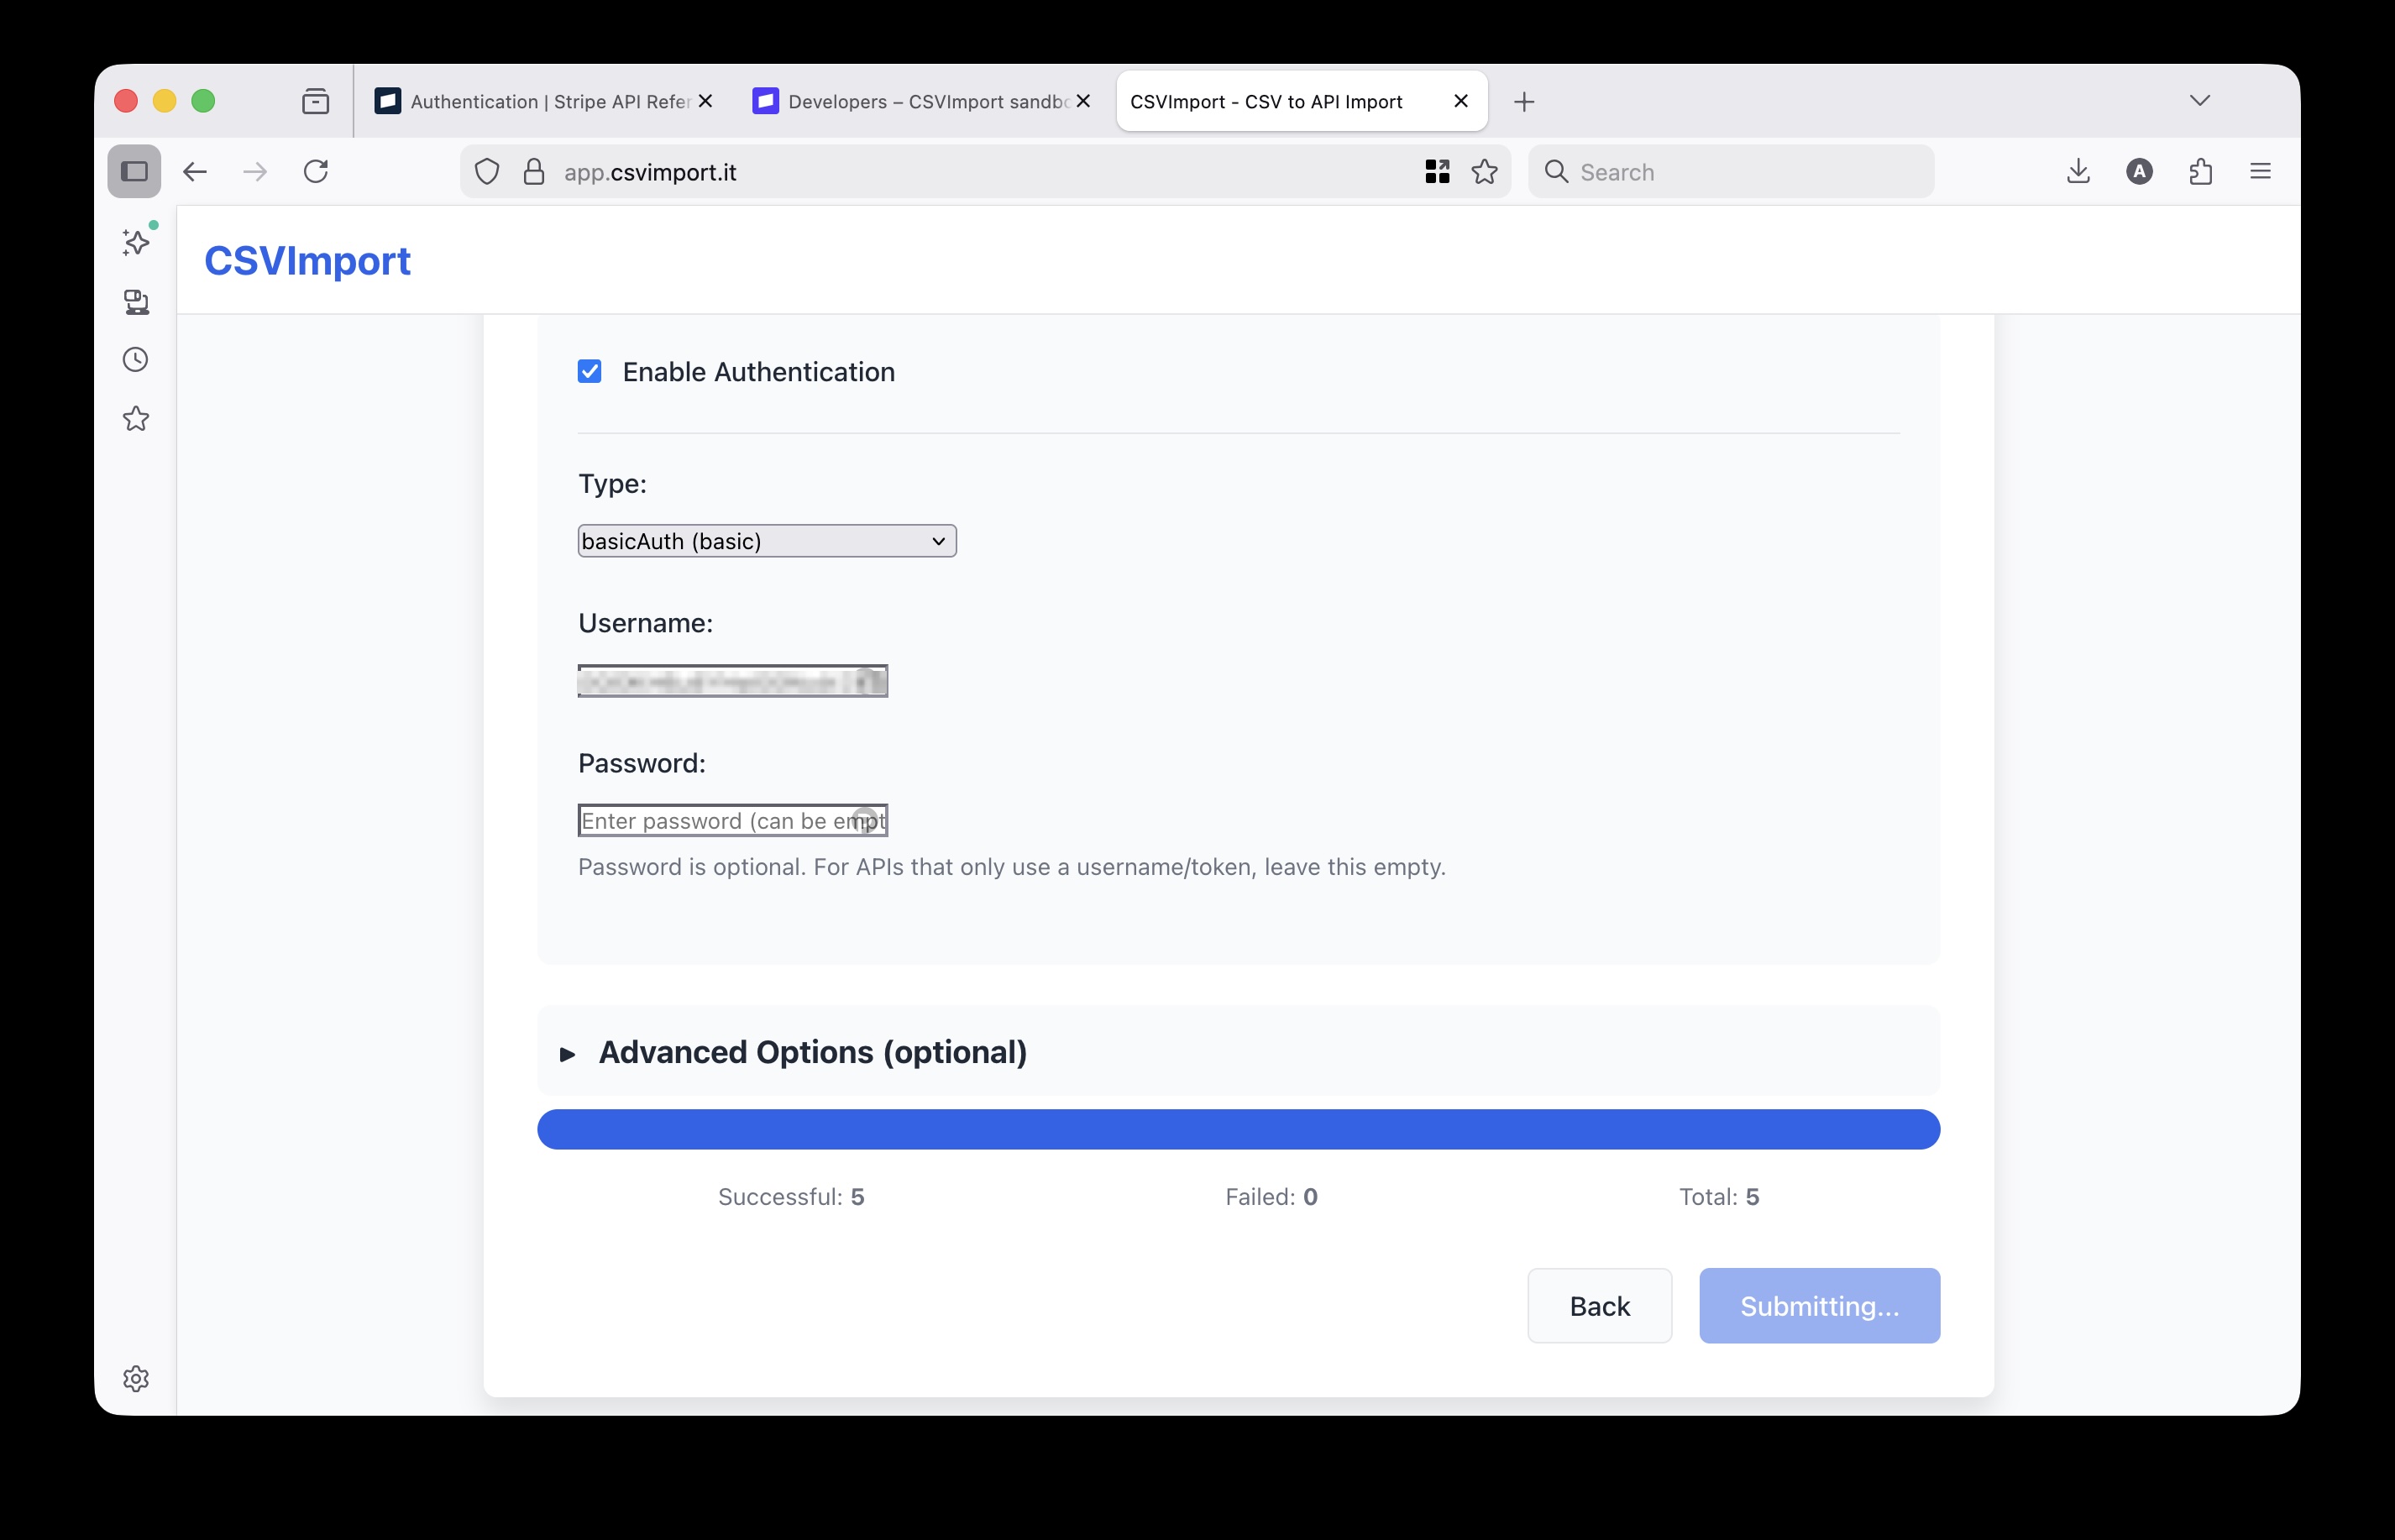
The tool processes each CSV row:
- Transforms the data to match Stripe’s expected format
- Sends a POST request to
/v1/products - Records the result (success or error)
- Moves to the next row
For large imports, the tool automatically handles rate limiting to stay within Stripe’s API limits.
Success!
Once complete, you’ll see a summary of the import results.
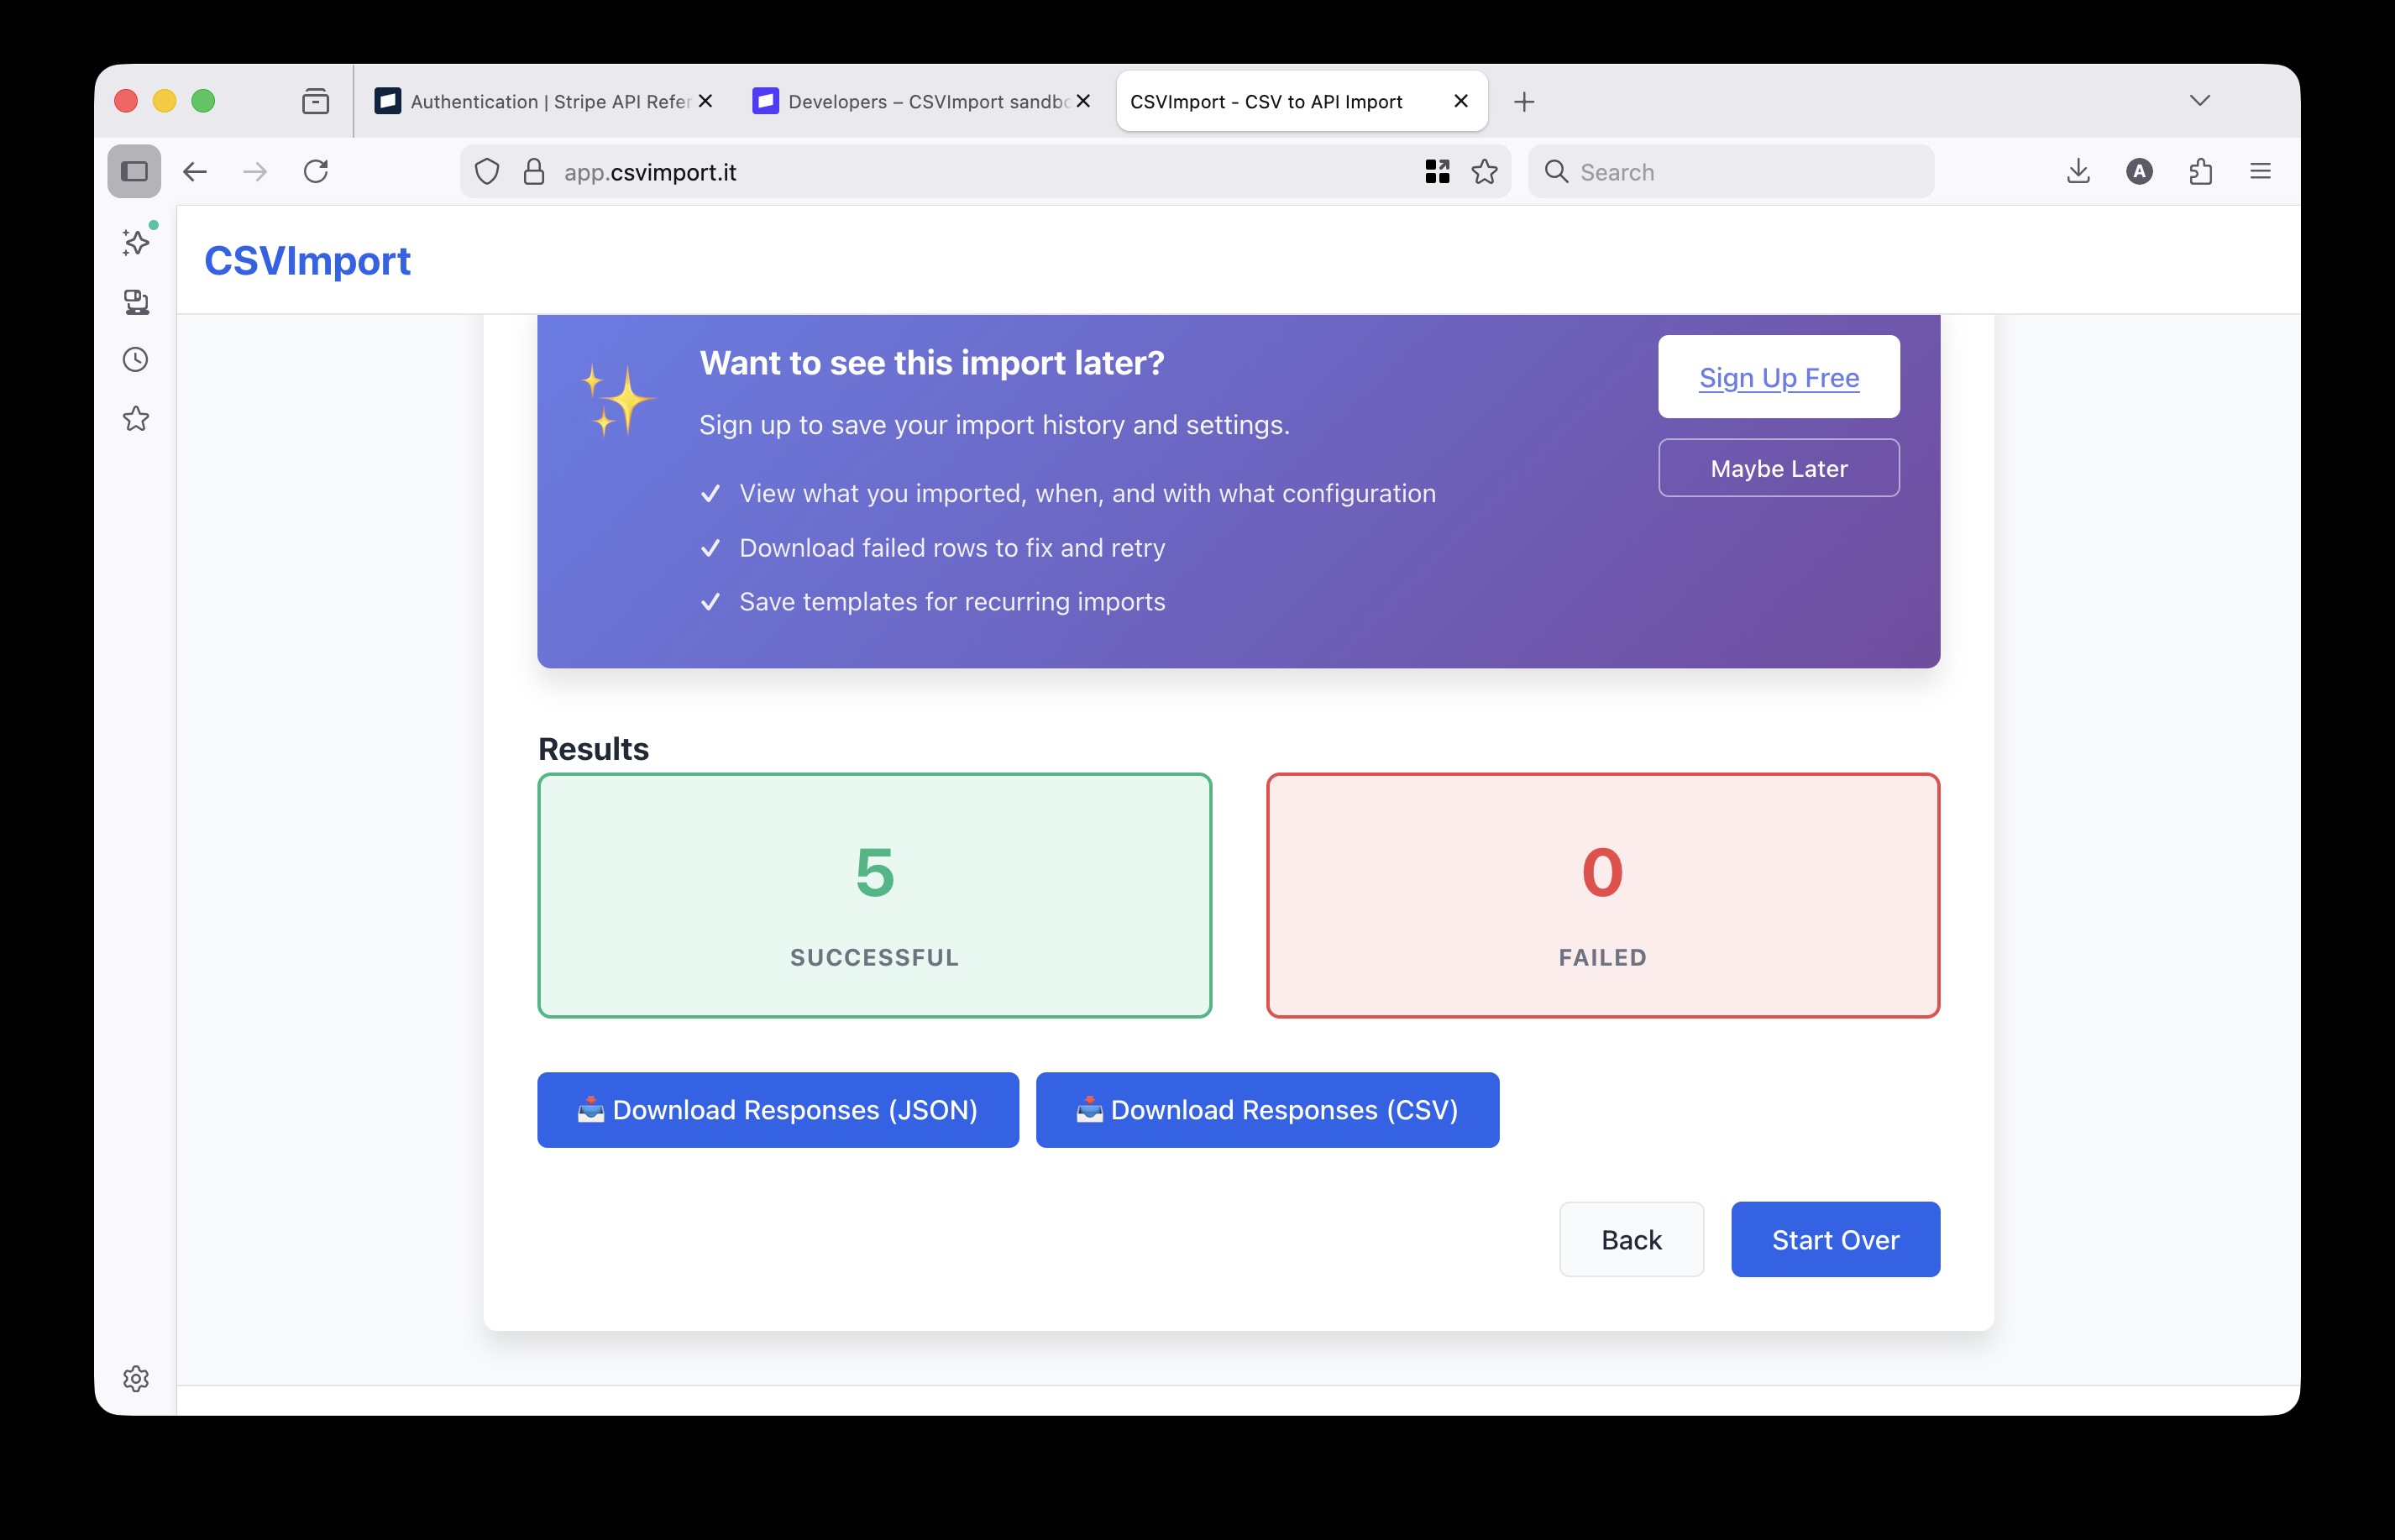
The results show:
- Total rows processed
- Successful imports (green)
- Failed imports (red) with error details
Verify Your Products in Stripe
Let’s confirm the products were created correctly in Stripe.
- Go to your Stripe Dashboard
- Navigate to Products (under the Product catalog section)
- You should see your newly imported products
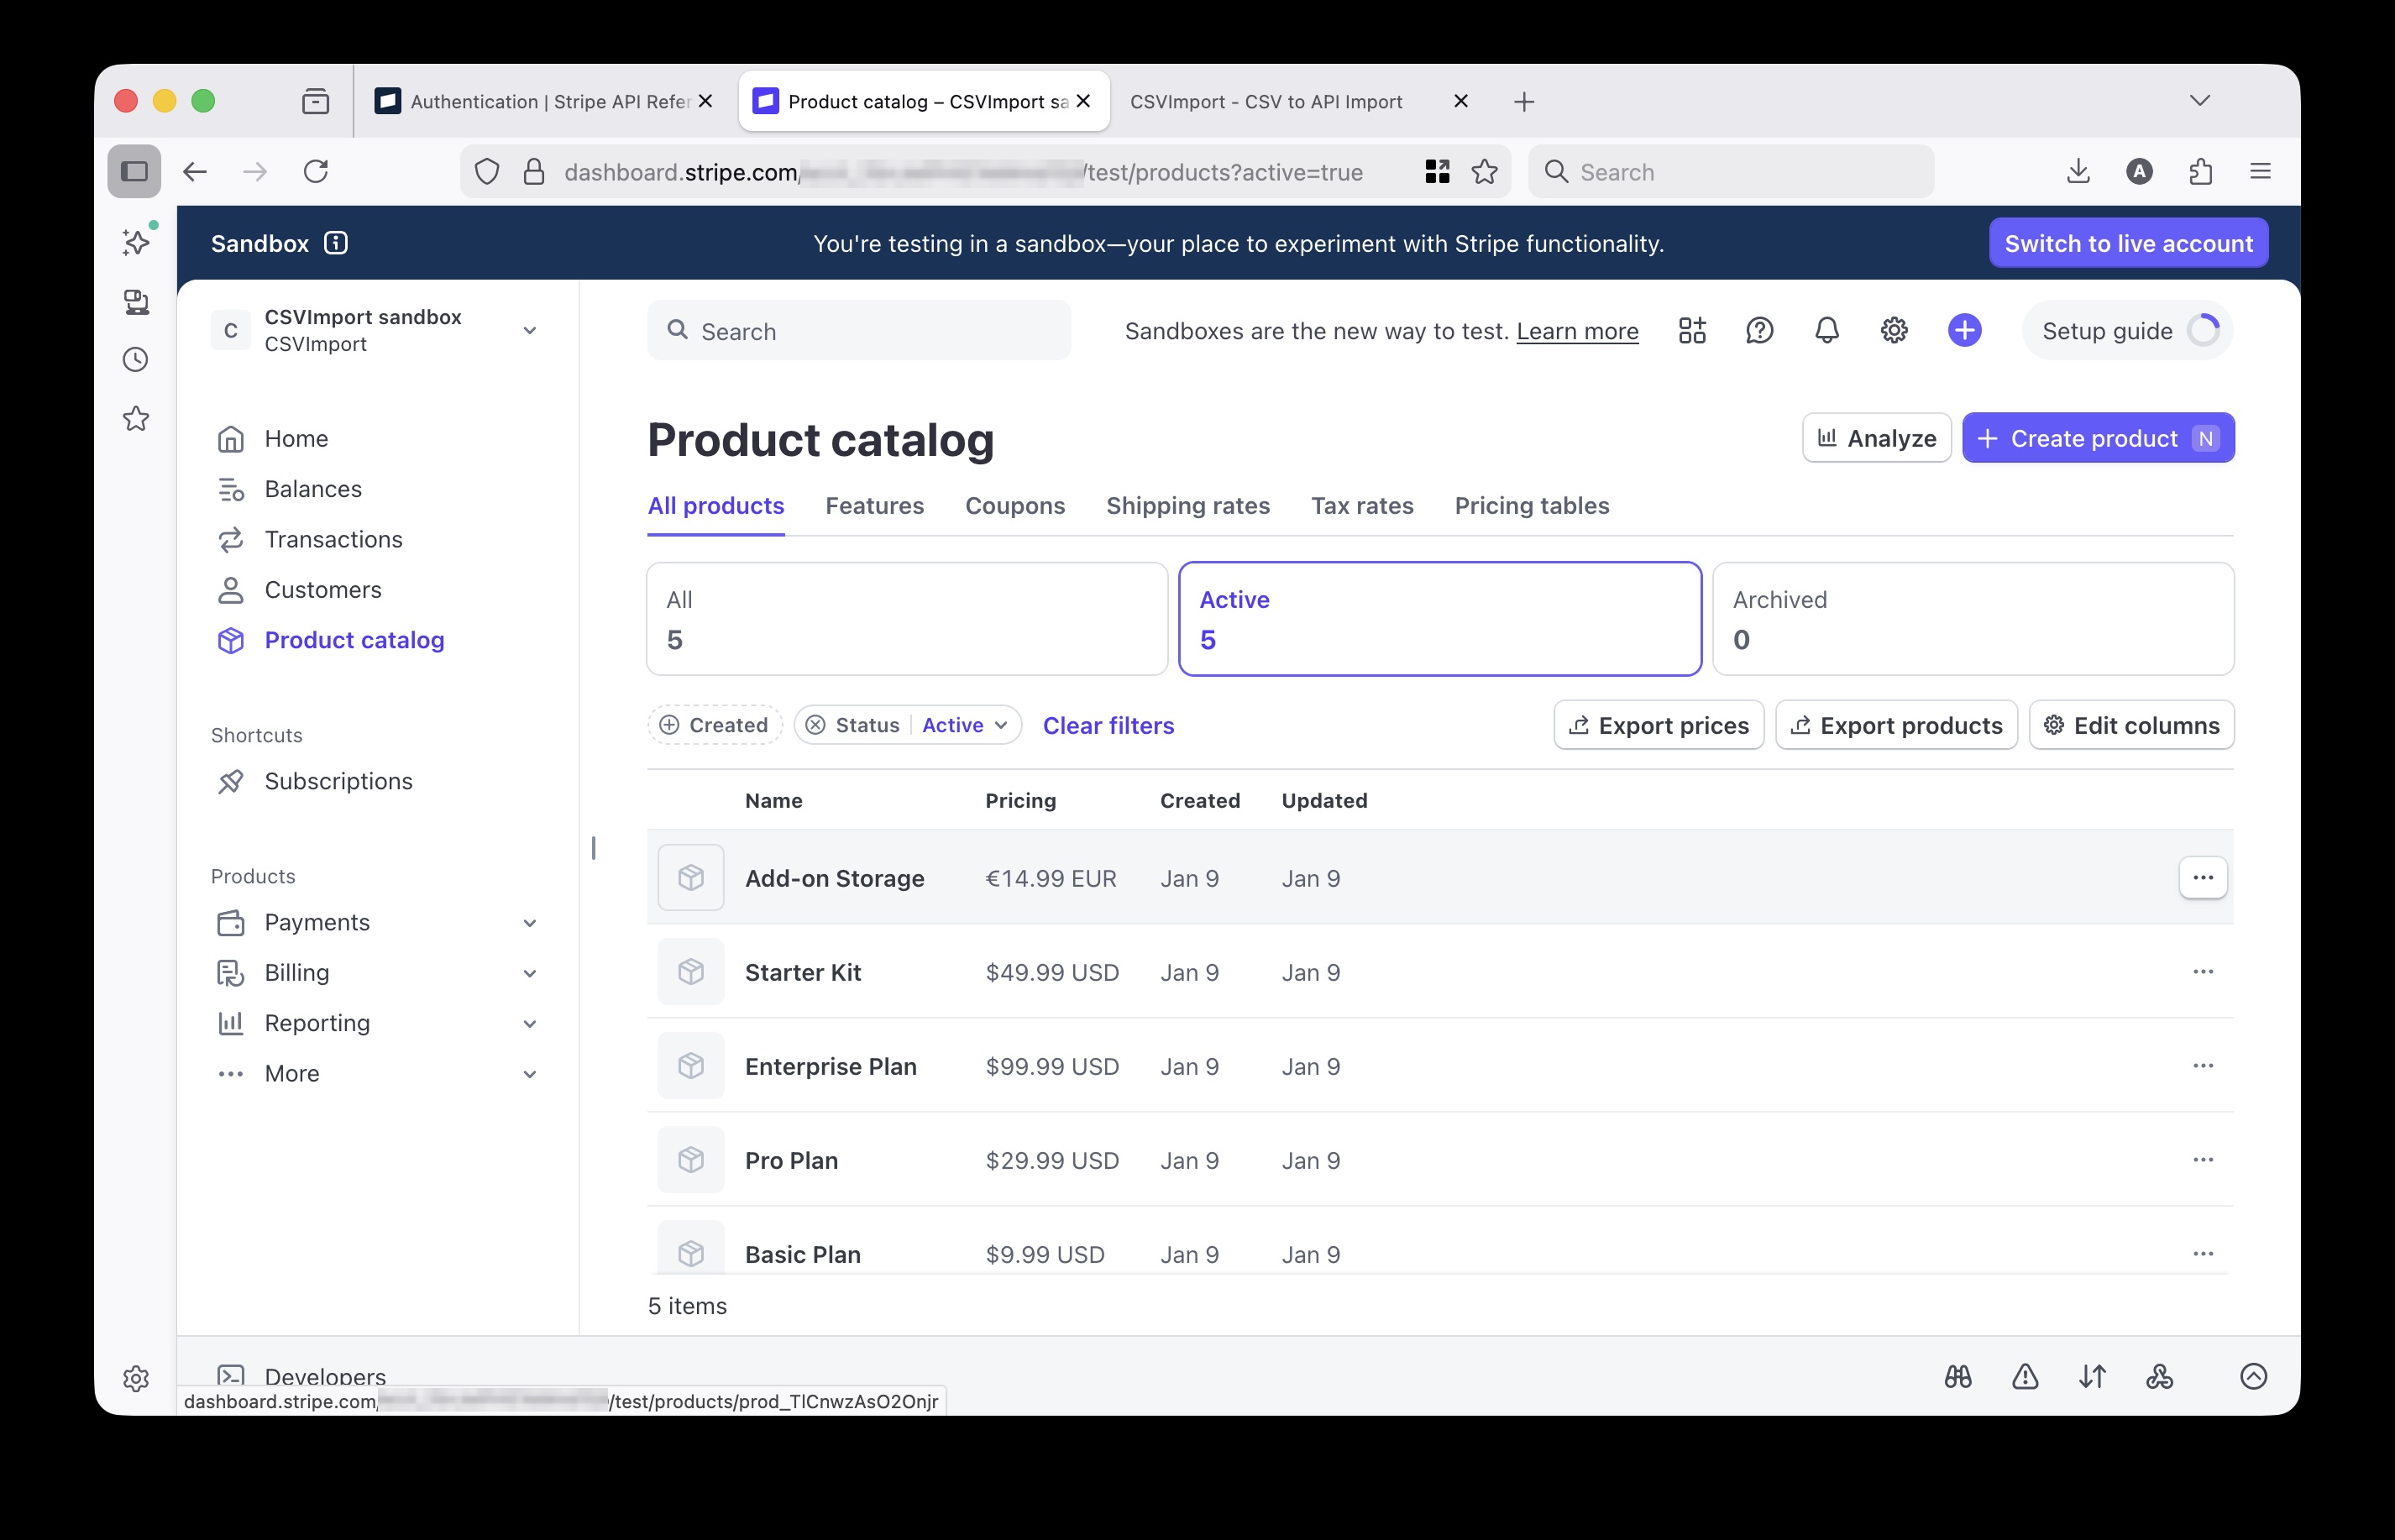
Each product includes:
- The name and description from your CSV
- The default price you specified
- A unique product ID generated by Stripe
Handling Errors
Sometimes imports don’t succeed 100% on the first try. Common issues include:
Duplicate Products
If you run the import twice, Stripe will create duplicate products (it doesn’t check for existing names). To avoid this:
- Use Stripe’s Dashboard to delete test products before re-importing
- Or add a unique identifier and use the update endpoint instead
Invalid Price Format
Prices must be in the smallest currency unit (cents for USD). For example:
- $29.00 →
2900 - $199.99 →
19999 - $0.99 →
99
Missing Required Fields
The name field is required by Stripe. Make sure every row has a product name.
API Rate Limits
Stripe allows 100 requests per second in test mode. For very large imports (1000+ products), the tool automatically throttles requests. You can also configure a custom delay between requests in the settings.
What’s Next?
Now that your products are in Stripe, you can:
- Add more product details - Update products with images, metadata, and tax codes through the Stripe Dashboard
- Create pricing tiers - Add multiple prices to each product for different billing intervals
- Set up subscriptions - Use these products in Stripe Billing for recurring revenue
- Import customers - Use the same process with
POST /v1/customersto import your customer list
Conclusion
Bulk importing products to Stripe doesn’t require writing code or hiring a developer. With a properly formatted CSV and an OpenAPI-driven import tool, you can:
- Import hundreds of products in minutes
- Avoid manual data entry errors
- Easily repeat the process for updates
The same approach works for any Stripe resource (customers, prices, coupons) and any API with an OpenAPI specification.
Ready to import your own product catalog? Try CSVImport with your Stripe test account - it’s free for up to 25 rows.
Ready to try CSVImport?
Import your CSV data into any API in minutes. No coding required.
More from the blog
Bulk Import Products to Stripe from CSV
Step-by-step tutorial showing how to import your product catalog into Stripe. No programming required.
Complete CSV to API Import Guide
Learn how to bulk import CSV data without writing scripts or code. Complete guide for non-developers.
Smart Field Mapping with Visual Validation
Prevent data import disasters with visual warnings for unmapped fields and semantic mismatches.
Why Data Migration Scripts Fail
Understanding the common pitfalls in data migration and how to avoid them with proper tooling.